Contents
- Orientation: Two Topics That Belong Together
- PART A - THE PRINCIPLES OF OSTEOSYNTHESIS
- Part I - The Four AO Principles and Their Evolution
- Part II - The Biology of Bone Healing
- Part III - The Concept of Stability
- Part IV - Implants and Techniques
- PART B - FRACTURES OF THE PROXIMAL HUMERUS
- Part V - Epidemiology, Anatomy, and Blood Supply
- Part VI - Assessment, Imaging, and Classification
- Part VII - Non-operative Treatment and the Operative Controversy
- Part VIII - Operative Treatment
- Part IX - Complications
- Part X - A Synthesis: Principles Applied to the Proximal Humerus
- References
Orientation: Two Topics That Belong Together
The konspekt pairs a specific fracture, the proximal humerus, with a general body of doctrine, the principles of osteosynthesis. The pairing is deliberate, because the proximal humerus is the fracture in which the principles are most sharply tested. It is overwhelmingly an osteoporotic fracture of the elderly, in which fixation must hold in soft bone, the blood supply to the articular fragment is precarious, and the choice between fixing the bone and replacing the joint is genuinely difficult. This summary is therefore built in two halves. The first sets out the AO principles of fracture management, the biology of bone healing, the concept of stability, and the implants and techniques that deliver it. The second applies that framework to the proximal humeral fracture itself. The principles are worth keeping in mind throughout the fracture half, since the recurring lessons (restore the medial calcar to give the construct a medial buttress, respect the soft-tissue blood supply to avoid osteonecrosis, fix rigidly enough to mobilise early but never at the cost of biology) are simply the general principles made concrete.
A single sentence from the AO text frames the whole subject: “It is not the purpose of osteosynthesis to permanently replace a fractured bone but to provide temporary support, allowing early functional rehabilitation with healing in an appropriate anatomical position.”[1]
PART A - THE PRINCIPLES OF OSTEOSYNTHESIS
Part I - The Four AO Principles and Their Evolution
The AO group (Arbeitsgemeinschaft für Osteosynthesefragen) was founded in 1958 by thirteen Swiss surgeons to answer a practical scandal of the time: why did fractures heal in six to twelve weeks yet keep patients off work for six to twelve months?[2] The answer, drawn from Robert Danis, was that the casts and traction then in use immobilised the joints and wasted the muscles while the bone healed, so the limb recovered long after the fracture did. Danis had observed that a perfectly reduced diaphyseal fracture held under absolute stability by a compression device healed without callus while the adjacent joints could be exercised immediately, and this observation became the seed of the AO method.[3]
The four original AO principles (1962) were: (1) anatomical reduction (restoration of anatomy); (2) stable fixation; (3) preservation of the blood supply; and (4) early, active mobilisation of the limb and the patient.[4] As understanding of soft tissues and healing matured, these were reworded into their modern form, which is worth knowing verbatim: fracture reduction and fixation to restore anatomical relationships; fixation providing absolute or relative stability as the personality of the fracture, the patient, and the injury requires; preservation of the blood supply by gentle reduction and careful handling; and early, safe mobilisation of the part and the patient as a whole.[5]
The most important conceptual shift is in the second principle. Early AO doctrine sought absolute stability for almost every fracture; modern doctrine reserves it for joint fractures and a few simple diaphyseal fractures, while accepting relative stability (and healing by callus) for the rest.[6] This is the move from “mechanics at the expense of biology” to biological fixation, the recognition, in the AO’s own words, that “bone has evolved to heal with some movement between fragments and without each fragment being in contact.” Indirect reduction that leaves fragments aligned but undisturbed, preserving their blood supply, is often better than an anatomical reduction bought with devascularising dissection.[7] The internal fixator (Perren and Tepic’s PC-Fix, 1985, which evolved into the locking compression plate) was the technical expression of this shift: a plate fixed by angular-stable locking screws that does not need to be pressed against the bone, and so spares the periosteal blood supply.[8]
Part II - The Biology of Bone Healing
2.1 Two kinds of healing
Bone heals in one of two quite different ways, and which one occurs depends on the mechanical environment.[9] Primary (direct) healing occurs only under absolute stability: the bone heals by internal osteonal (Haversian) remodelling, with no callus, the same process as normal bone turnover. Historically, primary healing was never the goal of absolute stability; it is an unavoidable by-product of a fixation rigid enough to allow early movement.[10] Secondary (indirect) healing occurs under relative stability, with controlled micromotion, and proceeds through visible callus. It is the normal, evolved way that bones heal, and it is faster than primary healing.[11] (The named subtypes of primary healing, “contact healing” where osteons cross directly at points of bony contact and “gap healing” where small gaps fill with transverse lamellar bone, describe the mechanisms the source details, though it does not use those exact labels.)[12]
2.2 The four stages of secondary healing
Secondary healing passes through four overlapping stages:[13]
- Inflammation (1-7 days): the fracture haematoma and inflammatory response; necrotic bone is resorbed and the haematoma is replaced by granulation tissue.
- Soft callus (from ~2-3 weeks, when the fragments stop moving freely): periosteal and endosteal progenitor cells form woven bone by intramembranous ossification away from the gap, while cells nearer the gap become cartilage; at the end of this stage shortening is prevented though angulation may still occur.
- Hard callus (3-4 months): the soft callus undergoes endochondral ossification to woven bone; bridging begins at the periphery, where strain is lowest, and progresses inward.
- Remodelling (months to years): woven bone is slowly replaced by lamellar bone and the medullary canal is restored.
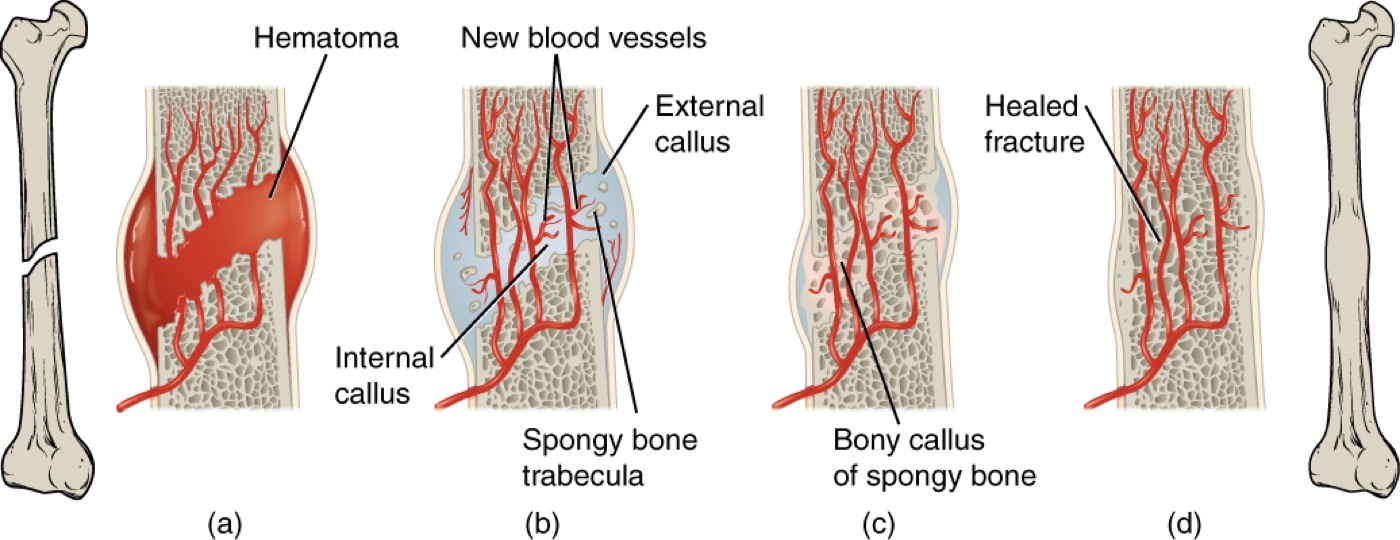
Figure 1. The stages of secondary (callus) bone healing: (a) fracture haematoma, (b) soft then hard callus, (c) bony callus, (d) remodelled bone. Source: OpenStax College, CC BY 3.0, via Wikimedia Commons.
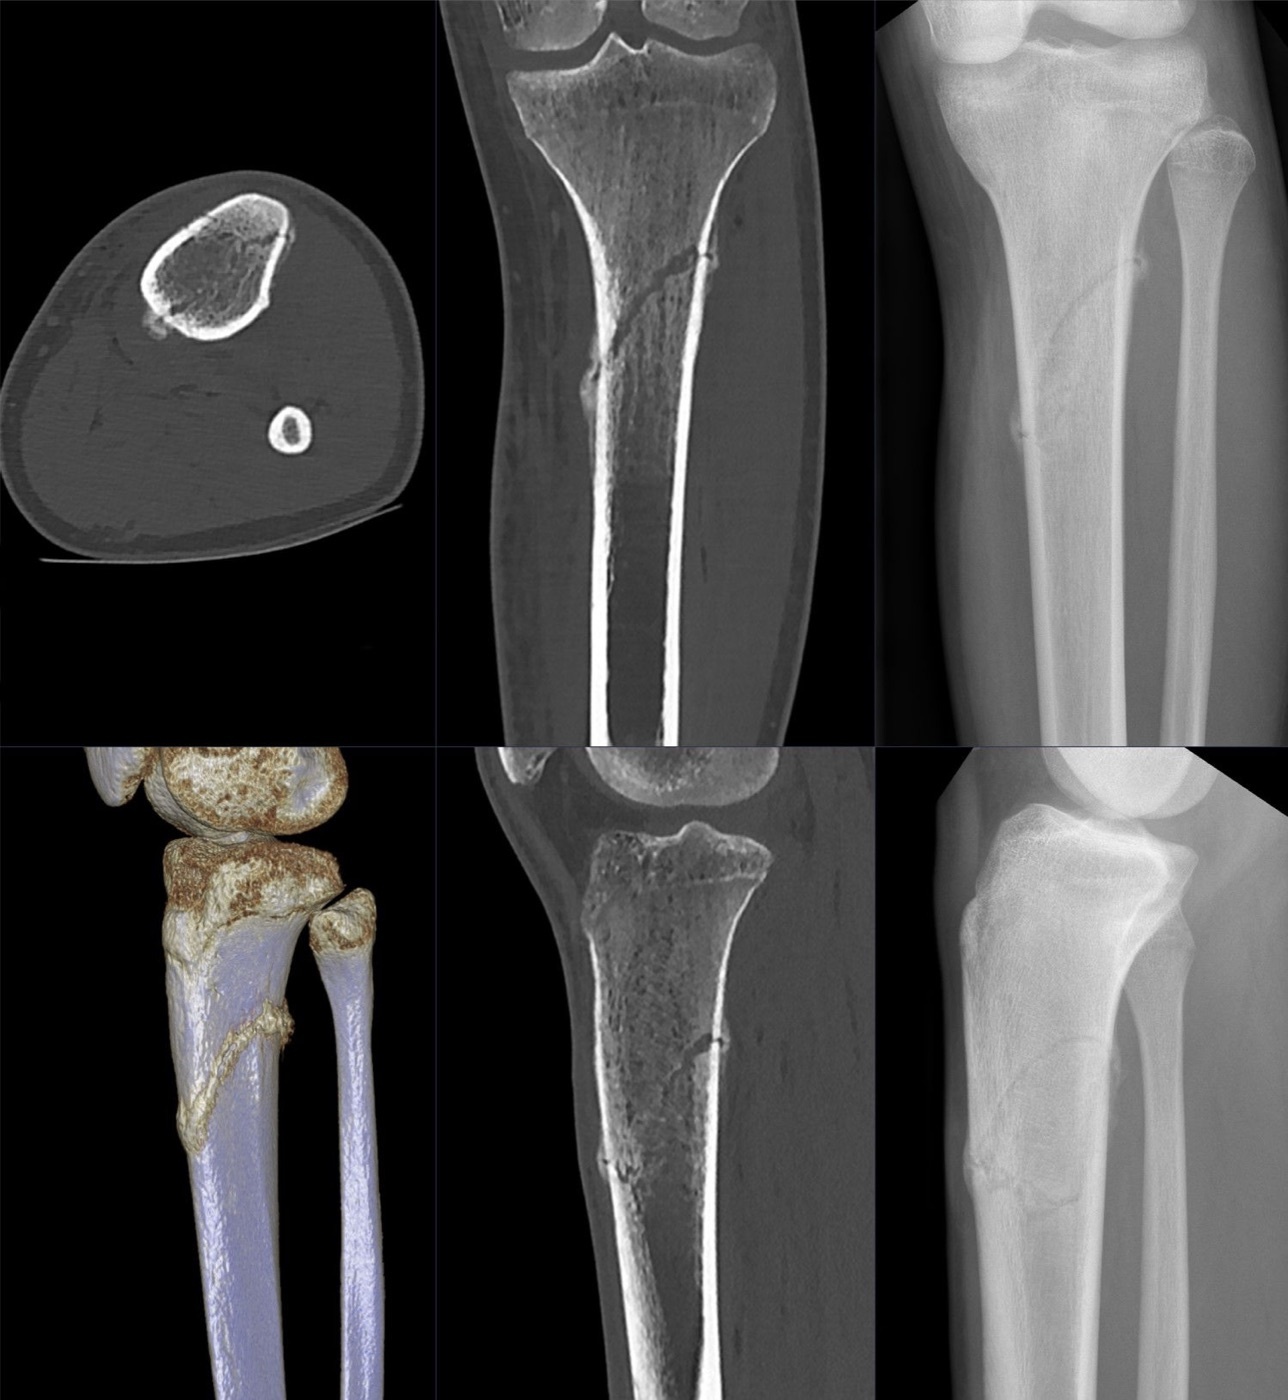
Figure 2. Abundant periosteal callus after a tibial shaft fracture, the radiographic hallmark of secondary healing under relative stability. Source: Hellerhoff, via Wikimedia Commons, CC BY-SA 4.0.
2.3 Perren’s interfragmentary strain theory
The mechanical principle that unifies all of this is Perren’s strain theory. Strain is the relative deformation of the tissue in the fracture gap: the change in gap length divided by the original gap length (Δl/l), expressed as a percentage.[14] Each tissue can form only when the local strain is below its tolerance, and the tolerances rise as the tissue gets weaker: granulation tissue tolerates ~100% strain, cartilage ~15%, and cortical (lamellar) bone only ~2%.[15] Healing therefore proceeds through a cascade of progressively stiffer tissues (haematoma → granulation tissue → cartilage → bone), each forming under the protection of its predecessor.[16]
The theory has direct clinical consequences. As a gap narrows, a given amount of motion produces higher strain, which is why nature widens the soft-callus zone to keep peripheral strain low.[17] Excessive interfragmentary strain (too much motion, or too wide a gap that is bridged by a flexible construct) produces a hypertrophic nonunion; too little strain (a construct that is too rigid across a gap) gives no stimulus and can delay healing, the rationale for dynamisation.[18] The same logic applies at the other extreme. Because the same motion across a small gap produces very high strain, a simple fracture must not be bridged with a flexible construct; it must be either compressed (absolute stability, near-zero strain) or it will fail.[19]
Part III - The Concept of Stability
The surgeon’s “stability” is not the engineer’s: it describes the degree of displacement at the fracture under physiological load.[20] A stable fracture does not visibly displace under physiological load, and the degree of stability determines the type of healing.[21]
3.1 Absolute stability
Absolute stability means there is no motion at the fracture under physiological load.[22] It abolishes strain in the repair tissue, so there is no callus and the bone heals directly by osteonal remodelling.[23] It is achieved only by anatomical reduction plus interfragmentary compression (the stiffness of an implant alone merely reduces motion; it does not abolish it), and the compression works through a preload that keeps the fragments pressed together and the friction this generates against shear.[24] Two implants deliver it: the lag screw (which compresses by preload and friction, generating up to ~3,000 N) and the compression plate (by an eccentric “load” screw, by an articulated tension device, or by prebending the plate so that tensioning compresses both the near and the far cortex).[25] Its indications are articular (intra-articular) fractures, where the joint surface must be anatomically restored and callus is undesirable, and simple diaphyseal fractures in bones such as the forearm.[26] The price is that, with no callus, the implant alone must hold the fracture for the long time primary healing takes, and so must resist fatigue; the appearance of callus after an attempt at absolute stability is a warning sign of instability.[27]
3.2 Relative stability
Relative stability allows the fragments to move under load, in controlled, elastic (reversible) micromotion, which stimulates callus and secondary healing.[28] Its aim is “to maintain the reduction and still keep the mechanical stimulation for fracture repair by callus formation.”[29] It is delivered by splinting devices: the intramedullary nail (a load-sharing splint), the bridge plate, the external fixator, and the locking plate used as an internal fixator.[30] Its indications are multifragmentary fractures and diaphyseal fractures.[31] The single most important caution, stated verbatim, is the corollary of the strain theory: “Plating with relative stability should only be applied in multifragmentary fractures and must not be used for simple fracture patterns… If simple fractures are plated, a technique providing absolute stability must be used.”[32] The biological priority is equally explicit. A hypertrophic nonunion from a too-flexible construct is far easier to treat than the devascularisation caused by over-aggressive reduction, so when in doubt, protect the biology.[33]
Part IV - Implants and Techniques
4.1 The screw and the lag screw
The screw is the basic device of fixation, converting rotation into linear motion and thereby into compression.[34] The term lag screw denotes a function, not a design: any screw becomes a lag screw when it compresses two fragments.[35] A fully threaded cortex screw is made to lag by drilling a glide (gliding) hole the size of the thread in the near cortex and a smaller pilot/thread hole in the far cortex, so the screw grips only the far cortex and its head presses the near fragment, generating interfragmentary compression of up to ~3,000 N.[36] The glide hole is drilled at 90° to the fracture plane, and the screw’s inclination follows the bisector rule: perpendicular to the fracture plane gives maximal compression in the absence of axial load, while a direction midway between the perpendicular to the fracture and the perpendicular to the shaft better resists axial functional load.[37] A single lag screw resists torque poorly, so it must be protected by a plate except close to a joint, and a locking head screw can never be used as a lag screw.[38] A position screw, by contrast, has no glide hole and holds fragments in relation without compressing them.[39]
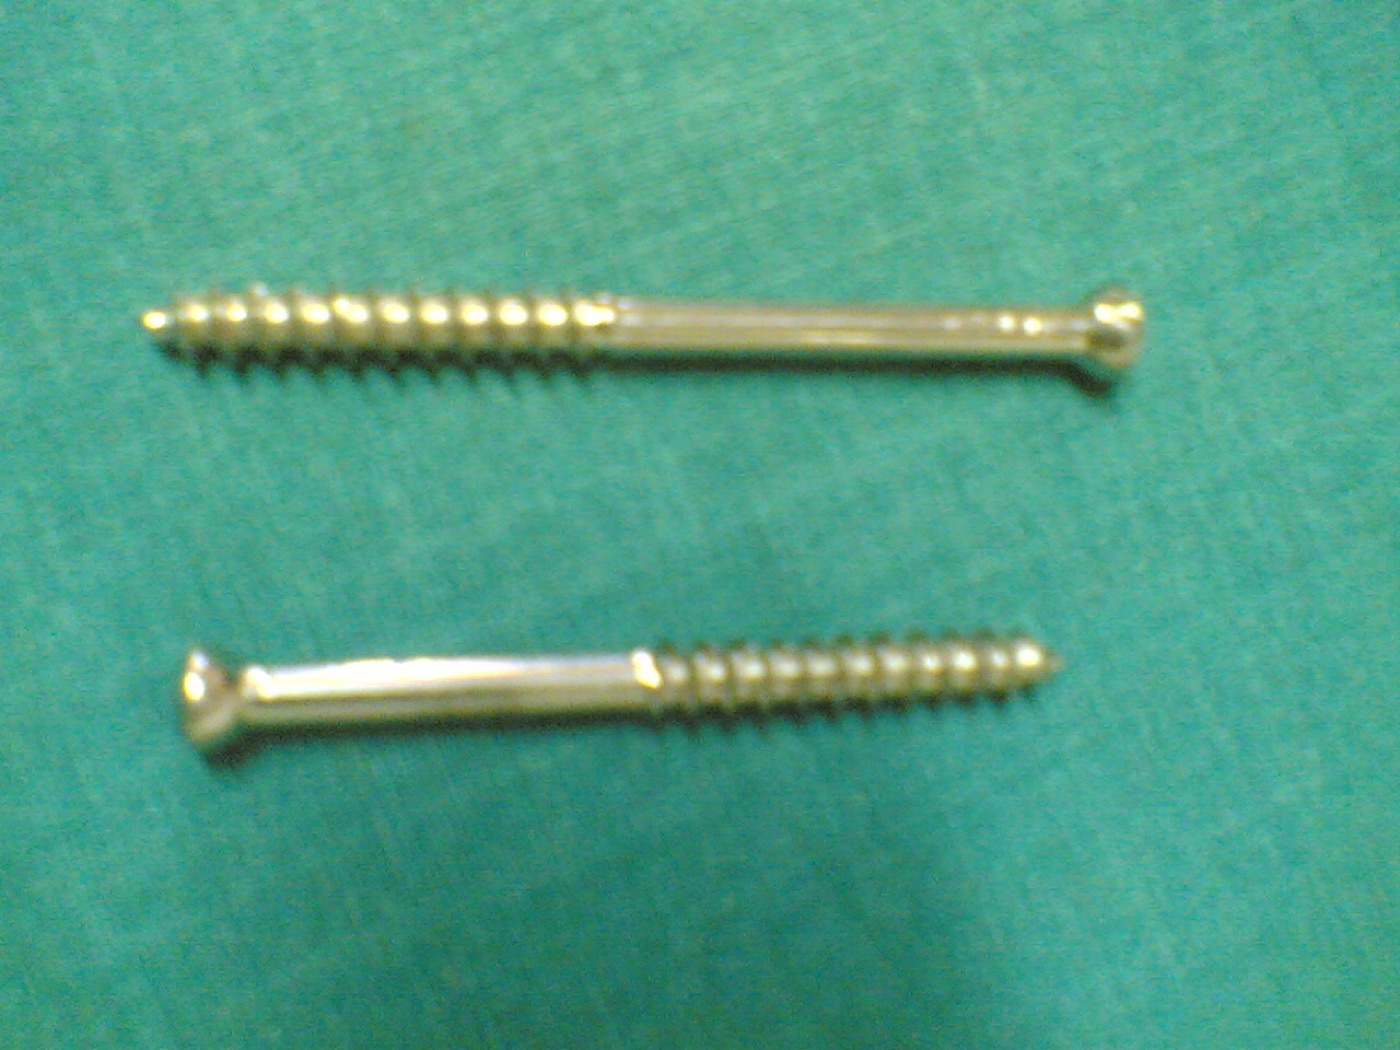
Figure 3. Partially threaded lag (cannulated) screws, the implant of interfragmentary compression and absolute stability. Source: Netha Hussain, via Wikimedia Commons, CC BY-SA 3.0.
4.2 The plate and its six functions
A plate has no single purpose; “the surgeon, not the designer of the plate, determines how a plate will function.”[40] The six biomechanical functions are:[41]
- Compression (an eccentric load screw or tension device compresses a simple transverse fracture, giving absolute stability);
- Protection (neutralisation) (the plate offloads a lag screw from bending, shear, and rotation);
- Buttress / antiglide (the plate resists axial load by applying force at 90° to the axis of deformity, in metaphyseal split fractures);
- Tension band (placed on the convex/tension side, it converts tensile into compressive force at the far cortex);
- Bridging (the plate spans a comminuted zone fixed only to the two main fragments, restoring length/alignment/rotation and giving relative stability);
- Reduction (the plate is used as a tool to reduce the fracture).
The tension-band principle deserves emphasis because it recurs (olecranon, patella, greater tuberosity): on an eccentrically loaded curved bone, a device on the tension (convex) side converts the tensile force into compression at the opposite cortex, but only if the opposite cortex is intact to bear that compression; a tension band over a deficient far cortex fails by fatigue.[42]
The locking plate (LCP/LISS) is the key modern development. Its locking head screws thread into the plate to form a fixed-angle construct that does not rely on plate-to-bone friction, so the plate need not be pressed against the bone, which preserves the periosteal blood supply. It transfers load like an internal fixator, the same principle as an external fixator with the bar brought close to the bone.[43] Because the screws are angular-stable, load is distributed along the whole construct rather than concentrated at one screw, which is why locking plates hold in osteoporotic bone, and the combi-hole lets a surgeon use conventional and locking screws in the same plate.[44] The governing rule is “reduce and lag first, lock second”: once a locking screw is placed in a fragment, only further locking screws may go into that side.[45]
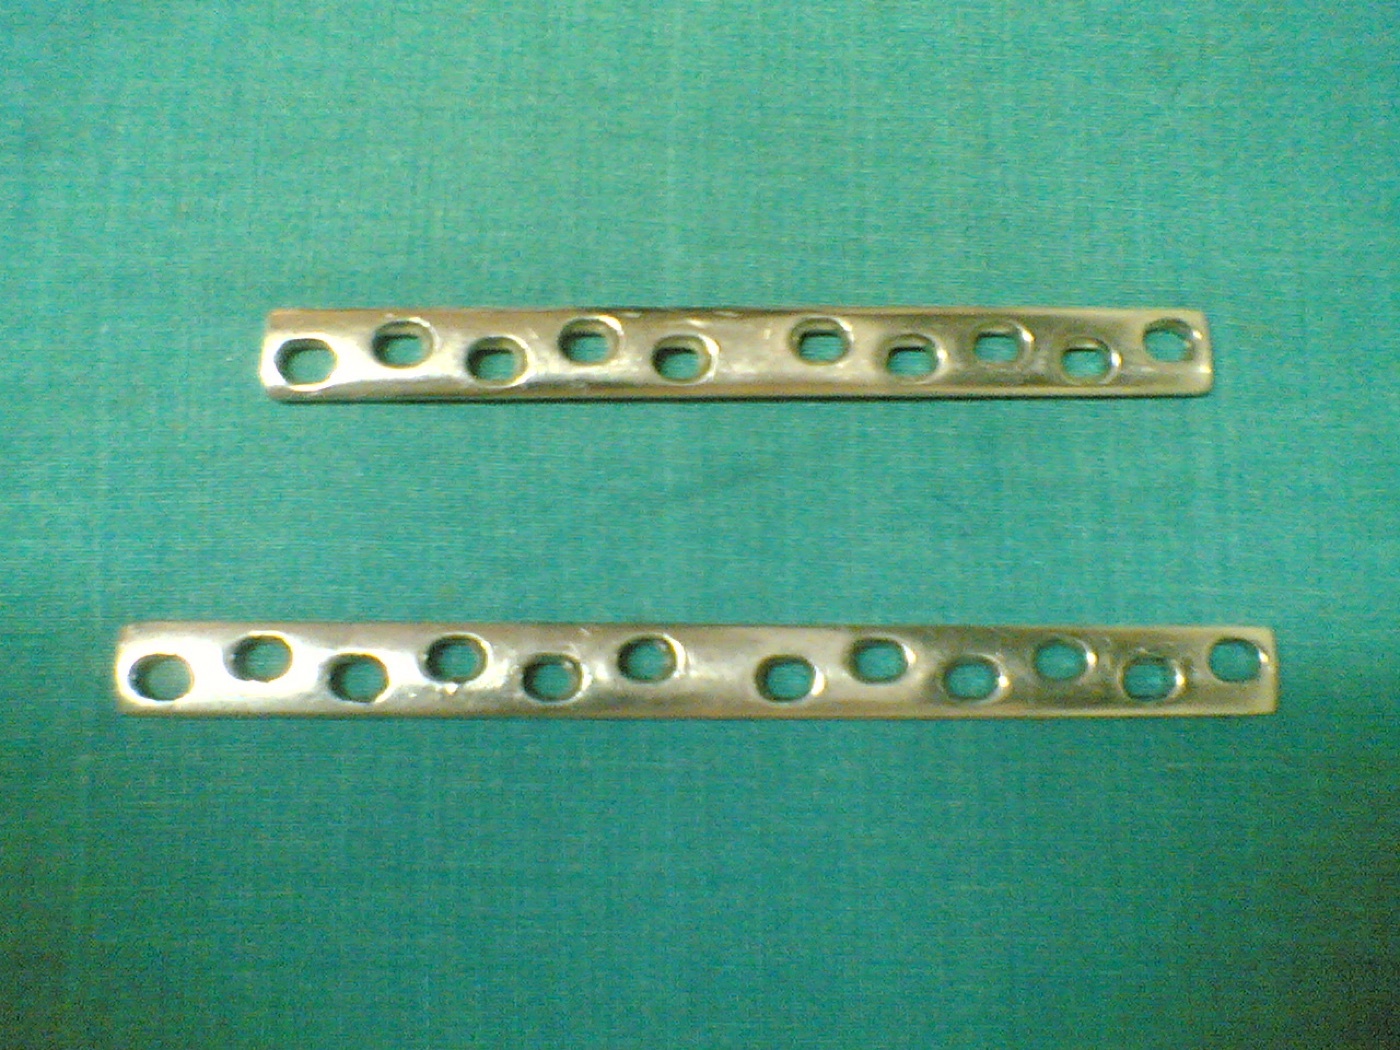
Figure 4. A broad dynamic compression plate (DCP); the oval inclined holes drive axial compression when a screw is placed eccentrically. Source: Netha Hussain, via Wikimedia Commons, CC BY-SA 3.0.
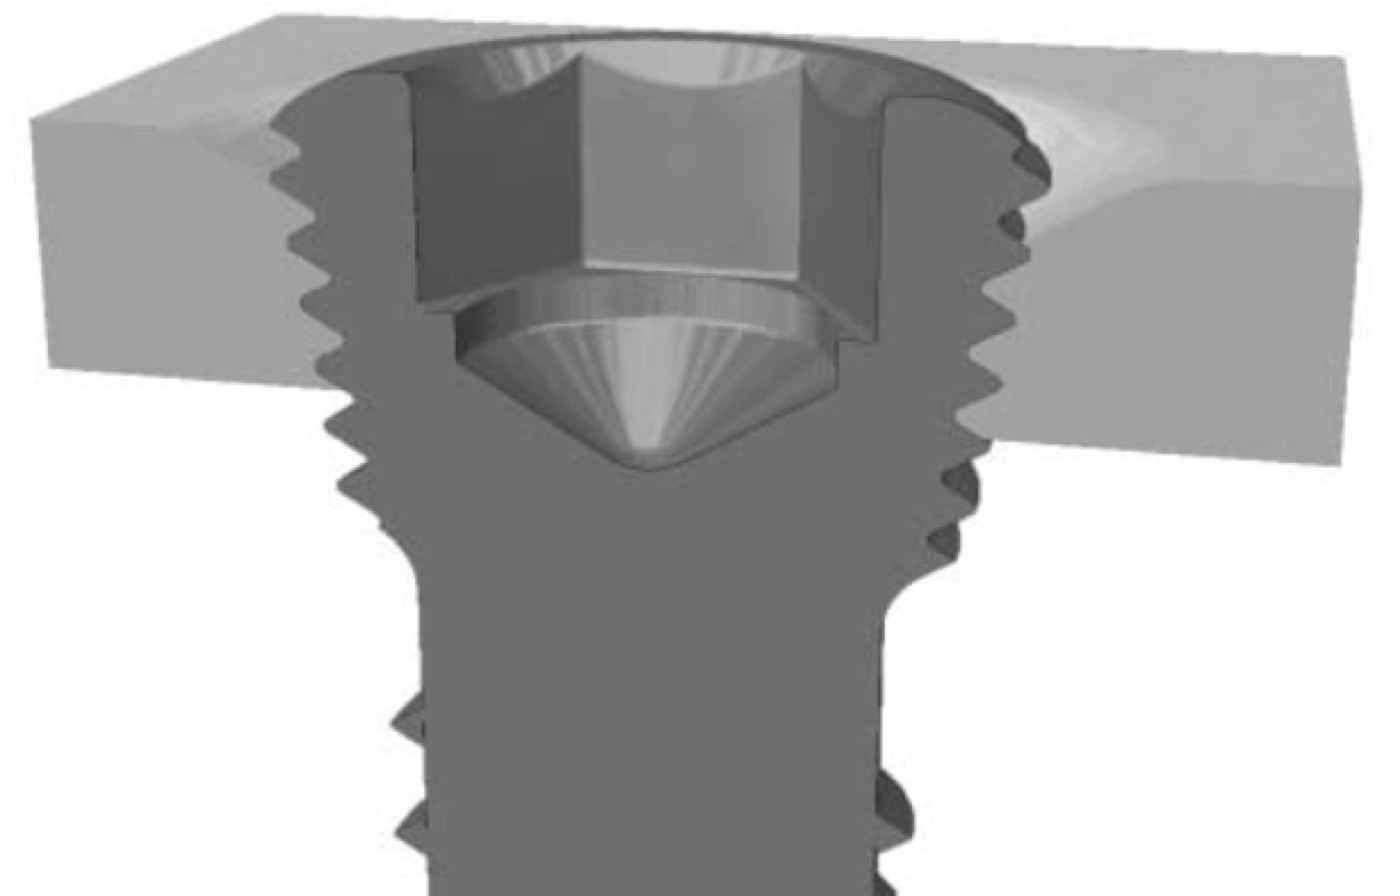
Figure 5. A locking-head screw whose threaded head locks into the threaded plate hole, forming a fixed-angle internal fixator that does not rely on plate-to-bone friction. Source: Karel Frydrýšek, via Wikimedia Commons, CC BY-SA 4.0.
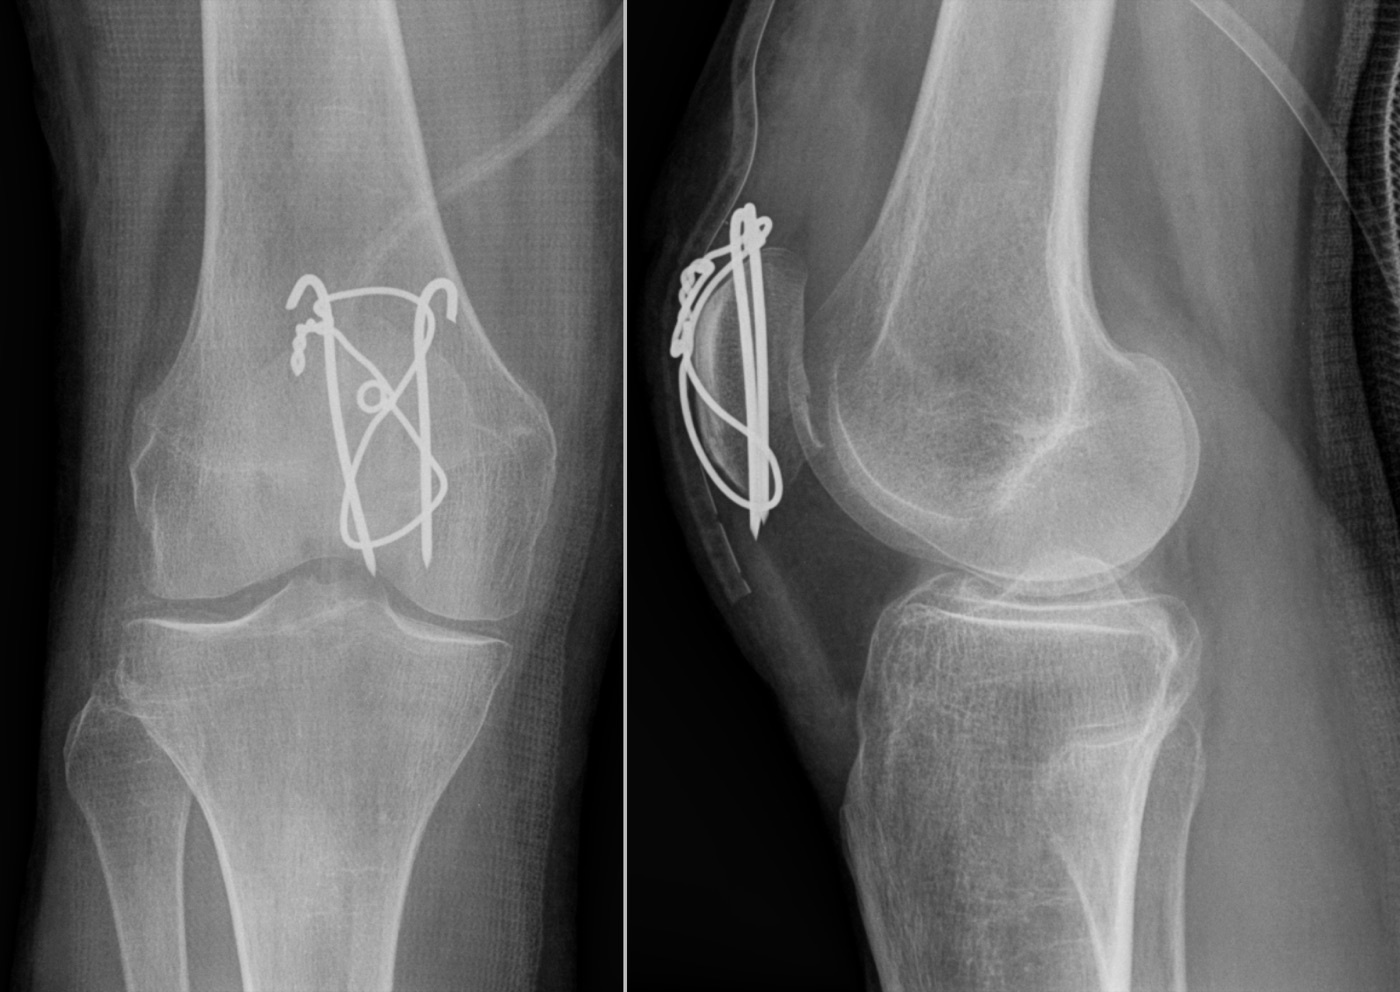
Figure 6. Tension-band wiring of a transverse patellar fracture: parallel K-wires and a figure-of-eight cerclage convert the tensile pull into compression across the fracture on flexion. Source: Hellerhoff, via Wikimedia Commons, CC BY-SA 3.0.
4.3 Nails, external fixators, and the strain principle in practice
The intramedullary nail is a load-sharing splint placed along the mechanical axis; it allows indirect reduction and early weight-bearing and heals by callus (relative stability).[46] Locked nails (static or dynamic) control length and rotation; reaming has biological advantages (the reaming debris is osteogenic, and a larger nail can be used) at the cost of raised intramedullary pressure and embolism risk.[47] The external fixator likewise gives relative stability and is the mainstay of damage control, open and infected fractures; its stiffness rises as the connecting bar is brought closer to the bone, the pins are spread wider, and larger pins are used (a 6 mm pin has double the bending stiffness of a 5 mm pin).[48]
The bridge plate is relative stability in plate form: it is fixed only to the two main fragments and spans the comminuted zone, which is left untouched, restoring length, alignment, and rotation without anatomical reduction of every fragment.[49] The biomechanical rules are to use a long plate with few, widely spaced screws (a long “working length” of unsupported plate over the fracture distributes the bending stress and lowers the strain), and bridge plating of a simple fracture must be avoided because the strain across the short gap exceeds tissue tolerance.[50] (The source uses the phrase “long working length” but does not give the formal definition, the span of unsupported implant between the innermost screws across the fracture, which is standard teaching.)[51] Here the strain theory becomes operative: a small gap demands near-zero strain (absolute stability by compression), while a large multifragmentary gap tolerates relative stability because the motion is shared across many planes and the local strain stays low.[52]
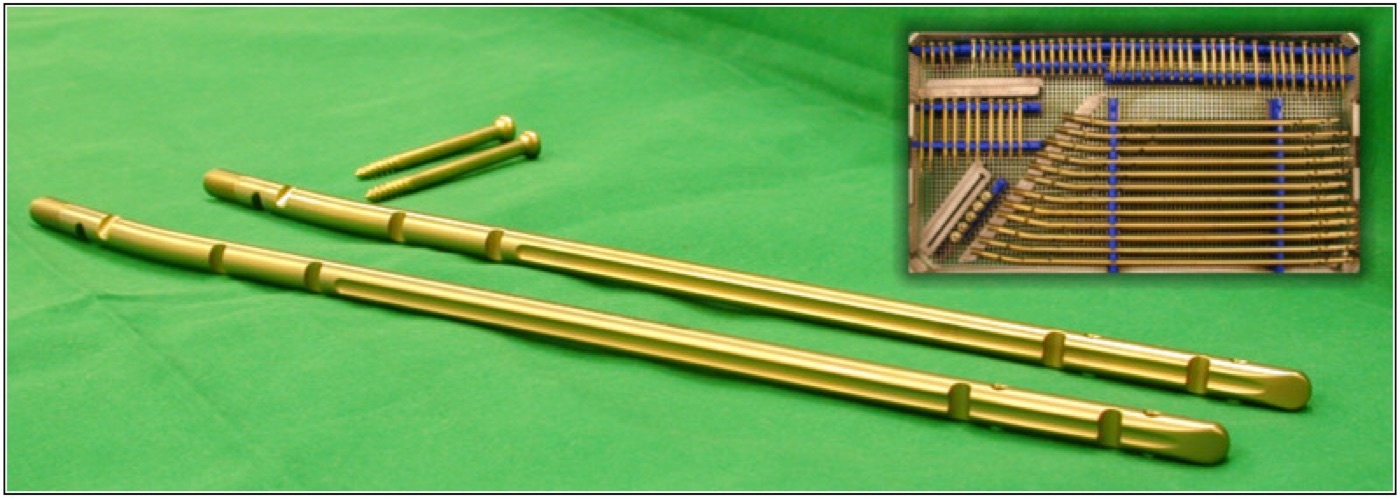
Figure 7. Interlocking intramedullary nails with locking screws: a load-sharing splint giving relative stability and healing by callus. Source: Chriudel, via Wikimedia Commons, CC BY-SA 3.0.
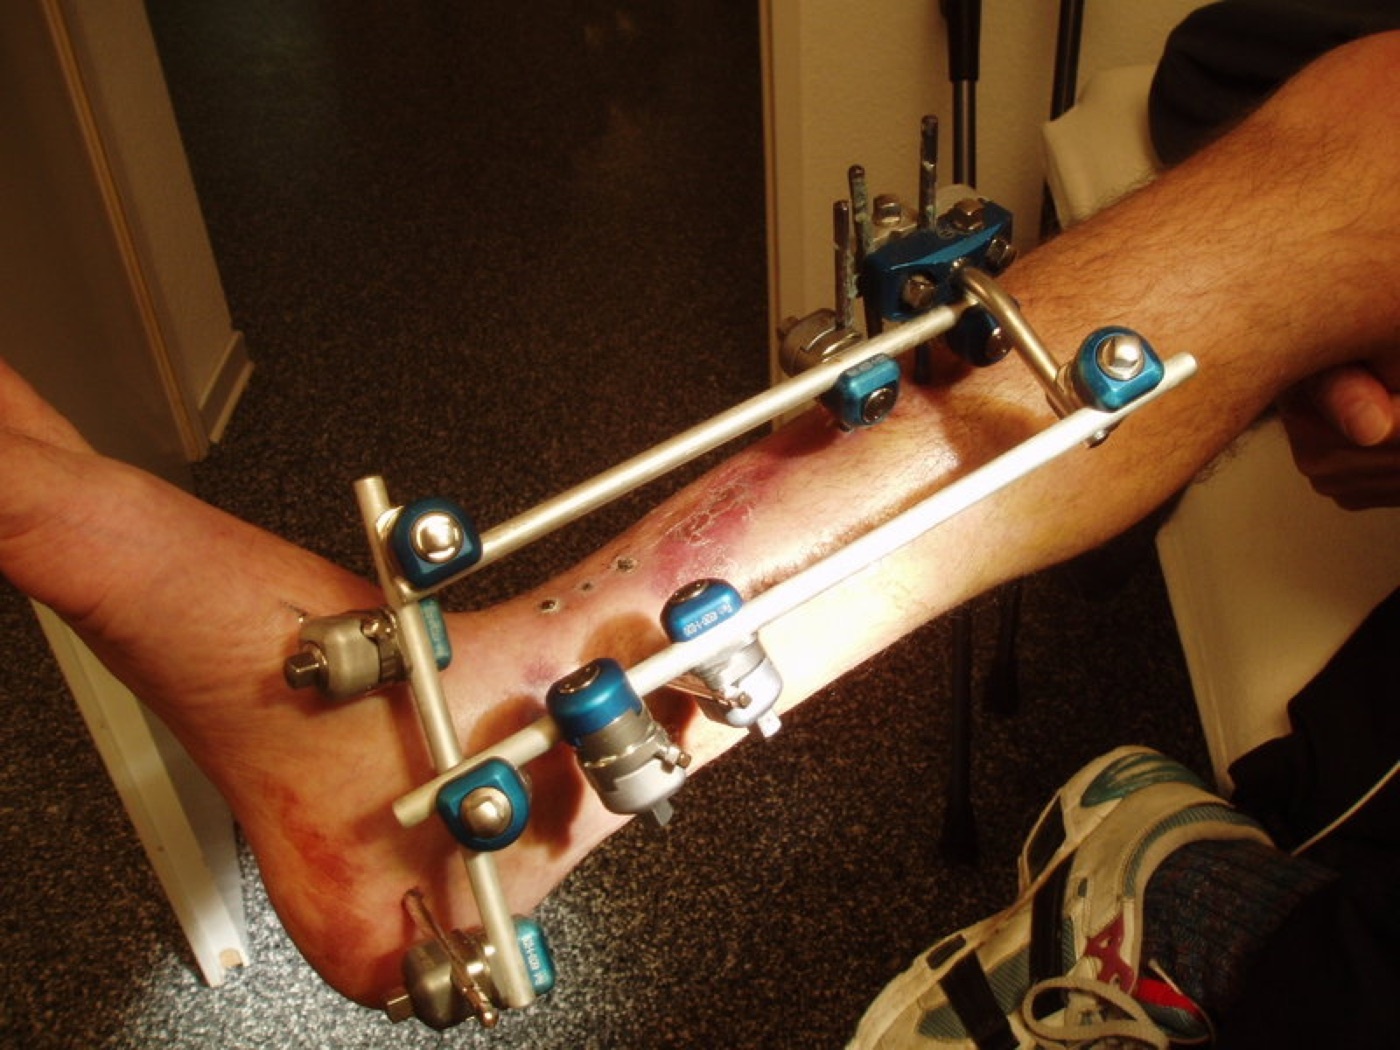
Figure 8. A joint-spanning external fixator: pins and rods giving relative stability while sparing the soft tissues, the mainstay of damage control. Source: via Wikimedia Commons, CC BY-SA 3.0.
PART B - FRACTURES OF THE PROXIMAL HUMERUS
Part V - Epidemiology, Anatomy, and Blood Supply
5.1 Epidemiology
The proximal humeral fracture is the third most common fragility fracture, after the hip and the distal radius, in patients over 65, and it accounts for about 4-5% of all fractures.[53] Its distribution follows that of osteoporosis: a unimodal peak around age 84, a female preponderance (only 15-30% occur in men), and an incidence that rises exponentially from the fifth decade in women.[54] Over 90% of these fractures in patients over 60 result from a simple fall from standing height, while the minority in the young follow high-energy trauma.[55] The incidence is rising with the ageing population (projected to reach 275,000 a year in the United States by 2030), and the rate of surgery is rising even faster, with marked regional variation.[56] The fracture also flags frailty: it raises the one-year risk of a hip fracture more than fivefold.[57]
5.2 The four parts and their deforming forces
Codman divided the proximal humerus into four parts along the old epiphyseal lines: the head, the greater tuberosity, the lesser tuberosity, and the shaft.[58] The anatomic neck is the junction of the articular surface and the tuberosities; the surgical neck is the weaker metadiaphyseal junction below the tuberosities.[59] Each part is pulled by its attached muscles, and these deforming forces account for the displacement patterns: the greater tuberosity is pulled superiorly and posteriorly by the supraspinatus and the other posterosuperior cuff; the lesser tuberosity is pulled medially by the subscapularis; and the shaft is pulled medially by the pectoralis major.[60] The neck-shaft (caput-collum-diaphyseal) angle averages about 130-135° and the head is retroverted roughly 20-30°.[61]
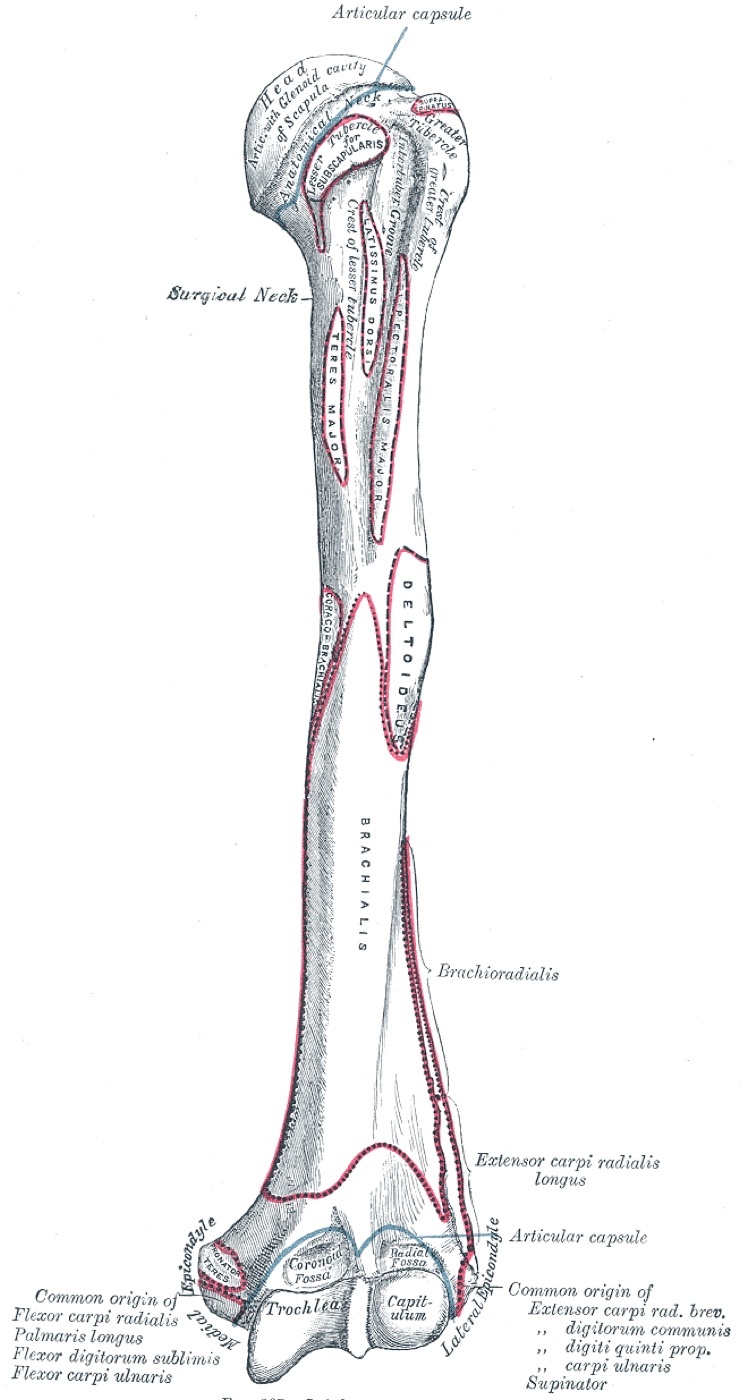
Figure 9. Anterior view of the proximal humerus: head, anatomical and surgical necks, and the greater and lesser tuberosities with their bicipital groove. From Gray’s Anatomy (H. V. Carter, 1918), public domain, via Wikimedia Commons.
5.3 Blood supply: a reversed dogma
The blood supply of the humeral head is among the most examinable points of the anatomy, because the classic teaching has been reversed. The old dogma held that the anterior circumflex humeral artery, through its ascending branch (which becomes the arcuate artery, the “artery of Laing”), provided most of the head’s perfusion, so that injury to it caused osteonecrosis.[62] Modern anatomical work has overturned that view. The posterior circumflex humeral artery and the posteromedial vessels are now understood to be the dominant supply, Hettrich finding the posterior circumflex artery provides about 64% of the head’s blood, which helps explain the relatively low rate of osteonecrosis even after displaced fractures.[63] The practical corollary, used in the classification of head ischaemia below, is that the length of the medial metaphyseal head extension (the calcar) and the integrity of the medial hinge are what actually protect the head’s perfusion.[64]
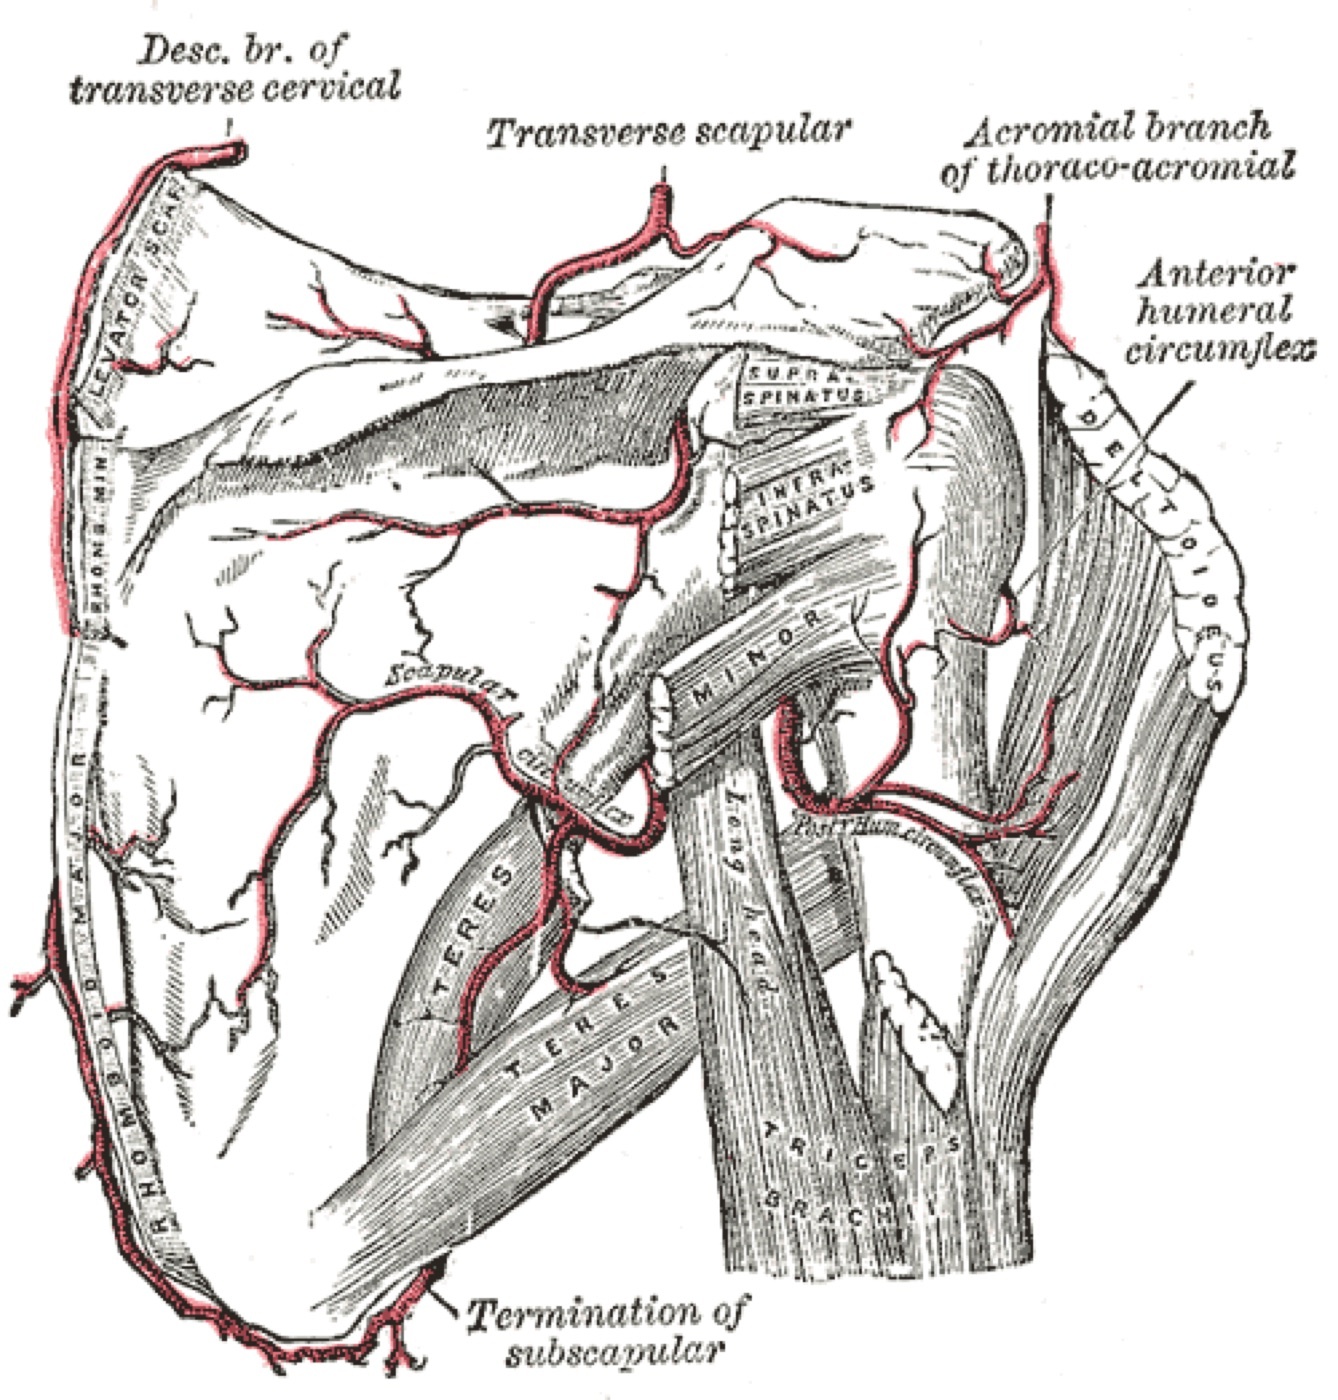
Figure 10. The anterior and posterior humeral circumflex arteries supplying the humeral head; modern work shows the posterior circumflex artery is dominant (~64% of the supply). From Gray’s Anatomy (H. V. Carter, 1918), public domain, via Wikimedia Commons.
The axillary nerve is the structure most at risk both in the injury and in surgery, running about 5-7 cm distal to the acromion; it is injured (with electromyographic evidence) in a large fraction of fractures, and it must be tested in every patient by sensation over the lateral deltoid and by palpating the deltoid as it contracts.[65]
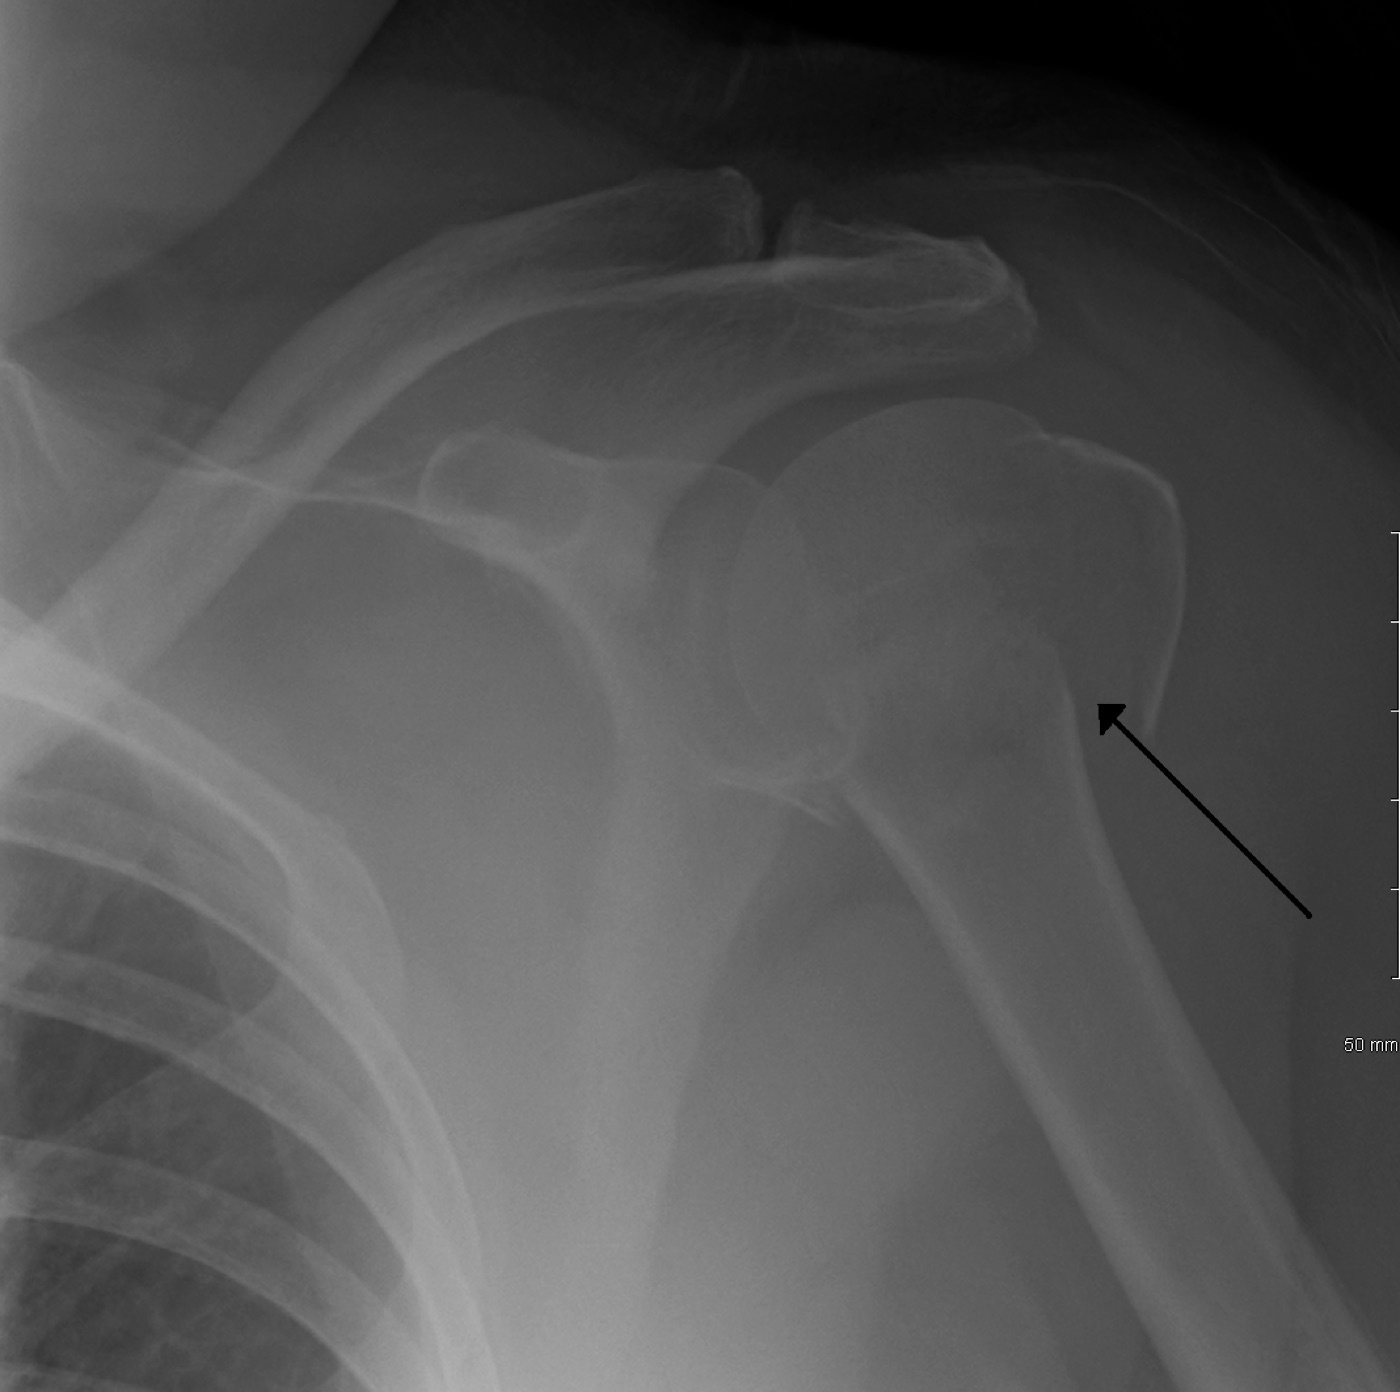
Figure 11. AP radiograph of a displaced proximal humeral fracture. Source: James Heilman, MD, via Wikimedia Commons, CC BY-SA 3.0.
Part VI - Assessment, Imaging, and Classification
6.1 Imaging
The radiographic workup is the trauma series: a true anteroposterior view of the scapula (the Grashey view, with the torso rotated ~30° so the glenoid is seen in profile), a scapular-Y (Neer) lateral, and an axillary view, the last being paramount for the head-glenoid relationship and tuberosity displacement.[66] In the painful acute patient the axillary view is replaced by a Velpeau view (the patient leans back over the cassette in the sling).[67] CT adds a great deal for tuberosity displacement, comminution, head-split and articular involvement, and (on the coronal images) for the integrity of the inferomedial hinge and the size of the metaphyseal head extension that predict head vascularity.[68]
6.2 The Neer classification
The Neer classification remains the most used, despite poor reliability.[69] It rests on Codman’s four segments and on a single displacement criterion: a segment counts as a separate “part” when it is displaced more than 1 cm or angulated more than 45° from its neighbours.[70] Neer himself stressed that these thresholds were arbitrary and were never meant to dictate treatment, since displacement is a continuum.[71] Fractures are then named by the number of displaced parts:[72]
- One-part (minimally displaced): any number of fracture lines, but nothing displaced beyond the threshold; about half of all proximal humeral fractures.
- Two-part: one displaced segment, named by it (surgical neck, greater tuberosity, lesser tuberosity, or the rare anatomic neck).
- Three-part: a displaced surgical neck plus one displaced tuberosity, with the head rotated by the intact opposing cuff.
- Four-part: all segments displaced; the valgus-impacted four-part variant is important because the intact medial hinge preserves the head’s blood supply and gives it a better prognosis than other four-part fractures.
- Fracture-dislocations and head-split / articular impression fractures are separate, high-risk categories.
The classification’s weakness is its poor reliability (interobserver kappa around 0.4), from fragment overlap and the difficulty of judging displacement on plain films, and CT does not reliably improve agreement.[73]
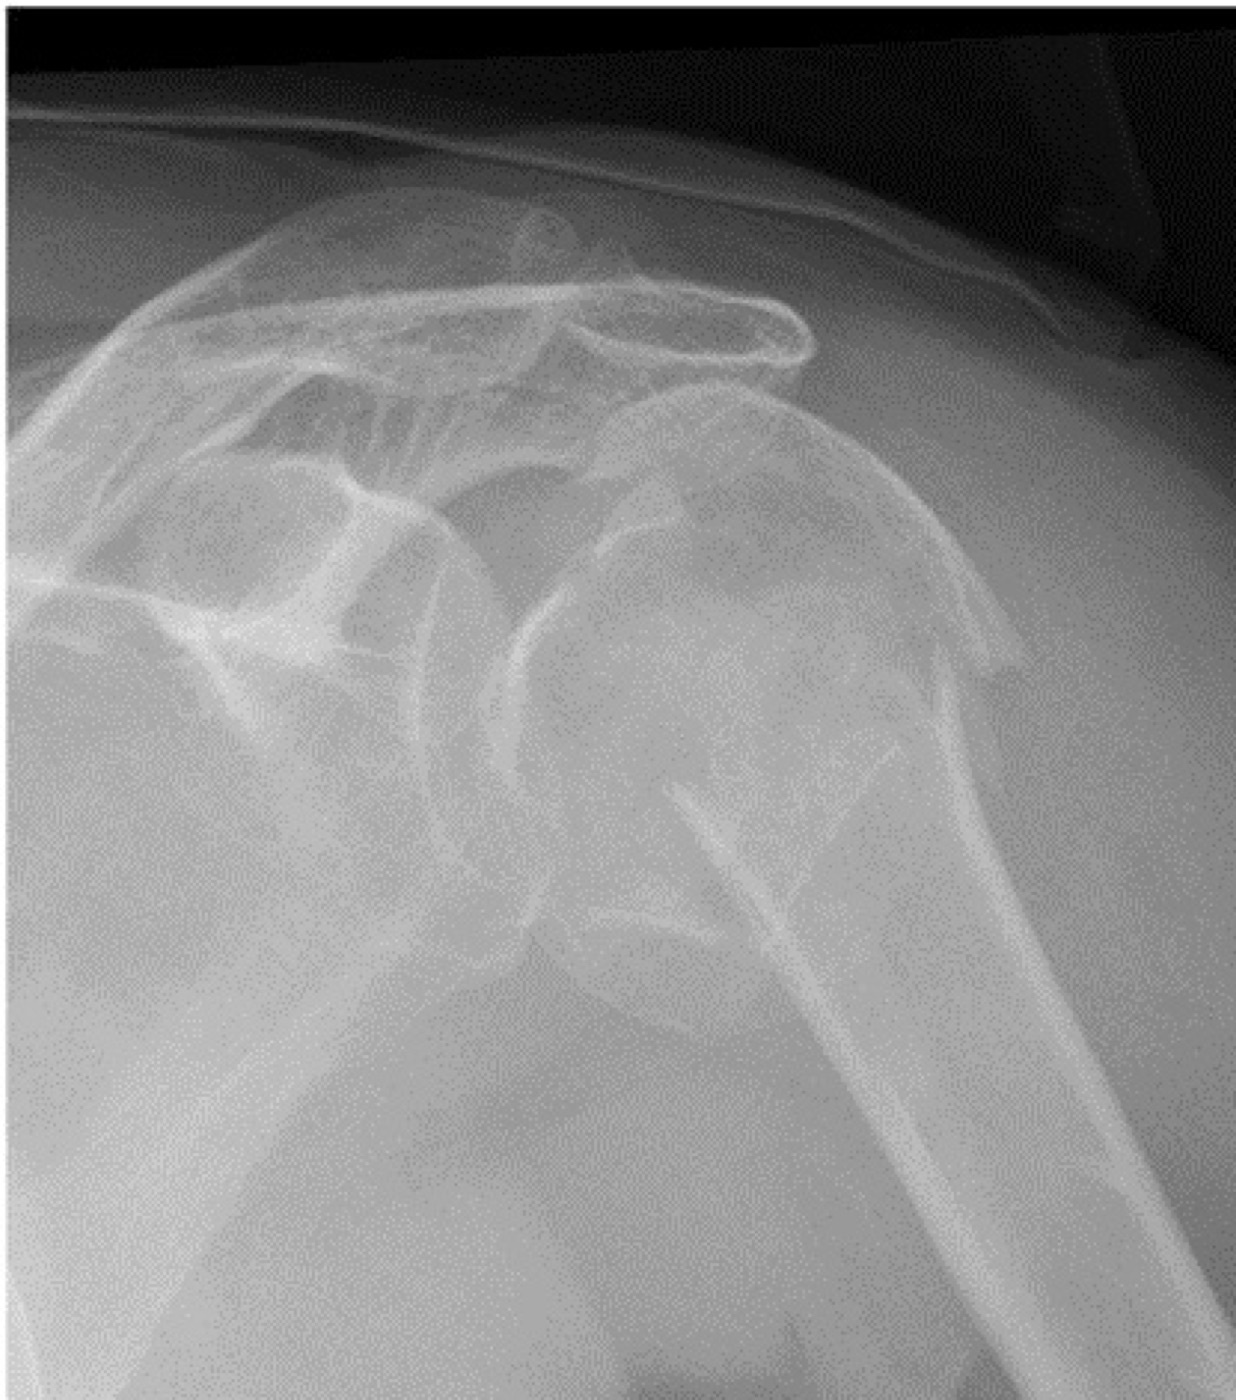
Figure 12. A complex, multifragmentary (three- to four-part) proximal humeral fracture. From Mattiassich et al. (2013), BMC Musculoskeletal Disorders, CC BY 2.0, via Wikimedia Commons.
6.3 The AO/OTA and Hertel (LEGO) classifications
The AO/OTA classification codes the proximal humerus as segment 11 and grades by the integrity of the vascular supply: type A is extra-articular unifocal (one fracture line, e.g. an isolated tuberosity or a surgical neck), type B is extra-articular bifocal (two lines, a surgical neck plus a tuberosity, with or without dislocation), and type C is articular / anatomic-neck, which carries the highest risk to head perfusion.[74] The Hertel (LEGO / Codman-Hertel binary) classification builds 12 basic patterns from the presence or absence of the five possible fracture planes between the four parts, and its chief value lies in its prediction of head ischaemia.[75] From intraoperative perfusion studies, the three predictors of an ischaemic head are a short calcar (a metaphyseal head extension of 8 mm or less), a disrupted medial hinge, and an anatomic-neck fracture pattern; the combination of all three gives a positive predictive value of about 97% for ischaemia.[76] (The source describes the medial hinge “disruption” qualitatively; the commonly quoted threshold of >2 mm displacement is standard teaching not stated numerically in the mined text.)[77] One caveat matters here: intraoperative ischaemia correlates poorly with eventual osteonecrosis, because ischaemic heads can revascularise, so these criteria guide planning but do not by themselves predict collapse.[78]
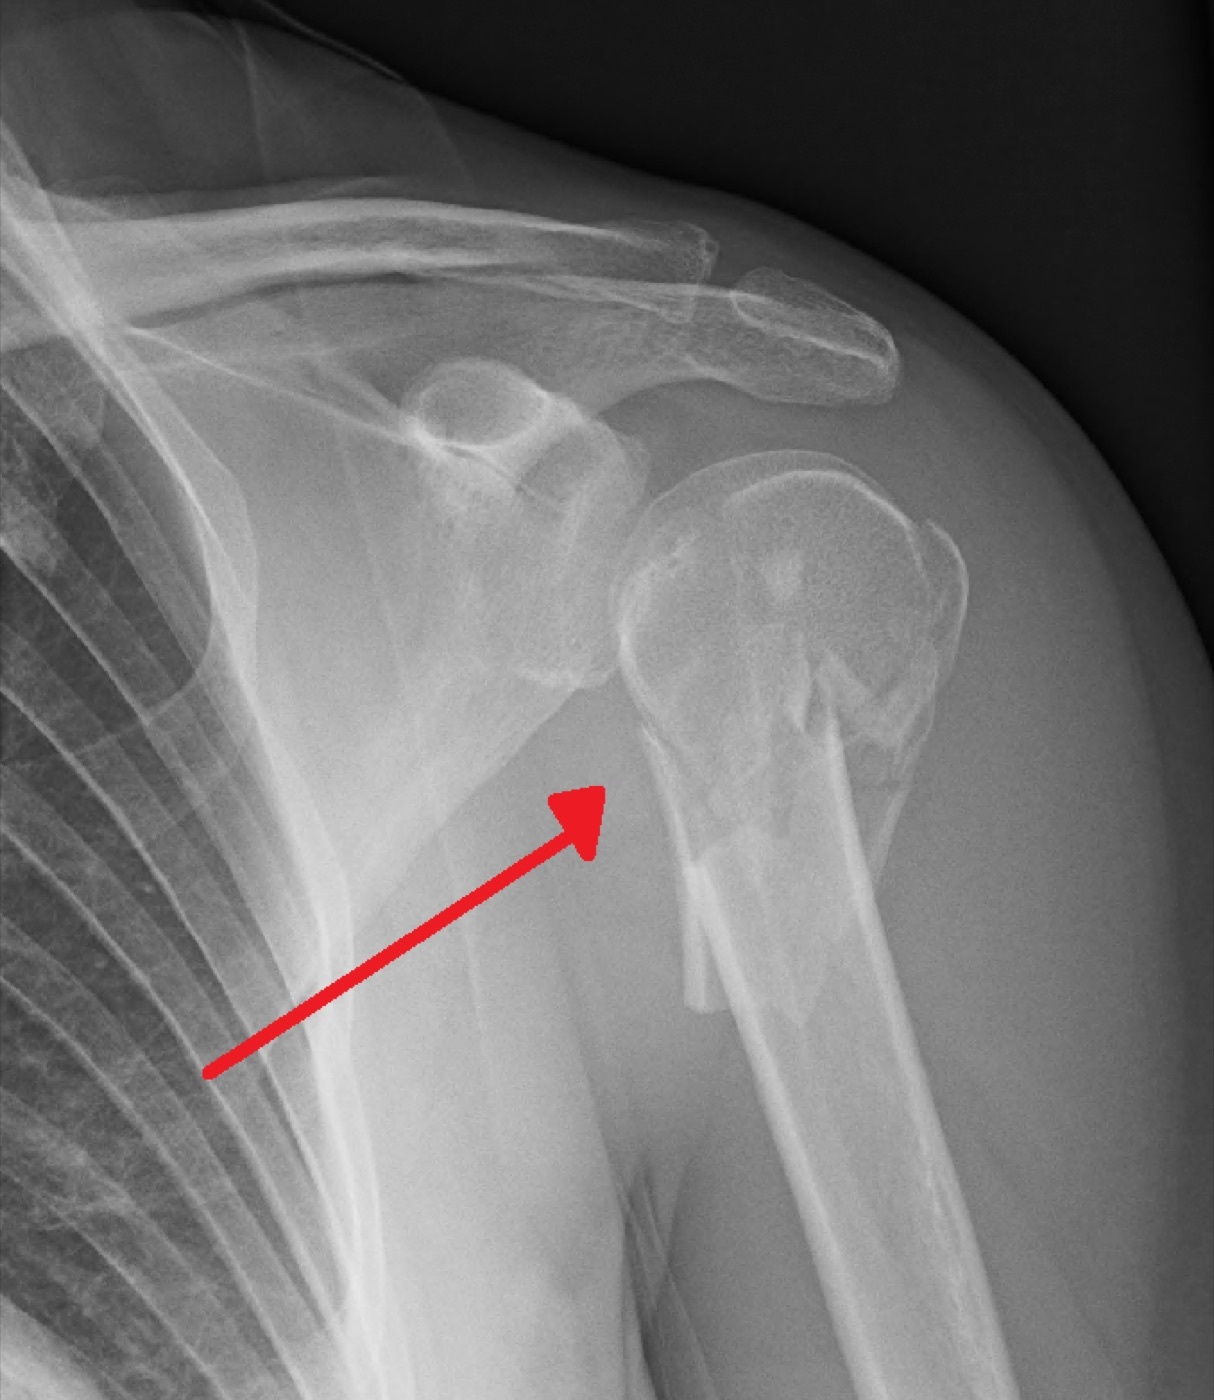
Figure 13. Proximal humeral fracture involving the greater tuberosity; displacement beyond threshold causes subacromial impingement and weakness. Source: James Heilman, MD, via Wikimedia Commons, CC BY-SA 4.0.
Part VII - Non-operative Treatment and the Operative Controversy
7.1 Non-operative treatment, the default
Non-operative treatment “continues to be the main treatment modality,” because at least half of these fractures are minimally displaced, and many displaced patterns do well too.[79] It suits minimally displaced fractures, stable surgical-neck fractures that move as a unit with the shaft, and tuberosity fractures displaced less than the operative threshold.[80] The protocol is a sling (often in slight external rotation, which relaxes the posterosuperior cuff and reduces greater-tuberosity displacement) for about 4-6 weeks, with early pendulum (Codman) exercises begun around one week in stable fractures; Hodgson showed that starting physiotherapy within a week gave better early function and less pain than three weeks of immobilisation.[81] Results are favourable, with minimally displaced fractures achieving good or excellent outcomes in 80-90%.[82]
7.2 The operative-versus-non-operative debate
The central controversy is whether the displaced fracture benefits from surgery, and the evidence increasingly says that for most it does not. The PROFHER trial (250 adults with displaced fractures, mostly surgical-neck) found no clinically or statistically significant difference between surgery and non-operative care at two and five years, and a Cochrane review reached the same conclusion while noting more reoperations after surgery.[83] These results are tempered by genuine limitations (PROFHER excluded fracture-dislocations, head-split fractures, and the young, and the surgical care was heterogeneous), so they do not settle the management of the severe patterns or the young patient; but they have shifted practice firmly toward non-operative treatment of the typical elderly displaced fracture.[84] Surgery is hard to prove superior not because non-operative results are uniformly excellent, but because surgery carries a high complication and reoperation burden.[85]
The accepted operative indications are therefore the patterns and patients that do poorly without surgery: fracture-dislocations, head-split fractures, head-impression fractures over 20-25% of the surface, unstable surgical-neck fractures with no cortical contact, tuberosity displacement over the threshold, severe varus or valgus of the head, open fractures, vascular injury, and the younger, active patient.[86]
Part VIII - Operative Treatment
8.1 Locking-plate fixation and the medial column
When internal fixation is chosen, the locking plate (PHILOS-type) is the workhorse, because conventional screws cannot resist the varus deforming forces in osteoporotic bone, whereas angular-stable screws can.[87] The technique applies the AO principles directly: a deltopectoral (or deltoid-split) approach, traction sutures through the rotator cuff to reduce the tuberosities without further devascularising them, restoration of the neck-shaft angle, and, above all, restoration of the medial calcar with calcar screws to give the construct medial support.[88] The plate is placed lateral to the bicipital groove, 5-8 mm below the top of the greater tuberosity, and the head screws are kept short of the subchondral bone.[89] Medial support is the single most important determinant of success: its absence leads to varus collapse and screw penetration, and an intact medial column has been shown to improve the Constant score (81 versus 65).[90]
The complication burden is high (up to ~50%), and the commonest complication is intra-articular screw penetration, either primary (an over-long screw placed at operation, ~14%) or secondary (the head collapses onto fixed-angle screws that cannot back out, up to 43% in patients over 60).[91] The chief preventable cause of failure is loss of medial support, and augmentation (a fibular strut graft or cement) markedly reduces it.[92]
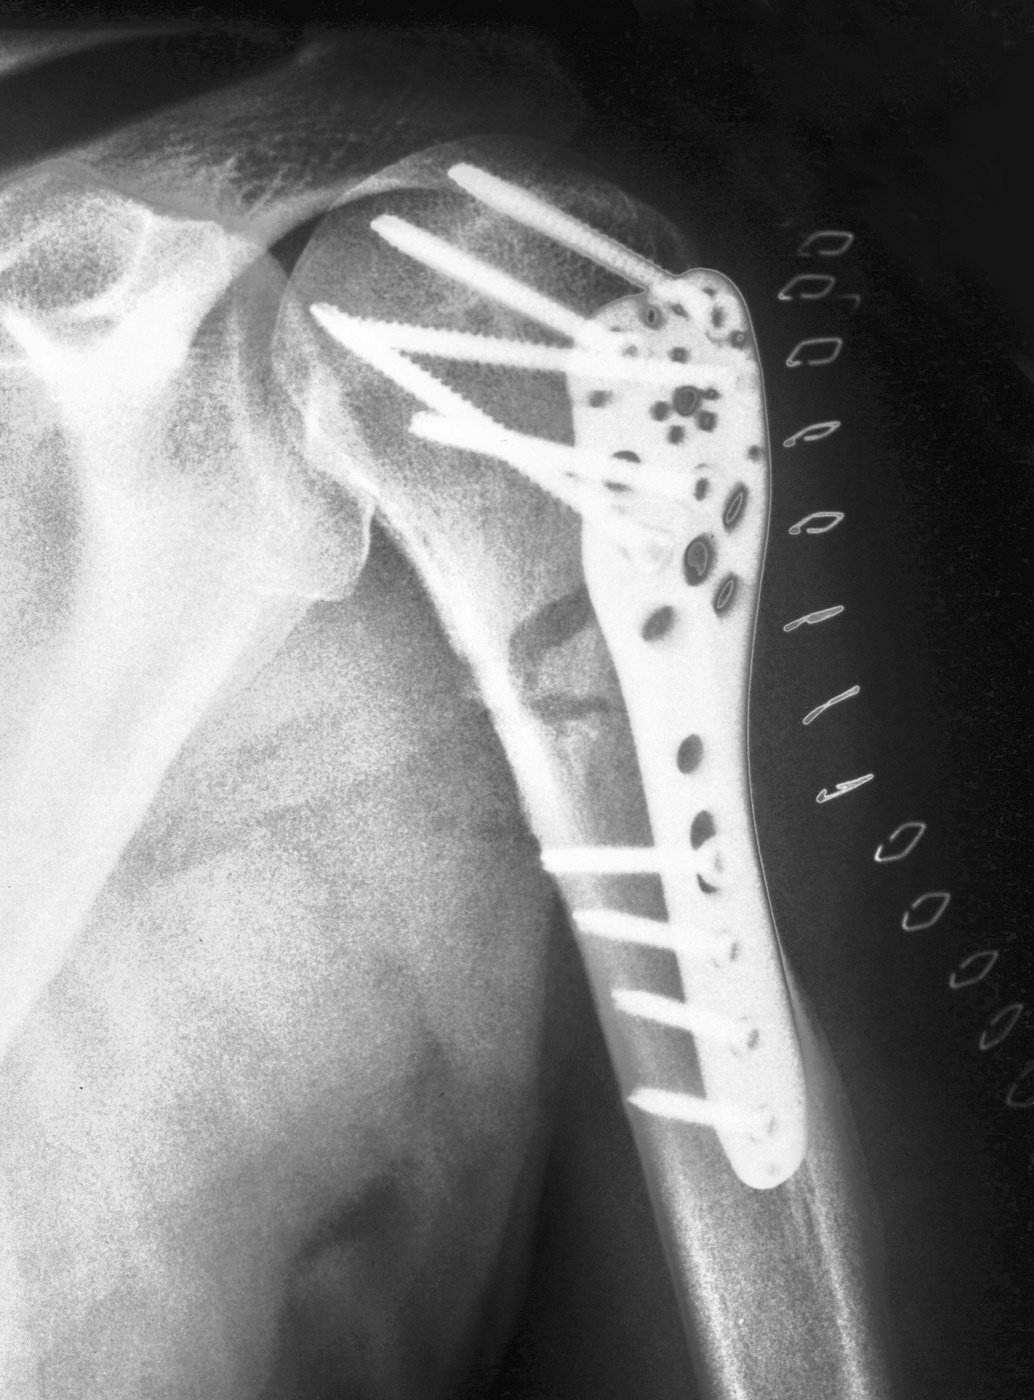
Figure 14. Locking-plate (PHILOS-type) fixation of a proximal humeral fracture, AP view: divergent angular-stable head screws over a restored medial column. Source: Thomas Zimmermann (THWZ), via Wikimedia Commons, CC BY-SA 3.0 DE.
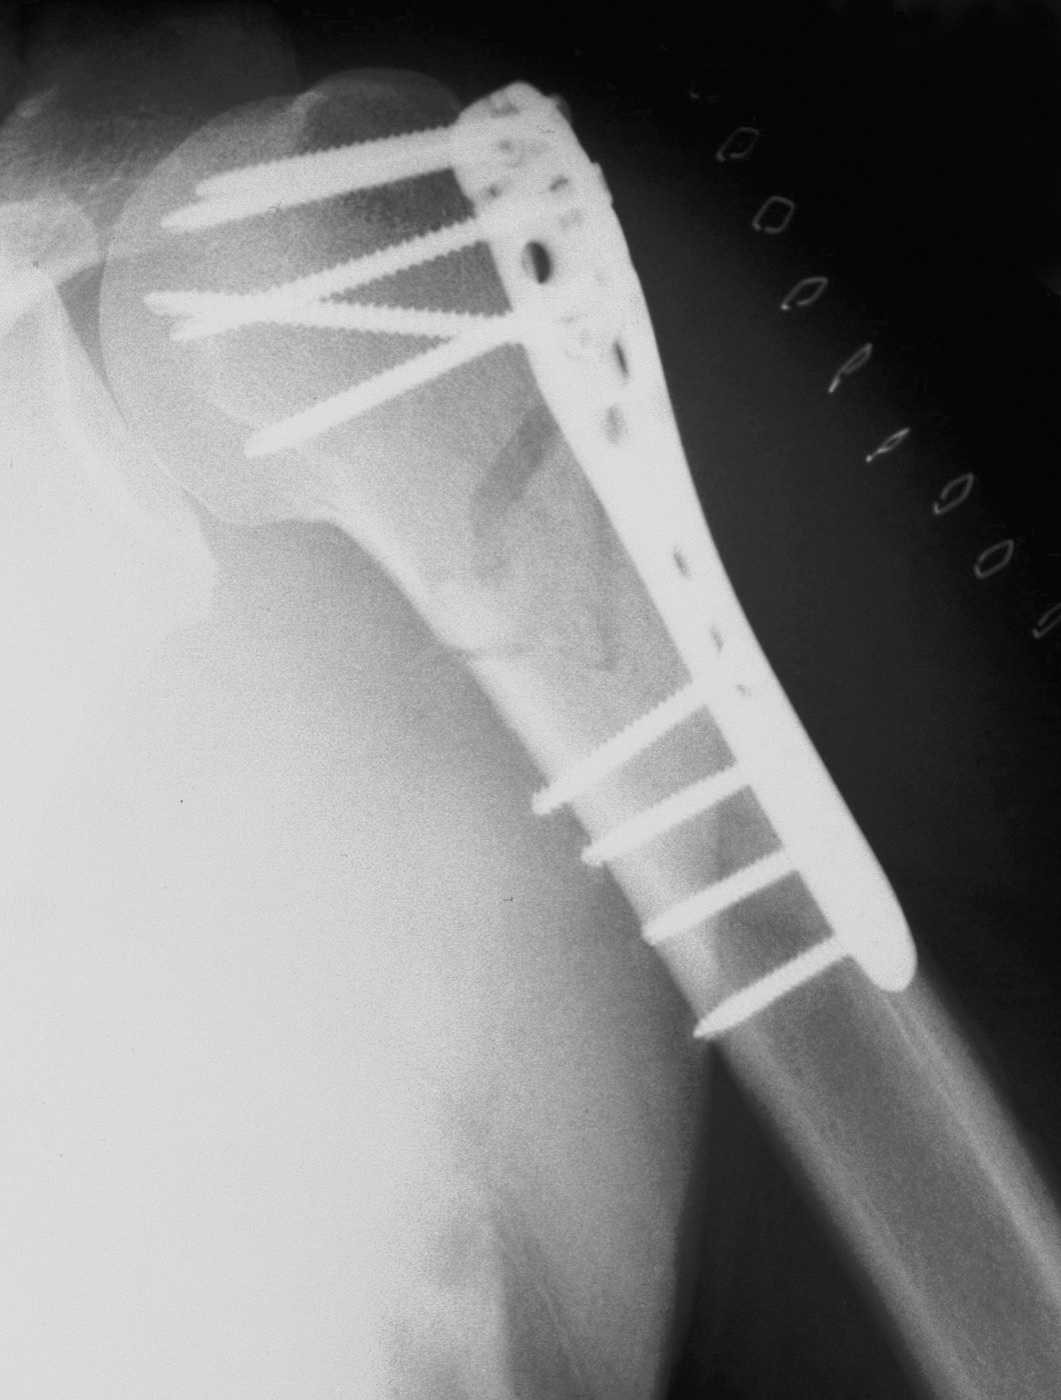
Figure 15. The same locking-plate fixation, lateral view. Source: Thomas Zimmermann (THWZ), via Wikimedia Commons, CC BY-SA 3.0 DE.
8.2 Other fixation: nails, pins, tension bands
Intramedullary nailing suits two-part surgical-neck fractures (especially with shaft extension); modern straight nails enter the head medial to the cuff footprint and cause fewer cuff complications than the older curved nails.[93] Percutaneous pinning preserves the soft tissues and suits the two-part and valgus-impacted fracture with good bone, but carries risks of pin migration and head penetration and is best reserved for younger patients.[94] Tension-band / suture fixation is well suited to isolated greater-tuberosity fractures, neutralising the cuff’s tensile pull.[95]
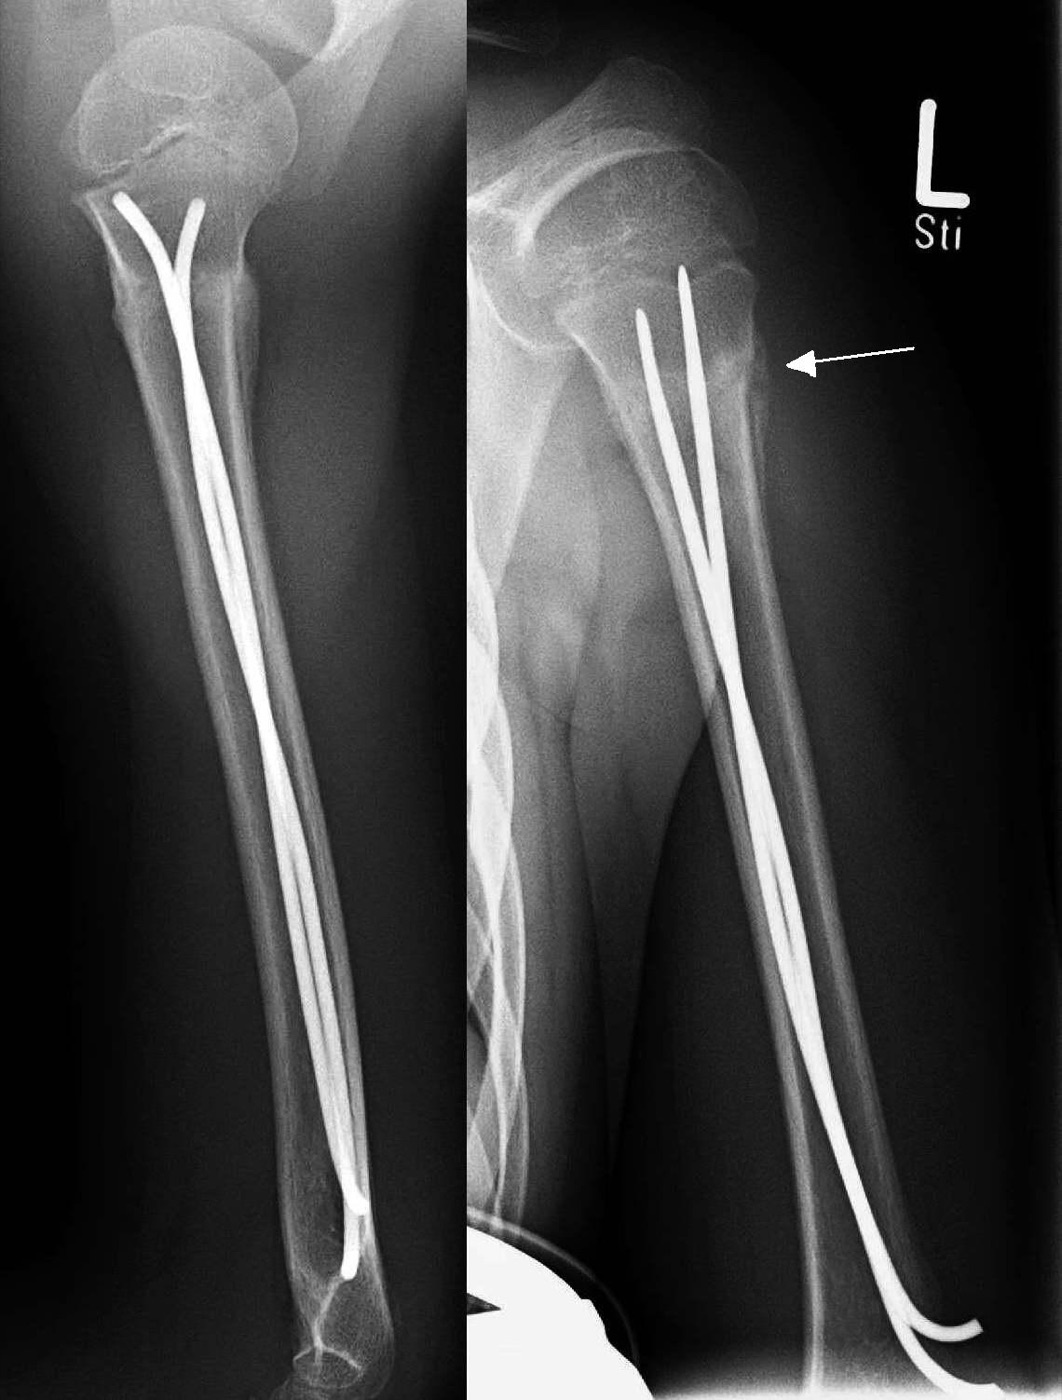
Figure 16. Proximal humeral fracture treated by intramedullary nailing, healed with callus. Source: Thomas Zimmermann (THWZ), via Wikimedia Commons, CC BY-SA 3.0 DE.
8.3 Arthroplasty: hemiarthroplasty versus reverse
For the fracture that cannot be reconstructed, the choice is between replacing the head and replacing the joint. Hemiarthroplasty (humeral head replacement) was the classic option for the four-part, head-split, or anatomic-neck fracture in the older patient, but its results are notoriously unpredictable because the outcome depends entirely on the healing of the tuberosities and on correct stem height and version; when the tuberosities fail to heal the result is often a near-pseudoparalytic shoulder.[96] Practice has shifted decisively. Reverse total shoulder arthroplasty (RSA) is now the replacement of choice for the elderly comminuted fracture, because its semiconstrained design lets the deltoid elevate the arm even without a functioning cuff, so it is far less dependent on tuberosity healing and gives more reliable function.[97] Tuberosity healing still matters in RSA, because a healed greater tuberosity restores active external rotation, but the floor of function is much higher than with hemiarthroplasty, and most comparative studies and a randomised trial favour the reverse.[98]
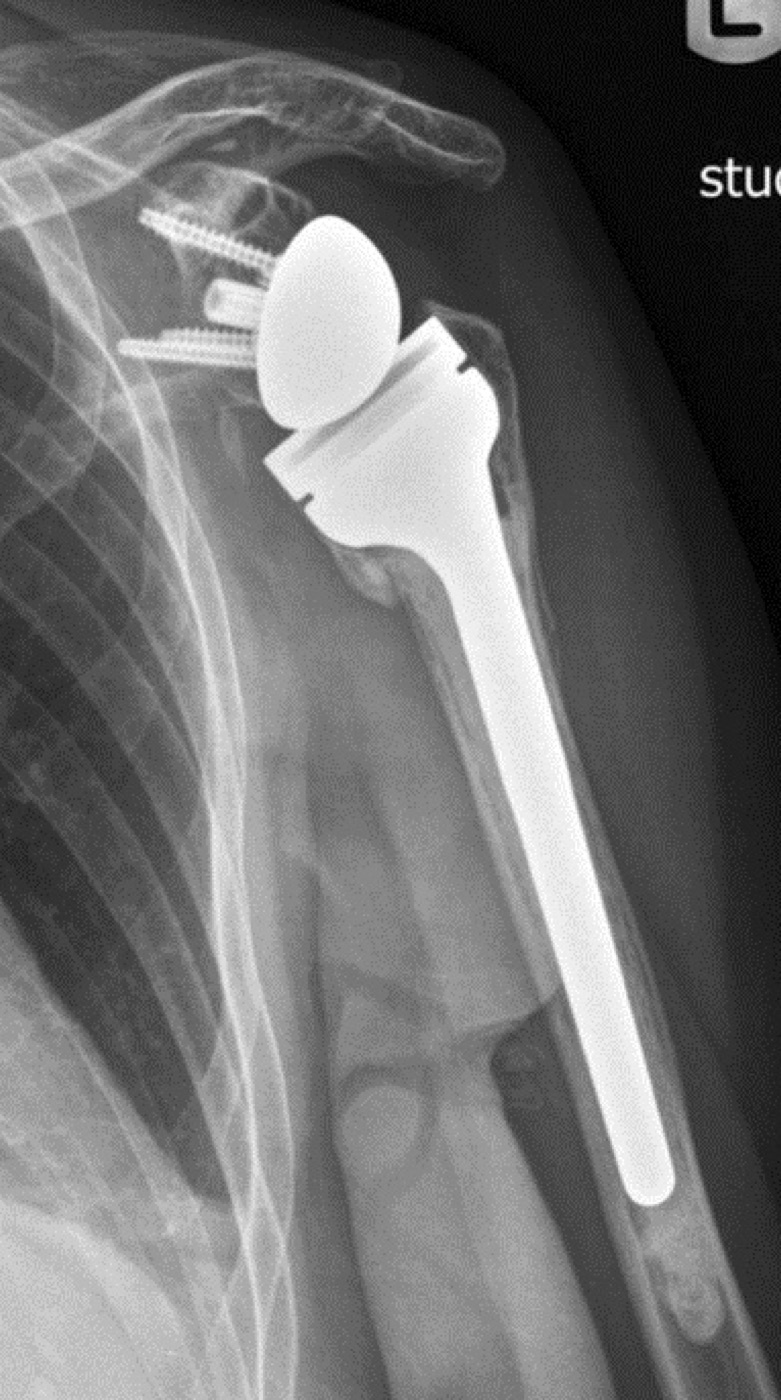
Figure 17. Reverse total shoulder arthroplasty for a comminuted proximal humeral fracture, one year after surgery with a healed greater tuberosity. From Mattiassich et al. (2013), BMC Musculoskeletal Disorders, CC BY 2.0, via Wikimedia Commons.
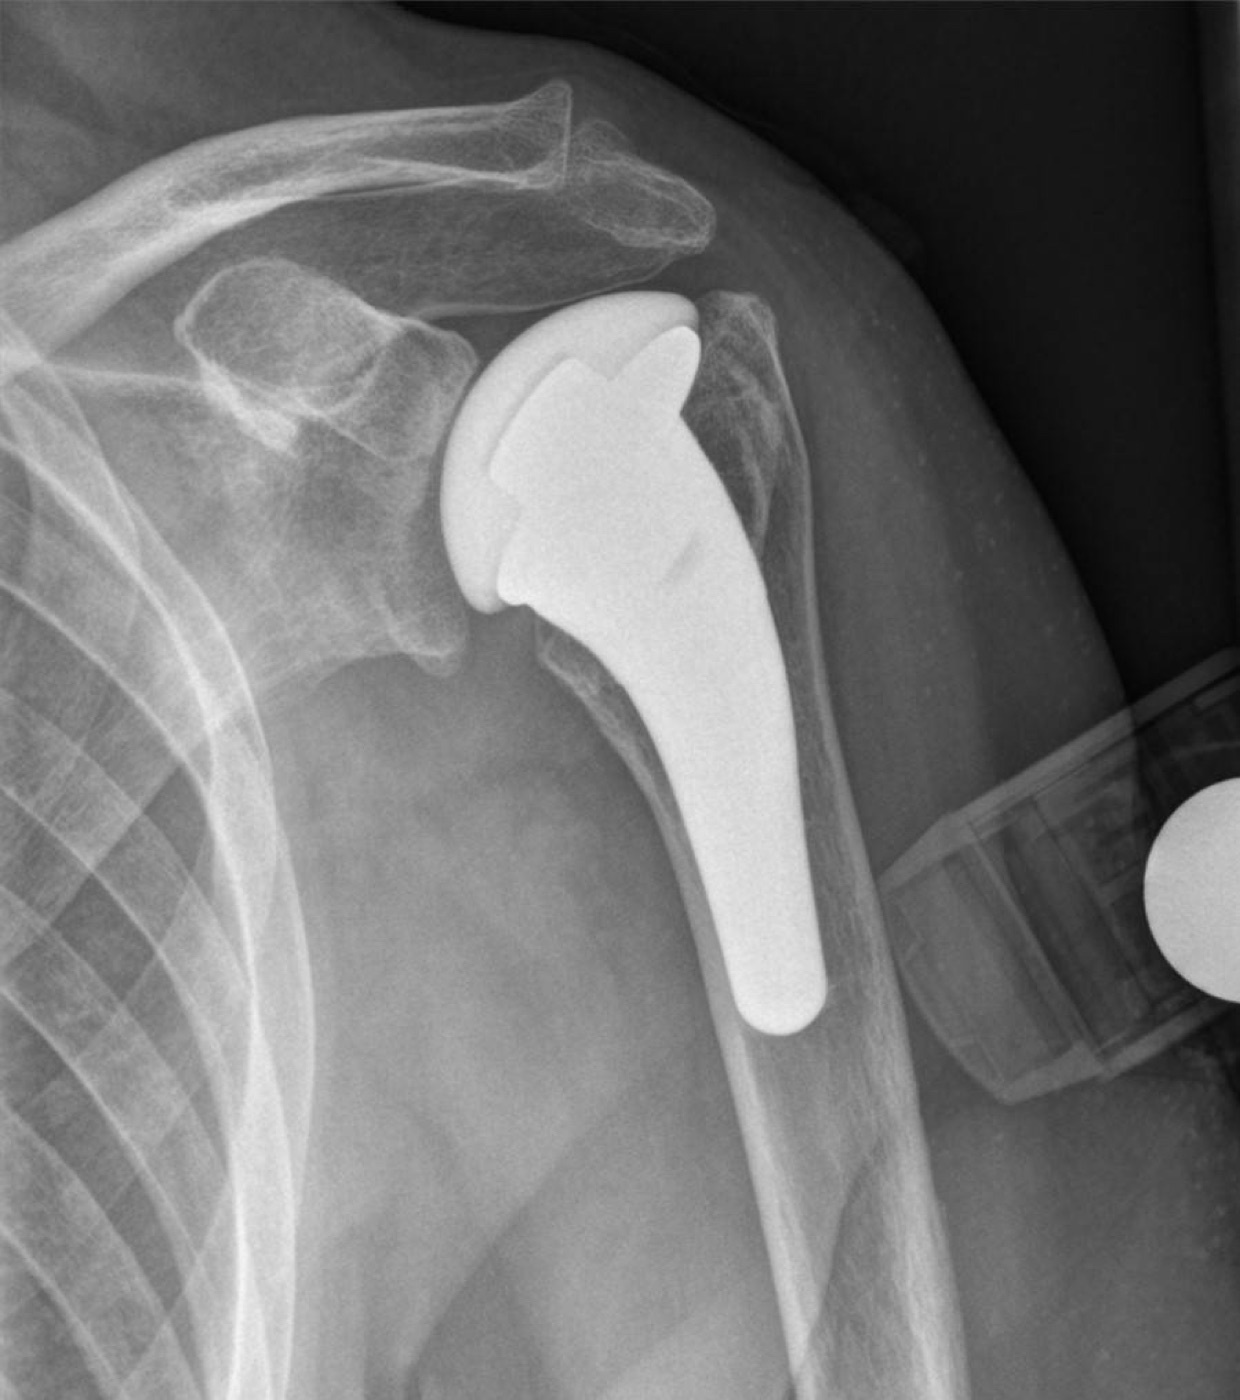
Figure 18. Hemiarthroplasty (humeral head replacement) for fracture, with the native glenoid preserved; its outcome depends on tuberosity healing. Source: Hellerhoff, via Wikimedia Commons, CC BY-SA 4.0.
8.4 Decision-making and the greater-tuberosity threshold
The decision proceeds by three questions: is the head dislocated, split, or severely impacted (then surgery, with the articular surface the priority); is there an unstable surgical neck with no contact (then internal fixation); or is it a tuberosity or angular-deformity question of displacement and demand?[99] The greater-tuberosity displacement threshold is itself a point of genuine disagreement: Rockwood & Green operate for more than 1 cm of displacement (or >20% head overlap), whereas The Shoulder cites the lower thresholds of 5 mm (McLaughlin), and as little as 3 mm in overhead athletes and manual labourers (Park), because even small superior displacement causes subacromial impingement.[100]
Part IX - Complications
The proximal humeral fracture is shaped as much by its complications as by its treatment. Avascular necrosis (humeral head osteonecrosis) is the signature complication, effectively inevitable in patterns that isolate the head (anatomic-neck fractures and complex fracture-dislocations), highest in four-part and valgus-malpositioned fractures, and reported overall at rates approaching 35% after plating; yet it is often asymptomatic, with most patients retaining good function.[101] Screw penetration, varus collapse, and loss of reduction are the mechanical failures of fixation, driven by loss of medial support in osteoporotic bone.[102] Nonunion (diagnosed when the fracture remains mobile at 16 weeks) is overall uncommon (~1%) but rises with metaphyseal comminution and surgical-neck translation, and is treated by fixation with bone graft or by arthroplasty.[103] Malunion, especially of the tuberosities, is a common source of symptoms (the greater tuberosity malunited posterosuperiorly blocks external rotation; superiorly it impinges). Stiffness and, rarely, infection round out the list.[104]
Part X - A Synthesis: Principles Applied to the Proximal Humerus
The proximal humeral fracture is the AO principles in miniature. Restoring the medial calcar is nothing more than re-establishing the medial buttress so that the construct does not collapse into varus, a direct application of the demand for stable fixation. Using traction sutures and indirect reduction rather than stripping the fragments is the third principle, preservation of blood supply, made concrete, and it is the same instinct that drives the modern preference for non-operative care of the typical elderly fracture and for the reverse arthroplasty that does not depend on fragile tuberosity healing. Choosing a locking plate means choosing a fixed-angle internal fixator that will hold in osteoporotic bone without crushing the periosteum. Mobilising the shoulder early, against the temptation to immobilise a painful elderly shoulder, is the fourth principle, the one that motivated the whole AO enterprise: the fracture heals in weeks, but the stiff, wasted shoulder of prolonged immobilisation can disable for life.
The wider lesson, which holds for this fracture and for all fractures, is that osteosynthesis is a compromise between mechanics and biology. The surgeon must decide what kind of healing is wanted (direct or by callus), choose the matching stability (absolute or relative), and select the implant that delivers it without sacrificing the blood supply. The proximal humerus, with its soft bone and precarious head, simply makes the cost of getting that compromise wrong unusually visible.
References
-
AO Principles of Fracture Management, p.29 (verbatim).
-
AO Principles of Fracture Management, pp.23-24.
-
AO Principles of Fracture Management, pp.23-24.
-
AO Principles of Fracture Management, p.25.
-
AO Principles of Fracture Management, p.27 (verbatim modern wording).
-
AO Principles of Fracture Management, p.25.
-
AO Principles of Fracture Management, p.29 (verbatim).
-
AO Principles of Fracture Management, p.25.
-
AO Principles of Fracture Management, p.32.
-
AO Principles of Fracture Management, p.32.
-
AO Principles of Fracture Management, p.32.
-
The dichotomy of “contact healing” versus “gap healing” is standard teaching; the AO source describes both mechanisms (osteonal cutter-heads crossing at contact points; minute gaps filling with transversely oriented lamellar bone before remodelling) on pp.32, 43 but does not use the labelled terms verbatim.
-
AO Principles of Fracture Management, p.33.
-
AO Principles of Fracture Management, pp.38, 47-48 (granulation tissue 100%, cartilage 15%, cortical bone 2%).
-
AO Principles of Fracture Management, pp.38, 47-48 (granulation tissue 100%, cartilage 15%, cortical bone 2%).
-
AO Principles of Fracture Management, pp.47-48.
-
AO Principles of Fracture Management, p.38.
-
AO Principles of Fracture Management, pp.37-40.
-
AO Principles of Fracture Management, pp.37-40.
-
AO Principles of Fracture Management, p.35 (verbatim definitions).
-
AO Principles of Fracture Management, p.35 (verbatim definitions).
-
AO Principles of Fracture Management, p.35 (verbatim definitions).
-
AO Principles of Fracture Management, p.39.
-
AO Principles of Fracture Management, p.40.
-
AO Principles of Fracture Management, pp.40-41.
-
AO Principles of Fracture Management, pp.40-41.
-
AO Principles of Fracture Management, pp.39, 43.
-
AO Principles of Fracture Management, pp.35-36 (verbatim aim).
-
AO Principles of Fracture Management, pp.35-36 (verbatim aim).
-
AO Principles of Fracture Management, pp.35-37.
-
AO Principles of Fracture Management, pp.35-37.
-
AO Principles of Fracture Management, p.37 (verbatim).
-
AO Principles of Fracture Management, p.40.
-
AO Principles of Fracture Management, pp.193, 195.
-
AO Principles of Fracture Management, p.193 (verbatim: the term lag screw refers to function, not design).
-
AO Principles of Fracture Management, pp.200-201.
-
AO Principles of Fracture Management, p.203 (bisector rule).
-
AO Principles of Fracture Management, p.203.
-
AO Principles of Fracture Management, p.199.
-
AO Principles of Fracture Management, pp.205-206 (six functions; verbatim “the surgeon, not the designer”).
-
AO Principles of Fracture Management, pp.205-206 (six functions; verbatim “the surgeon, not the designer”).
-
AO Principles of Fracture Management, pp.223-224, 229 (four criteria; the far cortex must withstand compression).
-
AO Principles of Fracture Management, pp.193, 212.
-
AO Principles of Fracture Management, pp.212-215.
-
AO Principles of Fracture Management, pp.212-215.
-
AO Principles of Fracture Management, pp.237-239.
-
AO Principles of Fracture Management, pp.237-239.
-
AO Principles of Fracture Management, pp.273-275.
-
AO Principles of Fracture Management, p.261 (verbatim definition of bridge plating).
-
AO Principles of Fracture Management, pp.262, 267.
-
“Working length” (the unsupported span of the implant across the fracture, over which bending stress is distributed) is standard teaching; the AO source uses “long working length” (p.267) but gives no formal one-line definition.
-
AO Principles of Fracture Management, p.262.
-
Rockwood & Green’s Fractures in Adults, p.1889; Rockwood & Matsen’s The Shoulder, p.207; AO Principles of Fracture Management, p.607.
-
Rockwood & Green’s Fractures in Adults, pp.1889-1890.
-
Rockwood & Green’s Fractures in Adults, p.1891; Rockwood & Matsen’s The Shoulder, p.207.
-
Rockwood & Green’s Fractures in Adults, p.1890.
-
Rockwood & Green’s Fractures in Adults, p.1891.
-
Rockwood & Green’s Fractures in Adults, pp.1904, 1917; AO Principles of Fracture Management, p.610.
-
Rockwood & Green’s Fractures in Adults, pp.1904, 1917; AO Principles of Fracture Management, p.610.
-
Rockwood & Green’s Fractures in Adults, p.1905; Rockwood & Matsen’s The Shoulder, p.208.
-
AO Principles of Fracture Management, p.610; Rockwood & Green’s Fractures in Adults, p.1917.
-
Rockwood & Green’s Fractures in Adults, pp.1917-1918; Rockwood & Matsen’s The Shoulder, p.208.
-
Rockwood & Green’s Fractures in Adults, pp.1919-1920; Rockwood & Matsen’s The Shoulder, p.209 (Hettrich: PCHA ~64%); AO Principles of Fracture Management, p.611.
-
AO Principles of Fracture Management, p.611; Rockwood & Green’s Fractures in Adults, p.1920.
-
Rockwood & Green’s Fractures in Adults, pp.1894-1895, 1922-1923; Rockwood & Matsen’s The Shoulder, p.210.
-
Rockwood & Green’s Fractures in Adults, pp.1896-1901; Rockwood & Matsen’s The Shoulder, pp.210-211.
-
Rockwood & Green’s Fractures in Adults, pp.1898-1899.
-
Rockwood & Green’s Fractures in Adults, pp.1901-1902.
-
Rockwood & Green’s Fractures in Adults, pp.1905, 1907; Rockwood & Matsen’s The Shoulder, pp.211-213.
-
Rockwood & Green’s Fractures in Adults, pp.1905, 1907; Rockwood & Matsen’s The Shoulder, pp.211-213.
-
Rockwood & Green’s Fractures in Adults, pp.1903-1904 (Neer: the 1 cm / 45° limits were arbitrary).
-
Rockwood & Green’s Fractures in Adults, pp.1905-1908.
-
Rockwood & Green’s Fractures in Adults, pp.1907-1908.
-
Rockwood & Green’s Fractures in Adults, pp.1907-1908; AO Principles of Fracture Management, pp.63, 612.
-
Rockwood & Green’s Fractures in Adults, p.1908.
-
Rockwood & Green’s Fractures in Adults, p.1920; Rockwood & Matsen’s The Shoulder, p.213 (97% positive predictive value).
-
The medial-hinge displacement threshold of “>2 mm” is standard teaching; the mined Rockwood/Shoulder extracts describe medial-hinge disruption qualitatively without the numeric value.
-
Rockwood & Green’s Fractures in Adults, pp.1908, 1920-1921; Rockwood & Matsen’s The Shoulder, p.213.
-
Rockwood & Green’s Fractures in Adults, p.1923.
-
Rockwood & Green’s Fractures in Adults, p.1923.
-
Rockwood & Green’s Fractures in Adults, pp.1926-1927.
-
Rockwood & Green’s Fractures in Adults, pp.1927-1928.
-
Rockwood & Green’s Fractures in Adults, pp.1933-1934 (PROFHER; Cochrane).
-
Rockwood & Green’s Fractures in Adults, pp.1933-1934.
-
Rockwood & Green’s Fractures in Adults, pp.1933-1934.
-
Rockwood & Green’s Fractures in Adults, p.1933.
-
Rockwood & Green’s Fractures in Adults, pp.1937-1938.
-
Rockwood & Green’s Fractures in Adults, pp.1942-1948; AO Principles of Fracture Management, p.621.
-
Rockwood & Green’s Fractures in Adults, pp.1942-1948; AO Principles of Fracture Management, p.621.
-
Rockwood & Green’s Fractures in Adults, p.1951 (Yang: Constant 81 vs 65 with medial support); AO Principles of Fracture Management, pp.621, 623.
-
Rockwood & Green’s Fractures in Adults, pp.1938, 1949-1951.
-
Rockwood & Green’s Fractures in Adults, pp.1938, 1949-1951.
-
Rockwood & Green’s Fractures in Adults, pp.1953-1959.
-
Rockwood & Green’s Fractures in Adults, pp.1959-1965.
-
Rockwood & Green’s Fractures in Adults, pp.1965-1968.
-
Rockwood & Green’s Fractures in Adults, pp.1976-1982, 2003-2004.
-
Rockwood & Green’s Fractures in Adults, pp.1968-1969.
-
Rockwood & Green’s Fractures in Adults, pp.1969, 1999-2003.
-
Rockwood & Green’s Fractures in Adults, pp.1983-1986.
-
Rockwood & Green’s Fractures in Adults, pp.1923-1924 (>1 cm /
20% overlap); Rockwood & Matsen’s The Shoulder, pp.213-214 (McLaughlin 5 mm; Park 3 mm).
-
Rockwood & Green’s Fractures in Adults, pp.2014-2015; AO Principles of Fracture Management, p.625 (AVN approaching 35%).
-
Rockwood & Green’s Fractures in Adults, pp.1949-1951.
-
Rockwood & Green’s Fractures in Adults, pp.2017-2021.
-
Rockwood & Green’s Fractures in Adults, pp.2021-2024.
-
AO Principles of Fracture Management, p.27.
-
AO Principles of Fracture Management, pp.32-33.
-
AO Principles of Fracture Management, pp.38, 47-48.
-
AO Principles of Fracture Management, pp.35-37.
-
AO Principles of Fracture Management, pp.193, 200-203.
-
AO Principles of Fracture Management, pp.205-206.
-
AO Principles of Fracture Management, pp.212-215.
-
Rockwood & Green’s Fractures in Adults, pp.1917-1920; Rockwood & Matsen’s The Shoulder, p.209.
-
Rockwood & Green’s Fractures in Adults, pp.1905-1908.
-
Rockwood & Green’s Fractures in Adults, p.1920; Rockwood & Matsen’s The Shoulder, p.213.
-
Rockwood & Green’s Fractures in Adults, pp.1933-1934.
-
Rockwood & Green’s Fractures in Adults, p.1951; AO Principles of Fracture Management, pp.621, 623.
-
Rockwood & Green’s Fractures in Adults, pp.1968-1969, 1999-2004.
-
Rockwood & Green’s Fractures in Adults, pp.1949-1951, 2014-2015; AO Principles of Fracture Management, p.625.