Contents
- Orientation: A Forgiving Bone with a Vulnerable Nerve
- Part I - Epidemiology
- Part II - Mechanism, Pathoanatomy, and Classification
- Part III - The Radial Nerve
- Part IV - Associated Injuries, Assessment, and Imaging
- Part V - Non-operative Treatment: The Mainstay
- Part VI - Operative Treatment
- Part VII - Complications
- Part VIII - A Synthesis: How to Reason Through the Humeral Shaft Fracture
- References
Orientation: A Forgiving Bone with a Vulnerable Nerve
Two facts shape the management of the humeral shaft fracture. The first is that the humerus is a non-weight-bearing bone whose shoulder and elbow tolerate a surprising amount of deformity. A few centimetres of shortening pass unnoticed, and considerable angulation and rotation are compatible with normal function. For this reason the majority of these fractures are treated non-operatively and heal, and functional bracing rather than surgery is the default. The second fact is that the radial nerve winds around the posterior humerus in the spiral groove, so that the bone’s commonest serious complication is a radial nerve palsy. How to manage that palsy, expectant versus surgical, is the chief controversy of the topic. Held together, these two ideas dictate the rest: treat the bone gently and conservatively, but examine and respect the nerve.
This summary applies the general principles of osteosynthesis (set out for the proximal humerus) to a specific diaphyseal bone, so the themes of absolute versus relative stability, plate functions, and biological fixation recur here in concrete form.
Part I - Epidemiology
Humeral shaft fractures account for about 1-2% of all fractures and 13-14% of all humeral fractures. The middle third is the commonest site (about 49-64%, usually transverse), the proximal third next (15-25%, usually oblique), and the distal third the least common (11-35%, though the most likely to injure the radial nerve).[1] The age and sex distribution is bimodal. Up to age 60 the fracture occurs equally in men and women, but after 60 it becomes more frequent and 80% of patients are women. This shift mirrors the change from high-energy injuries in young men to low-energy falls in elderly osteoporotic women.[2] A ground-level fall is the commonest cause, followed by road-traffic trauma. Pathological fractures make up 1.3-8% and open fractures 1.2-5%.[3]
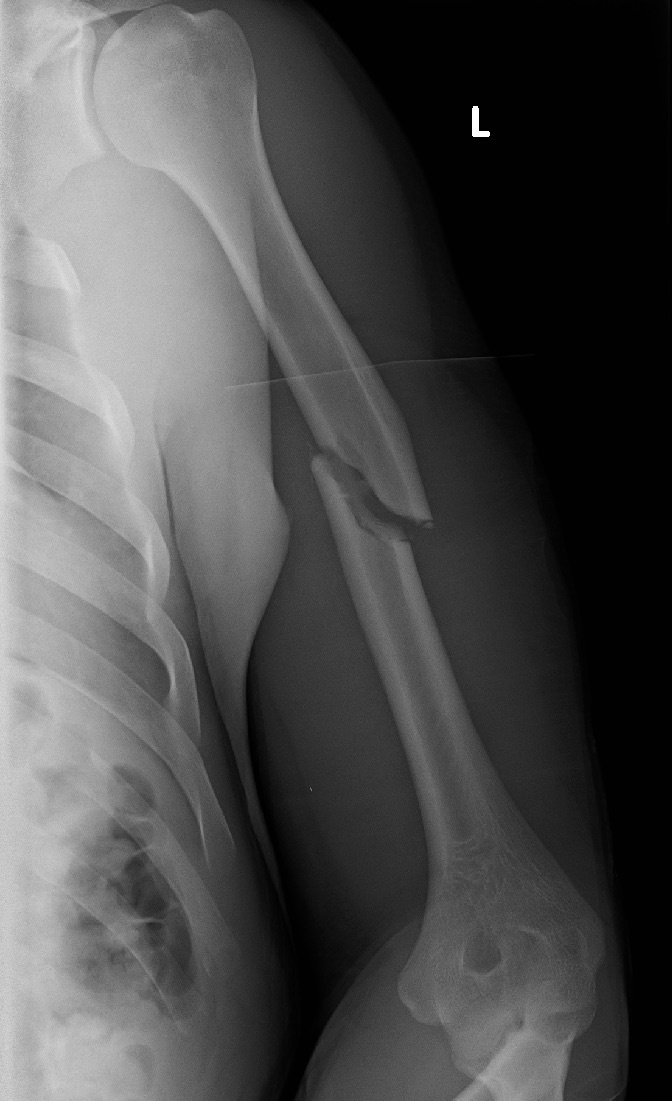
Figure 1. AP radiograph of a displaced fracture of the mid-shaft of the humerus. Source: James Heilman, MD, via Wikimedia Commons, CC BY-SA 4.0.
Part II - Mechanism, Pathoanatomy, and Classification
2.1 Mechanism and deforming forces
The shaft is fractured by direct trauma (typically producing transverse or comminuted patterns) and by indirect torsional or bending loads (producing spiral or oblique patterns). The AO text notes the spiral fractures of sports with high rotational forces such as baseball pitching and arm-wrestling.[4] The direction of displacement follows from the fracture’s level relative to the muscle insertions: the pull of the muscles attached to each fragment dictates its position. A fracture proximal to the pectoralis major insertion, for example, lets the deltoid abduct the proximal fragment.[5]
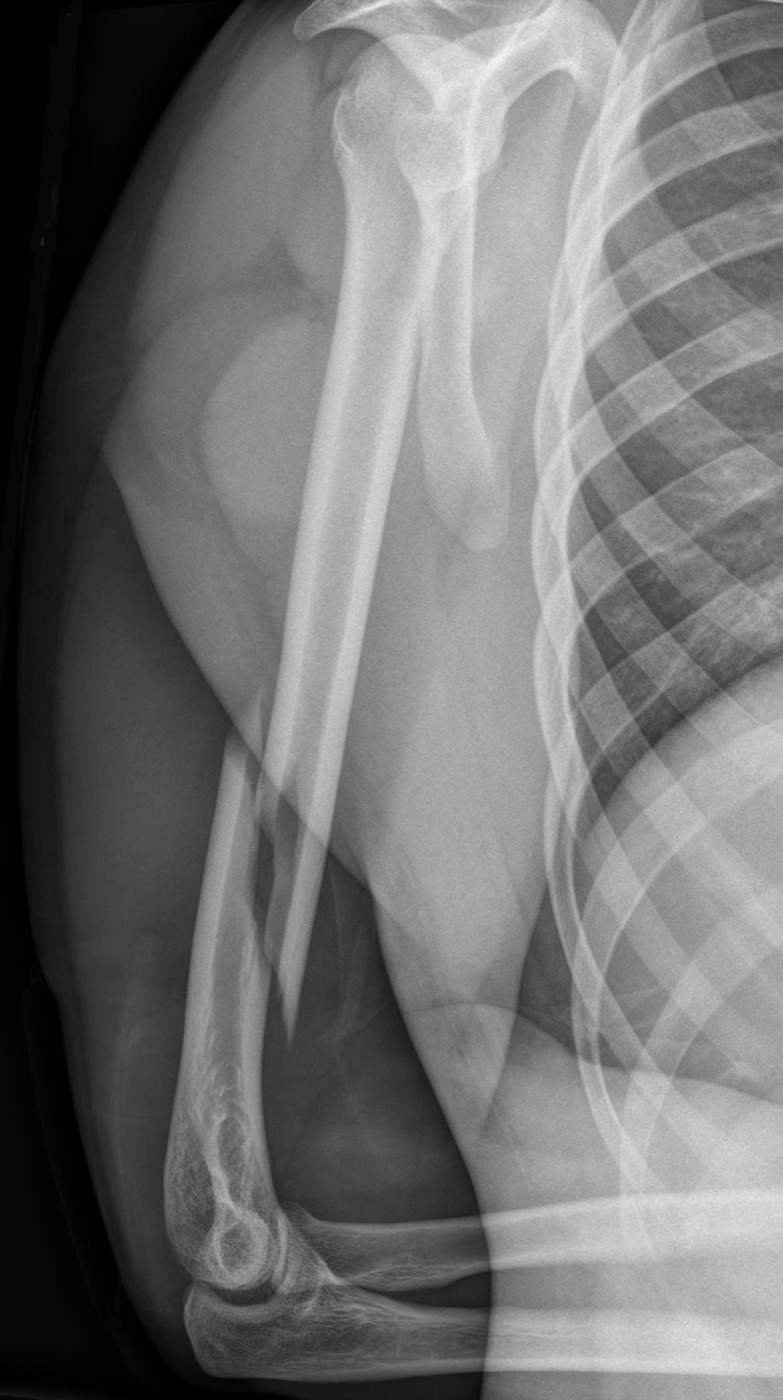
Figure 2. Spiral fracture of the humeral shaft sustained while arm-wrestling, the classic torsional mechanism. Source: Hellerhoff, via Wikimedia Commons, CC BY-SA 4.0.
2.2 Classification
The standard scheme is the AO/OTA classification (humerus = bone 1, shaft = segment 2), which grades by the number of cortical fragments and their contact: type 12-A simple (two fragments; A1 spiral, A2 oblique, A3 transverse), type 12-B wedge (intermediate fragments but retained contact between the main fragments), and type 12-C complex/multifragmentary (no contact after reduction), with severity rising from 12-A1 to 12-C3.[6] This pattern-to-type grading informs the choice of fixation: a simple fracture is a candidate for absolute stability, a multifragmentary fracture for relative stability.[7] A simpler descriptive system (Garnavos) divides the diaphysis into proximal, middle, and distal zones and codes the morphology as simple, intermediate, or complex. The AO scheme is preferred for research, the descriptive one for everyday communication.[8]
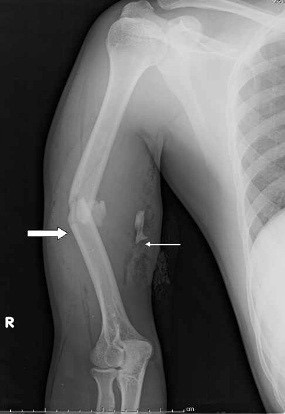
Figure 3. Displaced comminuted (multifragmentary) mid-shaft humeral fracture, an AO type-C pattern. From Pathak et al. (2012), J Med Case Rep 6:192, PMC3419694, CC BY 2.0.
The one essential eponym is the Holstein-Lewis fracture: a simple, displaced spiral fracture of the distal third in which the distal fragment deviates radially, accounting for about 7% of humeral shaft fractures and carrying a high rate of radial nerve injury and entrapment.[9] Holstein and Lewis originally recommended exploring the nerve when symptoms were present, but later work supports non-operative treatment even with palsy, since the nerve usually recovers on its own.[10]
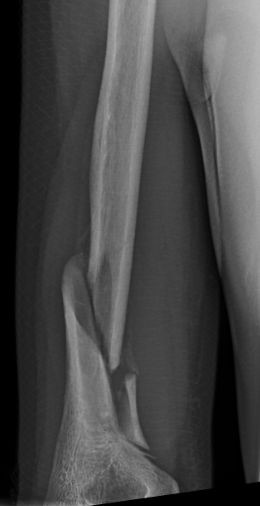
Figure 4. Holstein-Lewis fracture: a spiral fracture of the distal third of the humeral shaft, classically associated with radial nerve injury. Public domain, via Wikimedia Commons.
Part III - The Radial Nerve
3.1 Anatomy and vulnerability
The radial nerve forms in the axilla from the posterior cord, passes with the profunda brachii artery into the posterior compartment, and runs in the spiral (radial) groove across the posterior mid-shaft under the lateral head of triceps.[11] It then pierces the lateral intermuscular septum at the junction of the middle and distal thirds, about a handbreadth (10-15 cm) above the lateral epicondyle, where it is relatively fixed and therefore vulnerable to displacement.[12] This anatomy accounts for two clinical observations: middle- and distal-third fractures threaten the nerve, and transverse and spiral fractures injure it more often than oblique or comminuted ones.[13]
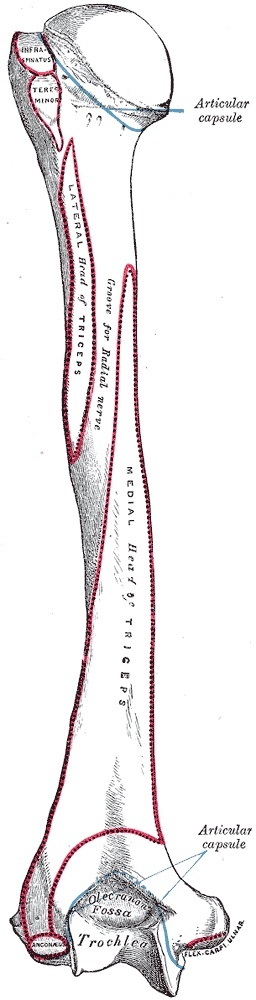
Figure 5. Posterior view of the humerus showing the spiral (radial) groove that carries the radial nerve across the mid-shaft. From Gray’s Anatomy (H. V. Carter, 1918), public domain, via Wikimedia Commons.
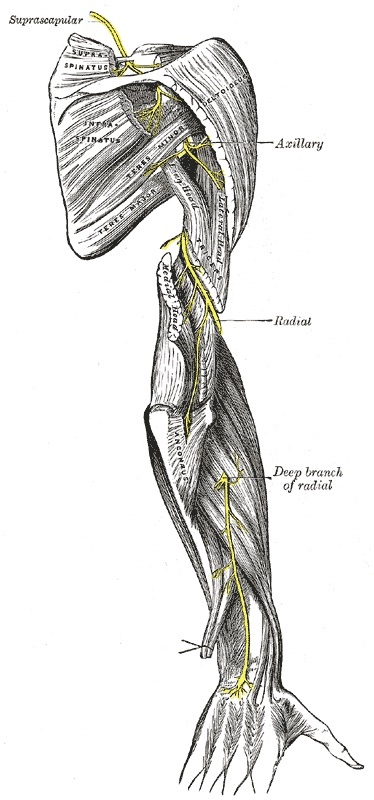
Figure 6. The course of the radial nerve through the posterior arm. From Gray’s Anatomy (H. V. Carter, 1918), public domain, via Wikimedia Commons.
3.2 Radial nerve palsy: incidence and natural history
Radial nerve palsy complicates about 10-12% of closed humeral shaft fractures (a pooled prevalence of 11.8%), presenting with wrist drop, loss of finger and thumb metacarpophalangeal extension, and numbness over the dorsoradial hand.[14] Its natural history is the crux of management: most are lesions in continuity that recover spontaneously. Rockwood describes spontaneous recovery in about 70% (grading the lesion as an axonotmesis), with the onset of recovery at a mean of about 7 weeks and full recovery by a mean of 6 months. The AO text, framing the closed-injury lesion as a neurapraxia, puts spontaneous recovery above 95%.[15] Whichever figure one takes, the conclusion is the same: a primary palsy in a closed fracture is not, by itself, an indication for surgery.[16]
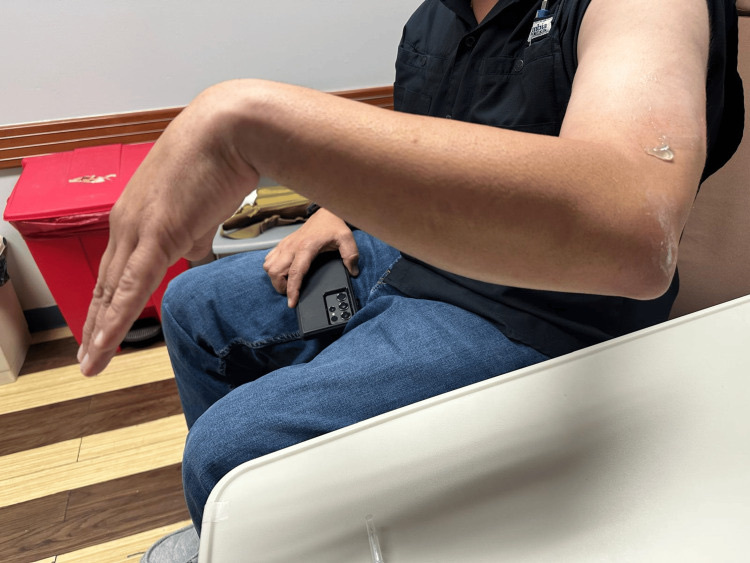
Figure 7. Wrist drop: the loss of wrist and finger extension that characterises radial nerve palsy. From Marrero Borrero et al. (2026), Cureus, PMC12893233, CC BY 4.0.
3.3 The exploration controversy and its indications
The management of the palsy is genuinely contested. The expectant camp (Shao, Liu) holds that initial observation is preferred to early exploration, that operative management does not improve recovery, and that one should wait up to about six months. The interventionist camp (Pailhé, Venouziou) argues for early fixation to optimise nerve recovery, and warns that high-energy injuries often carry a neurotmesis with a poor prognosis.[17] The workable synthesis, common to both source texts, is to observe a primary palsy in a closed, low-energy fracture, reassessing clinically (advancing Tinel sign) and with electrodiagnostic studies at around three months, and to explore if there is no recovery by three to six months, while exploring early when the fracture is open, when there is a vascular injury, a penetrating or gunshot wound, a floating elbow, or a secondary palsy that develops after closed reduction.[18] A secondary palsy after manipulation is widely treated as an indication for exploration and fixation, because the nerve may be entrapped in the fracture.[19]
Part IV - Associated Injuries, Assessment, and Imaging
Beyond the radial nerve, the shaft fracture can carry a vascular (brachial artery) injury, and the combination of an ipsilateral humeral and forearm fracture is the unstable “floating elbow,” a high-energy pattern best managed by fixing all the fractured components to allow early mobilisation.[20] Assessment therefore demands a complete neurovascular examination, with the radial nerve examined specifically. Imaging is two orthogonal radiographs that include the shoulder and the elbow to exclude fracture extension or an associated joint injury, with CT reserved for suspected intra-articular extension.[21]
Part V - Non-operative Treatment: The Mainstay
5.1 Why it works, and how
Acute, closed, isolated humeral shaft fractures in cooperative, ambulatory patients heal non-operatively with good function in the great majority. Union rates across the functional-bracing literature average about 94-95%.[22] The sequence is to apply a temporary immobilisation first, a coaptation (U-) slab, a hanging arm cast, or a sling-and-swathe / Velpeau bandage, for the first one to two weeks until the acute pain and swelling settle, then convert to a Sarmiento functional brace.[23] The functional brace, described by Sarmiento in 1977, is a prefabricated two-part thermoplastic sleeve tightened with Velcro straps. It works by hydraulic soft-tissue compression: the snug sleeve squeezes the muscle envelope to splint the bone while allowing active use of the shoulder, elbow, and hand. Sarmiento’s large series reported a nonunion rate of only 2.6% (1.5% in closed fractures).[24] The hanging cast must be supervised, because if left unchecked it can distract the fracture and cause nonunion.[25]
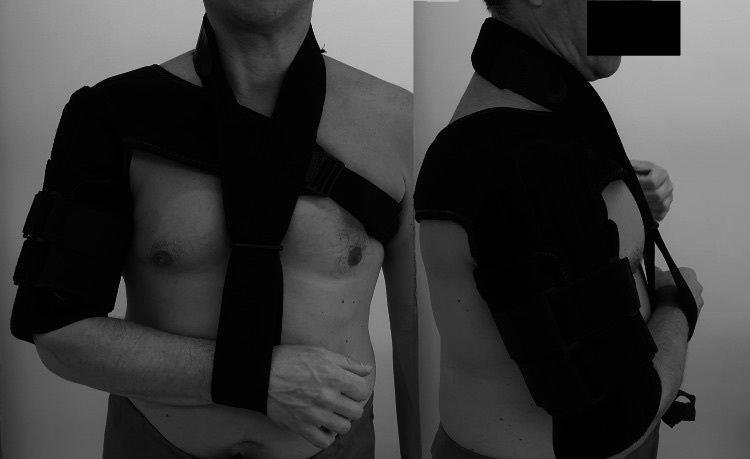
Figure 8. A functional (Sarmiento-type) humeral brace: a two-part sleeve that splints the fracture by hydraulic soft-tissue compression while allowing joint motion. From Arealis et al. (2021), Cureus 13(5):e14852, PMC8174392, CC BY 4.0.
5.2 Acceptable alignment
The radiographic limits within which a fracture may be accepted for non-operative care are examinable, and the two source texts give slightly different sets. Sarmiento’s outcome data found that up to about 20° of anterior-posterior angulation and 15° of varus were well tolerated. The AO and operative-indication figures are angulation under 20° (anterior) and 30° (varus), rotation under 30-40°, and shortening under about 3 cm (up to 5 cm has been reported as acceptable, but 2-3 cm is the practical limit for most active patients).[26] Deformity beyond these limits, or a patient unwilling to accept a visible deformity, shifts the balance toward surgery. Recent work adds a caution: shoulder external rotation is lost in a substantial minority after bracing (a rotational malunion), so the brace should be applied early.[27]
Part VI - Operative Treatment
6.1 Indications
Surgery is indicated for the fracture or patient that does poorly in a brace: an open fracture, a vascular injury, a floating elbow or other ipsilateral-arm injury, polytrauma, bilateral fractures, a segmental or pathological fracture, failure to hold an acceptable reduction, a secondary radial nerve palsy after closed reduction, and a brachial plexus injury, with the transverse and proximal-third patterns (higher nonunion) and the obese or large-breasted patient as relative indications.[28]
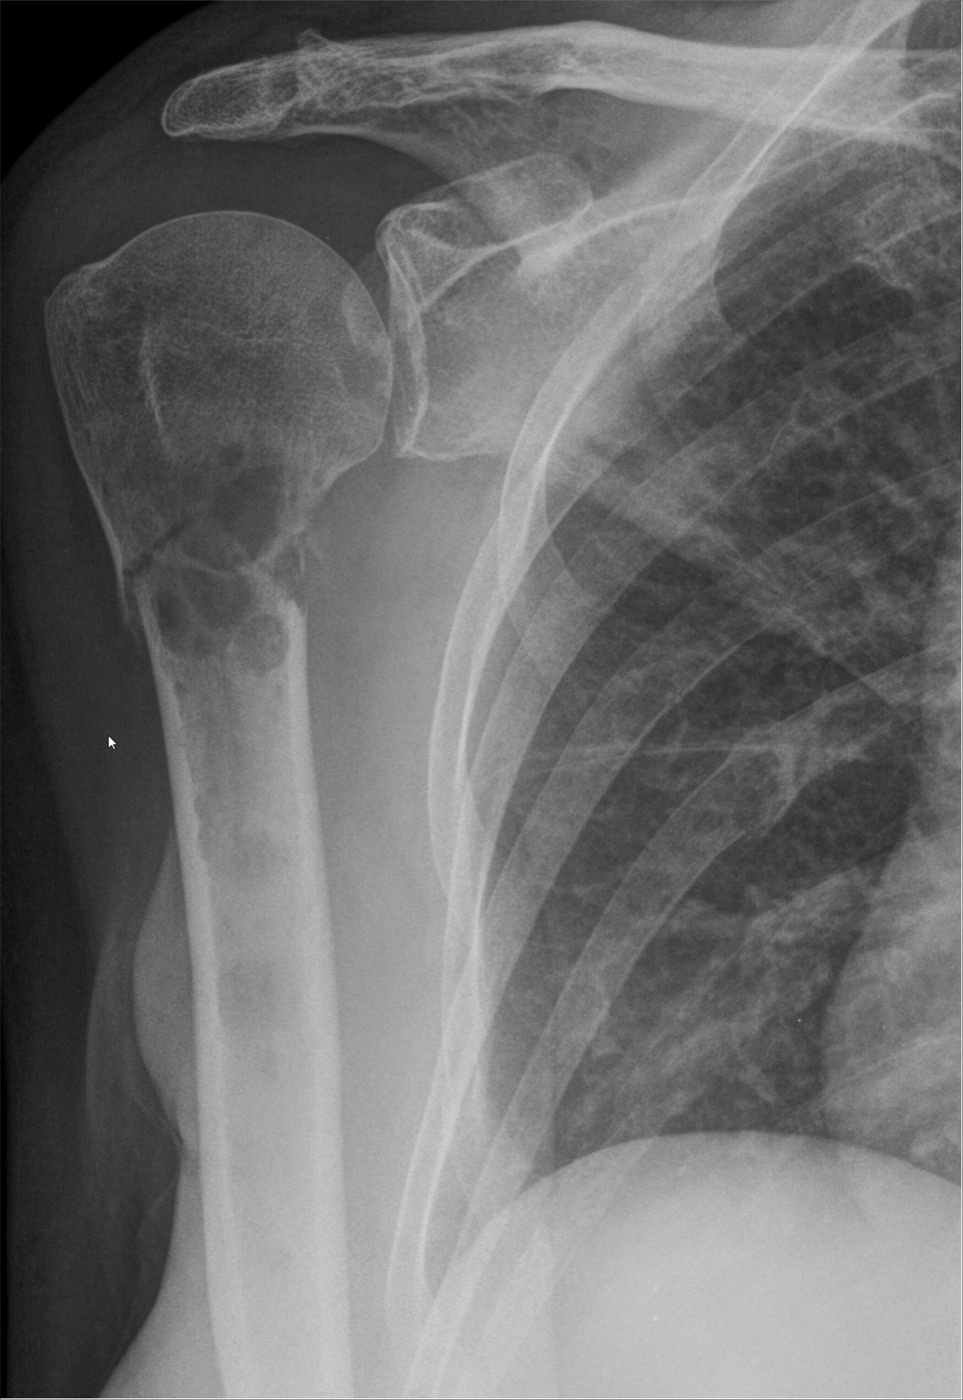
Figure 9. Pathological humeral fracture through osteolytic metastatic breast carcinoma, an operative indication. Source: Hellerhoff, via Wikimedia Commons, CC BY-SA 4.0.
6.2 The plate-versus-nail question
When surgery is chosen, the two options are open compression plating and intramedullary nailing, and the weight of evidence favours plating. Open reduction and compression plating is the surgical gold standard: a 4.5 mm dynamic compression (or low-contact) plate, at least eight holes long with three to four screws (six to eight cortices) each side, applied through an anterolateral approach for proximal and middle fractures or a posterior approach for distal fractures, with deliberate identification and protection of the radial nerve. Union rates exceed 95% and the iatrogenic radial nerve palsy rate is about 2-5%.[29] Intramedullary nailing (usually antegrade, through the rotator cuff, or retrograde) is a load-sharing splint useful for segmental, pathological, and osteoporotic fractures, but its drawback is shoulder morbidity: antegrade nailing damages the cuff and causes impingement and shoulder pain. Meta-analyses consistently find that nailing produces more shoulder problems and more reoperations than plating (one analysis reporting revision 18% versus 6%, and shoulder complaints 21% versus 1%), which is why plating is now preferred and performed in the large majority of operative cases.[30]
The fracture pattern dictates the mode of plating, following the general principles. A simple (type A) fracture is fixed with absolute stability (a lag screw through the plate, or axial compression), whereas a multifragmentary (type C) fracture is bridge-plated for relative stability, leaving the comminuted zone undisturbed.[31] Minimally invasive plate osteosynthesis (MIPO), through small proximal and distal incisions, reduces soft-tissue stripping but demands respect for the radial-nerve danger zone (and is contraindicated if there is a pre-operative radial nerve palsy). External fixation is reserved for damage control and contaminated open fractures.[32]
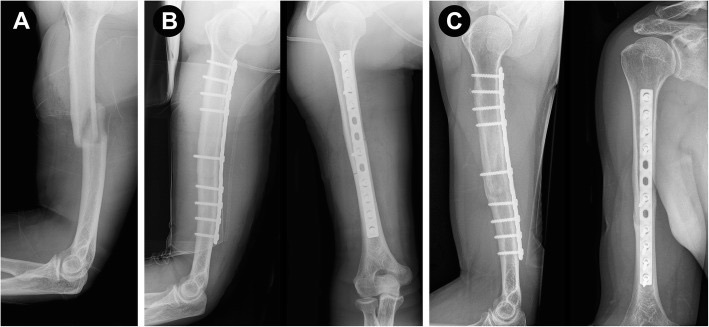
Figure 10. Humeral shaft fracture treated by open reduction and compression-plate fixation (a long limited-contact dynamic compression plate), pre- and post-operative views. From BMC Musculoskeletal Disorders 2019;20:527, PMC6844056, CC BY 4.0.
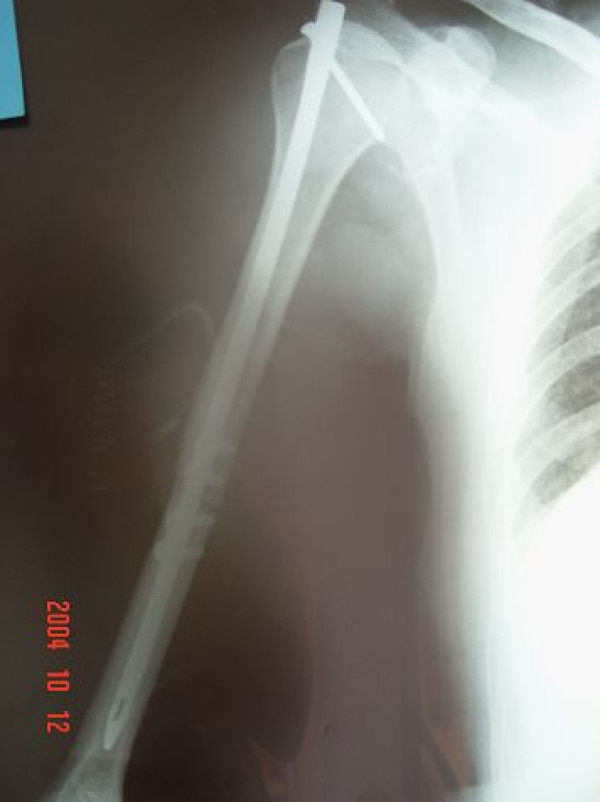
Figure 11. Humeral shaft fracture treated by antegrade intramedullary nailing. From Kazakos et al. (2009), Cases J 2:9075, PMC2803872, CC BY 2.0.
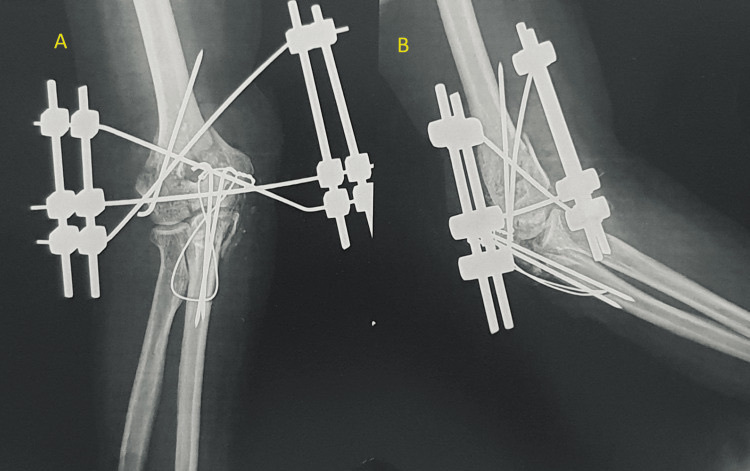
Figure 12. An external fixator applied to the humerus/elbow for an open fracture, used for damage control and contaminated injuries. From Phalak et al. (2024), Cureus 16(8):e66460, PMC11380531, CC BY 4.0.
Part VII - Complications
The chief complication is nonunion, occurring in roughly 1-10% of non-operatively treated and 10-15% of operatively treated fractures. The higher surgical figure reflects that difficult fractures are the ones operated on. Risk factors are a transverse pattern, the proximal third, distraction (an unsupervised hanging cast), comminution, obesity, smoking, and an AO type-A pattern.[33] Most humeral shaft nonunions are atrophic, and the best-evidence treatment is open reduction with a compression plate and autologous bone graft.[34] Other complications are the radial nerve palsy already discussed (iatrogenic palsy after plating around 2-5%, higher again when operating on a nonunion), infection (uncommon, given the good soft-tissue envelope), and malunion. Malunion is usually well tolerated, though a rotational malunion costs shoulder external rotation.[35]
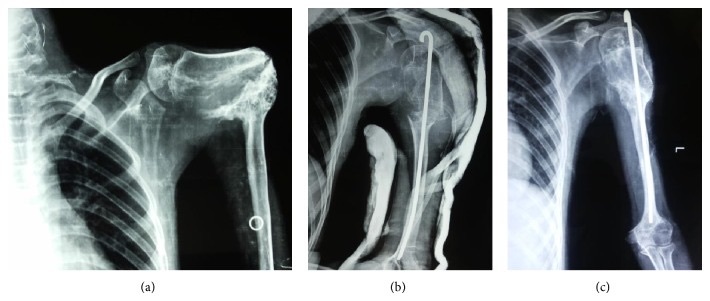
Figure 13. Hypertrophic nonunion of the humeral shaft (left), treated to union by fixation (right). From Magu et al. (2014), Case Rep Orthop 2014:854349, PMC4266758, CC BY.
Part VIII - A Synthesis: How to Reason Through the Humeral Shaft Fracture
For most patients the humeral shaft fracture is among the simplest decisions in orthopaedic trauma: a forgiving, non-weight-bearing bone in a sleeve of muscle that splints it, treated by a temporary slab and then a functional brace, healing in about 90-95% of cases with a deformity the shoulder and elbow will hide. Two things complicate that picture: the radial nerve, and the small group of fractures that will not do well in a brace. For the nerve, examine it before and after any reduction, observe a primary palsy in a closed fracture (because most recover), and explore early only for the open, vascular, penetrating, floating-elbow, or secondary-palsy situations. For the fracture, recognise the indications for surgery and, when operating, prefer the plate (the gold standard) over the nail (which troubles the shoulder), matching the mode of plating to the pattern: absolute stability for the simple fracture, bridging for the comminuted one. Put briefly, trust the brace, watch the nerve, and when you must operate, plate it.
References
-
Rockwood & Green’s Fractures in Adults, p.2052.
-
Rockwood & Green’s Fractures in Adults, pp.2052-2053.
-
Rockwood & Green’s Fractures in Adults, pp.2052-2053.
-
AO Principles of Fracture Management, p.627. (The mined Rockwood extract names throwing injuries and twisting falls as causes but does not spell out the direct-transverse versus torsional-spiral pattern correlation; the AO text supplies the baseball/arm-wrestling spiral mechanism.)
-
Rockwood & Green’s Fractures in Adults, p.2068.
-
Rockwood & Green’s Fractures in Adults, p.2061; AO Principles of Fracture Management, p.629. (The 12-A/B/C types and “12A1 simple spiral” are in the sources; the A1 spiral / A2 oblique / A3 transverse subgroup labels are the standard AO subdivision, presented in the Rockwood figure rather than its transcribed text.)
-
AO Principles of Fracture Management, pp.633, 635, 639.
-
Rockwood & Green’s Fractures in Adults, pp.2061-2062.
-
Rockwood & Green’s Fractures in Adults, p.2055; AO Principles of Fracture Management, p.629.
-
Rockwood & Green’s Fractures in Adults, p.2055; AO Principles of Fracture Management, p.629.
-
Rockwood & Green’s Fractures in Adults, p.2068; p.1095.
-
Rockwood & Green’s Fractures in Adults, p.2068; p.1095; AO Principles of Fracture Management, p.628.
-
Rockwood & Green’s Fractures in Adults, p.2068; p.1095; AO Principles of Fracture Management, p.628.
-
Rockwood & Green’s Fractures in Adults, p.2053; p.1095 (Shao et al.: 11.8%).
-
Rockwood & Green’s Fractures in Adults, p.1095 (~70% spontaneous recovery, axonotmesis; onset mean 7 weeks, full recovery mean 6 months); AO Principles of Fracture Management, p.640 (closed injury “almost always a neurapraxia”; >95% recover). The commonly taught figure that 70-90% of these palsies are neurapraxias that recover is standard teaching; the two mined sources differ on the lesion grade and recovery rate, and both are reported here.
-
Rockwood & Green’s Fractures in Adults, p.2071.
-
Rockwood & Green’s Fractures in Adults, pp.2054-2055.
-
Rockwood & Green’s Fractures in Adults, pp.1096, 2055; AO Principles of Fracture Management, pp.629, 640.
-
Rockwood & Green’s Fractures in Adults, p.2127; AO Principles of Fracture Management, p.629 (secondary radial nerve injury is an absolute indication for osteosynthesis).
-
Rockwood & Green’s Fractures in Adults, pp.2058-2060.
-
Rockwood & Green’s Fractures in Adults, pp.2059-2061; AO Principles of Fracture Management, p.627.
-
Rockwood & Green’s Fractures in Adults, pp.2070-2071, 2073; AO Principles of Fracture Management, p.629.
-
Rockwood & Green’s Fractures in Adults, pp.2071-2072.
-
Rockwood & Green’s Fractures in Adults, pp.2072-2073.
-
Rockwood & Green’s Fractures in Adults, p.2072.
-
Rockwood & Green’s Fractures in Adults, pp.2073, 2075; AO Principles of Fracture Management, p.629.
-
Rockwood & Green’s Fractures in Adults, pp.2073-2074.
-
Rockwood & Green’s Fractures in Adults, pp.2074-2076; AO Principles of Fracture Management, p.629.
-
Rockwood & Green’s Fractures in Adults, pp.2082-2087; AO Principles of Fracture Management, pp.630, 639 (plate length and fixation), p.640 (plating union 92-98%, infection <1%, iatrogenic radial palsy 3%).
-
Rockwood & Green’s Fractures in Adults, pp.2113-2115, 2127; AO Principles of Fracture Management, p.641.
-
AO Principles of Fracture Management, pp.633, 635, 639.
-
Rockwood & Green’s Fractures in Adults, pp.2087-2092, 2111-2113; AO Principles of Fracture Management, pp.635-637.
-
Rockwood & Green’s Fractures in Adults, p.2120.
-
Rockwood & Green’s Fractures in Adults, pp.2121-2123.
-
Rockwood & Green’s Fractures in Adults, pp.2122, 2126-2127.
-
Rockwood & Green’s Fractures in Adults, pp.2070-2073; AO Principles of Fracture Management, p.629.
-
Rockwood & Green’s Fractures in Adults, pp.1095, 2068; AO Principles of Fracture Management, p.628.
-
Rockwood & Green’s Fractures in Adults, p.2055.
-
Rockwood & Green’s Fractures in Adults, pp.1095-1096, 2071; AO Principles of Fracture Management, p.640.
-
Rockwood & Green’s Fractures in Adults, pp.1096, 2055, 2127; AO Principles of Fracture Management, p.629.
-
Rockwood & Green’s Fractures in Adults, pp.2073, 2075; AO Principles of Fracture Management, p.629.
-
Rockwood & Green’s Fractures in Adults, pp.2072-2073.
-
Rockwood & Green’s Fractures in Adults, pp.2074-2076; AO Principles of Fracture Management, p.629.
-
Rockwood & Green’s Fractures in Adults, pp.2113-2115; AO Principles of Fracture Management, pp.640-641.
-
AO Principles of Fracture Management, pp.633, 635, 639.
-
Rockwood & Green’s Fractures in Adults, pp.2120-2123.
-
Rockwood & Green’s Fractures in Adults, pp.2087-2092; AO Principles of Fracture Management, pp.635-637.