Contents
- Orientation
- Part I - The Framework: Internervous Planes and the Surgical Anatomy of the Spine
- Part II - Surgical Anatomy of the Cervical Region
- Part III - Anterior Approach to the Cervical Spine
- Part IV - Posterior Approaches to the Cervical Spine
- Part V - Approaches to the Thoracic Spine
- Part VI - Posterior Approach to the Lumbar Spine
- Part VII - Anterior and Anterolateral Approaches to the Lumbar Spine
- Part VIII - Posterior Approach for Scoliosis and Rib Excision
- References
Orientation
This is the first topic of the konspekt’s third part, the surgical anatomy and operative approaches, and what it demands differs from the fracture topics. The examiner wants to know whether a candidate can take a scalpel safely from skin to spine: which plane to develop, which named nerve or vessel sits at each depth, how the patient is positioned, and how the exposure is extended. Hoppenfeld builds the whole subject on one organising idea, the internervous plane, the interval between two muscles supplied by different nerves, which can be opened without denervating either. Where no true internervous plane exists, as in much of the spine, safety comes instead from staying in the bloodless midline or from respecting the segmental innervation of the paraspinal muscles.[1]
The konspekt title gives the cervical region special weight, and rightly so. The anterior cervical approach is the one where a single misplaced retractor injures the recurrent laryngeal nerve, the carotid sheath or the oesophagus, and where understanding the three fascial layers of the neck is the whole key to a safe dissection.[2] Each approach below is set out the same way: its uses, the position, the landmarks and incision, the internervous plane, the superficial and deep dissection, the dangers, and how to enlarge it. A Bulgarian glossary and a viva appendix close the document.
Part I - The Framework: Internervous Planes and the Surgical Anatomy of the Spine
Every approach in this chapter follows either a posterior or an anterior logic. The posterior approaches (to the cervical, thoracic and lumbar spine, and the scoliosis exposure) all exploit the same truly internervous midline plane: the paraspinal muscles of the two sides are supplied segmentally by the posterior primary rami, and because no nerve crosses the midline, a midline incision through the ligamentum nuchae and the supraspinous ligament denervates nothing and crosses no major vessel.[3] That is why the posterior midline approach can, in theory, be carried from the occiput to the coccyx. The price is that it reaches only the posterior elements (spinous processes, laminae, facets, pedicles) and, through them, the canal and the disc, never the front of the vertebral body.
The anterior approaches have no such tidy internervous plane. The anterior cervical approach works between two structures rather than two muscles, the visceral column medially and the carotid sheath laterally; the anterior lumbar approaches pass through or behind the peritoneum to mobilise the great vessels off the front of the spine; and the thoracic approaches lack an internervous plane altogether and bleed accordingly.[4] What they buy is direct access to the vertebral body for corpectomy, interbody fusion, deformity correction and decompression of anterior compression.
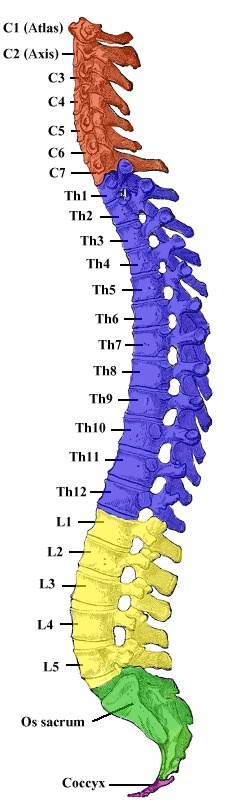
Figure 1. The vertebral column in lateral view, colour-coded into cervical, thoracic, lumbar, sacral and coccygeal regions with each level labelled. Gray’s Anatomy (1918), public domain, via Wikimedia Commons.
The danger structures recur region by region. In the cervical spine the structures to protect are the recurrent laryngeal nerve, the vertebral artery, the sympathetic chain and the cord; in the thoracic spine, the segmental vessels (and through them the cord’s blood supply), the pleura and the great vessels; in the lumbar spine, posteriorly the dura and nerve roots, anteriorly the great vessels, the ureter and the superior hypogastric plexus.[5]
Part II - Surgical Anatomy of the Cervical Region
Because the konspekt singles out the cervical region, its surgical anatomy deserves a section of its own. Everything turns on the arrangement of the deep cervical fascia into three layers, since the anterior approach is essentially a journey through them.[6] The investing layer surrounds the neck like a collar, splitting to enclose the sternocleidomastoid and the trapezius, and joining the ligamentum nuchae behind; the only structures superficial to it are the platysma and the external jugular vein. The pretracheal layer invests the strap muscles and runs from the hyoid into the chest. Its decisive property is that it is continuous with the carotid sheath, so dividing it on the medial border of the sheath is what lets the surgeon swing the sheath laterally and the visceral column medially. The prevertebral layer is a tough membrane over the prevertebral muscles, and on its surface runs the cervical sympathetic trunk, lying roughly over the transverse processes.[7]
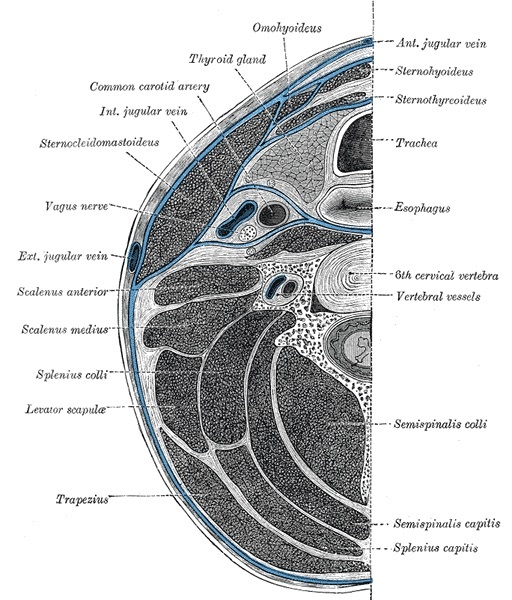
Figure 2. Transverse section of the neck at the sixth cervical vertebra: the sternocleidomastoid and carotid sheath (common carotid artery, internal jugular vein, vagus nerve) laterally, and the strap muscles, thyroid, trachea and oesophagus medially. This is the plane developed in the anterior cervical approach. Gray’s Anatomy (1918), public domain, via Wikimedia Commons.
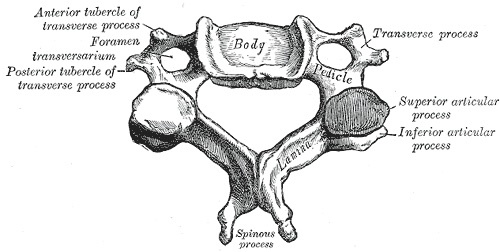
Figure 3. A typical cervical vertebra seen from above, showing the body, the foramen transversarium (transmitting the vertebral artery), the transverse-process tubercles, the pedicle, lamina, articular processes and spinous process. Gray’s Anatomy (1918), public domain, via Wikimedia Commons.
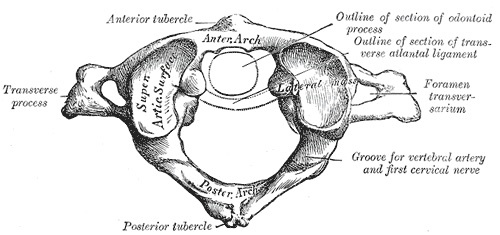
Figure 4. The atlas (C1) from above, showing the anterior and posterior arches, the lateral masses, the foramina transversaria and the groove on the posterior arch for the vertebral artery. Gray’s Anatomy (1918), public domain, via Wikimedia Commons.
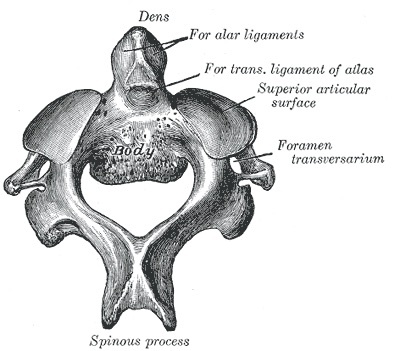
Figure 5. The axis (C2), showing the odontoid process (dens) with its facets for the alar and transverse ligaments. Gray’s Anatomy (1918), public domain, via Wikimedia Commons.
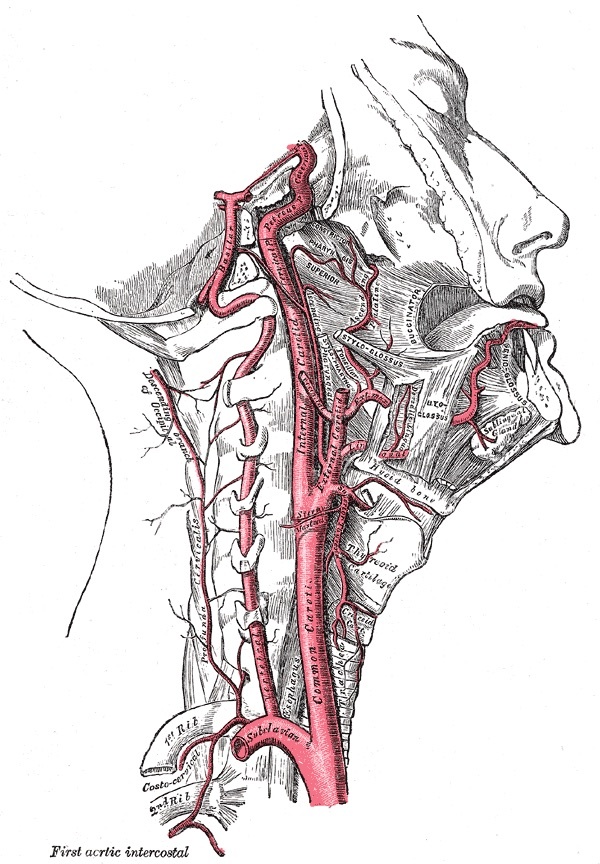
Figure 6. The internal carotid and vertebral arteries (right side); the vertebral artery ascends through the foramina transversaria of the cervical vertebrae. Gray’s Anatomy (1918), public domain, via Wikimedia Commons.
The visceral column retracted medially comprises the thyroid gland, the trachea and the oesophagus, with the strap muscles (sternohyoid and sternothyroid) investing them; the cricoid ring, the only complete tracheal ring, lies opposite C6.[8] The vertebral artery, which supplies the hindbrain, ascends through the foramina transversaria, lying anterior to the spinal nerve and well anterior to the posterior facet joints, so it stays hidden during a correctly midline approach. Posteriorly, the suboccipital region carries the four small suboccipital muscles (rectus capitis posterior major and minor, obliquus capitis superior and inferior), all supplied by the suboccipital nerve (the posterior ramus of C1). Here the vertebral artery loops over the posterior arch of the atlas before piercing the posterior atlanto-occipital membrane to enter the canal, the point at which it is most vulnerable.[9]
The posterior cervical muscles lie in three layers worth knowing for the posterior approach: the trapezius superficially (an upper-limb muscle on the spinal accessory nerve), the splenius capitis in the intermediate layer, and a deep layer that subdivides into the semispinalis capitis, semispinalis cervicis and the multifidus and rotators.[10]
Part III - Anterior Approach to the Cervical Spine
The anterior approach exposes the vertebral bodies and discs from C3 to T1 and is the workhorse for anterior cervical discectomy and fusion, corpectomy, osteophyte and tumour removal, biopsy, drainage and fracture fixation.[11] The patient lies supine with an interscapular roll to extend the neck, the head turned away, the table tilted up 30 degrees to reduce venous bleeding, and halter traction available. The level is judged from the surface landmarks (hyoid C3, thyroid cartilage C4-5, cricoid and carotid tubercle C6) and confirmed radiologically; a transverse skin-crease incision runs from the midline obliquely to the posterior border of the sternocleidomastoid, which heals cosmetically along the skin lines.
The side of approach is a classic examination point. The right recurrent laryngeal nerve is more vulnerable than the left because, low in the neck, it crosses from lateral to medial to reach the trachea, and it is occasionally aberrant (non-recurrent) on the right, crossing the field at the level of the thyroid gland. Many surgeons therefore prefer a left-sided approach, while others simply approach from the side of the pathology.[12] There is no true internervous plane. Superficially the platysma is split (it is supplied high up by the facial nerve, so this is harmless); more deeply the plane lies between the sternocleidomastoid (spinal accessory nerve) and the strap muscles (segmental C1-C3); and in the depth between the paired longus colli muscles (segmental C2-C7).[13]
The superficial dissection divides the platysma, opens the investing fascia along the anterior border of the sternocleidomastoid, retracts the muscle and carotid sheath laterally and the strap muscles, trachea and oesophagus medially, then divides the pretracheal fascia on the medial side of the sheath; the superior and inferior thyroid arteries tether this plane and may need ligation.[14] The deep dissection splits the longus colli in the midline with cautery, elevates it subperiosteally together with the anterior longitudinal ligament, confirms the level with a needle and radiograph, and places retractors under the medial edge of the longus colli to protect the deep structures.
The dangers are the heart of this approach. The recurrent laryngeal nerve matters most, protected by keeping retractors under the medial edge of the longus colli; its injury causes hoarseness and a weak voice.[15] The superior laryngeal nerve runs with the superior thyroid vessels and must be spared when they are divided. The sympathetic chain lies on the anterolateral longus colli over the transverse processes, so dissection stays subperiosteal and midline to avoid a Horner syndrome (ptosis, miosis, anhidrosis). The carotid sheath is protected by the sternocleidomastoid and must never have a self-retaining retractor placed against it. The vertebral artery stays safe as long as the plane does not stray laterally onto the transverse processes, and correct retractor placement protects the oesophagus and trachea; the thoracic duct is at risk in low left-sided approaches (standard teaching). The approach cannot be formally extended, though the incision can be shifted or made longitudinal along the sternocleidomastoid for a wider exposure.[16]
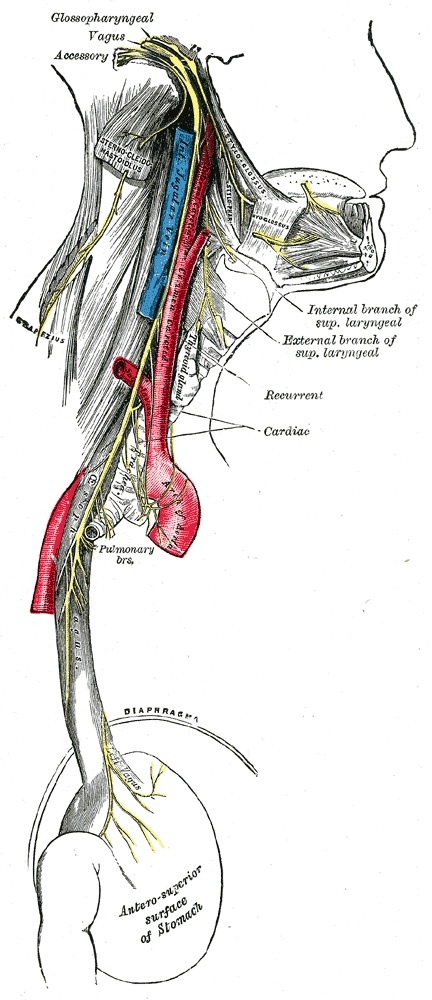
Figure 7. Course of the vagus nerve in the neck and thorax, showing the superior laryngeal and recurrent laryngeal branches. The left recurrent nerve loops under the aortic arch and the right under the right subclavian artery; the right ascends at a higher level and crosses from lateral to medial low in the neck, making it the more vulnerable in the anterior cervical approach. Gray’s Anatomy (1918), public domain, via Wikimedia Commons.
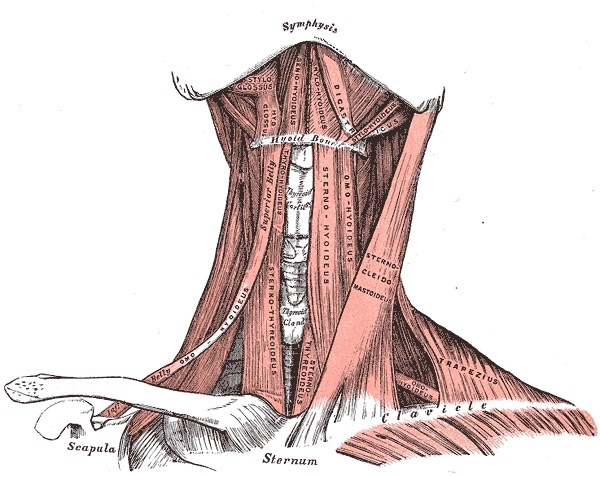
Figure 8. Anterior view of the muscles of the neck, showing the sternocleidomastoid and the strap (infrahyoid) muscles that bound the midline corridor of the anterior cervical approach. Gray’s Anatomy (1918), public domain, via Wikimedia Commons.
Part IV - Posterior Approaches to the Cervical Spine
The midline posterior approach is the most commonly used cervical exposure, giving quick, safe access to the posterior elements for fusion, laminectomy or laminoplasty, tumour, facet-dislocation reduction, root exploration and fracture fixation.[17] The patient lies prone with the head in slight flexion to open the interspinous spaces and fixed in Mayfield tongs (which also protect the eyes and free the airway); a seated position reduces venous bleeding but risks air embolism. The spinous processes serve as landmarks (C2, C7 and T1 are the largest and most palpable), and because the levels are small and crowded, a needle marker and radiograph confirm the level before incision. The internervous plane is the midline between the paracervical muscles of the two sides, supplied segmentally by the posterior rami.[18]
The dissection runs through the nuchal ligament and strips the paraspinal muscles subperiosteally off the spinous processes and laminae, unilaterally for a disc or bilaterally for a fusion, exposing the laminae and facet joints; the ligamentum flavum is then removed off the leading edge of the inferior lamina to reach the blue-white dura.[19] The dangers are the cord and nerve roots (never retract the cord; remove enough bone to avoid the need), the plentiful thin-walled epidural venous plexus (controlled with bipolar or Malis cautery), and the vertebral artery, which is safe within its transverse foramen unless the transverse process has been destroyed by tumour, infection or trauma. In the midline the approach is highly extensile, from the occiput to the coccyx.[20]
The posterior approach to the C1-C2 space is a variant for atlantoaxial fusion, decompression, tumour and fracture stabilisation. The patient lies prone with the neck flexed to separate the occiput from the atlas; the external occipital protuberance serves as the upper landmark, since C2’s spinous process is palpable only as a resistance and C1 has no spinous process at all.[21] Dissection cuts down on the large C2 spinous process and works proximally onto the posterior tubercle of C1 and the occiput; the facets of C1-C2 lie about an inch more anterior than those of C2-C3, so finding the C1 ring requires a deliberately deep dissection. Two dangers stand out here: the cord (retraction can be fatal from respiratory paralysis) and the vertebral artery, which loops over the superior border of the posterior arch of C1 lateral to the midline and pierces the posterior atlanto-occipital membrane at its lateral angle, the point of maximal vulnerability. Dissection on the C1 ring therefore stays close to the midline (standard teaching limits it to about 1.5 cm lateral in the adult). The greater and third occipital nerves cross the field laterally and are spared by staying midline.[22]
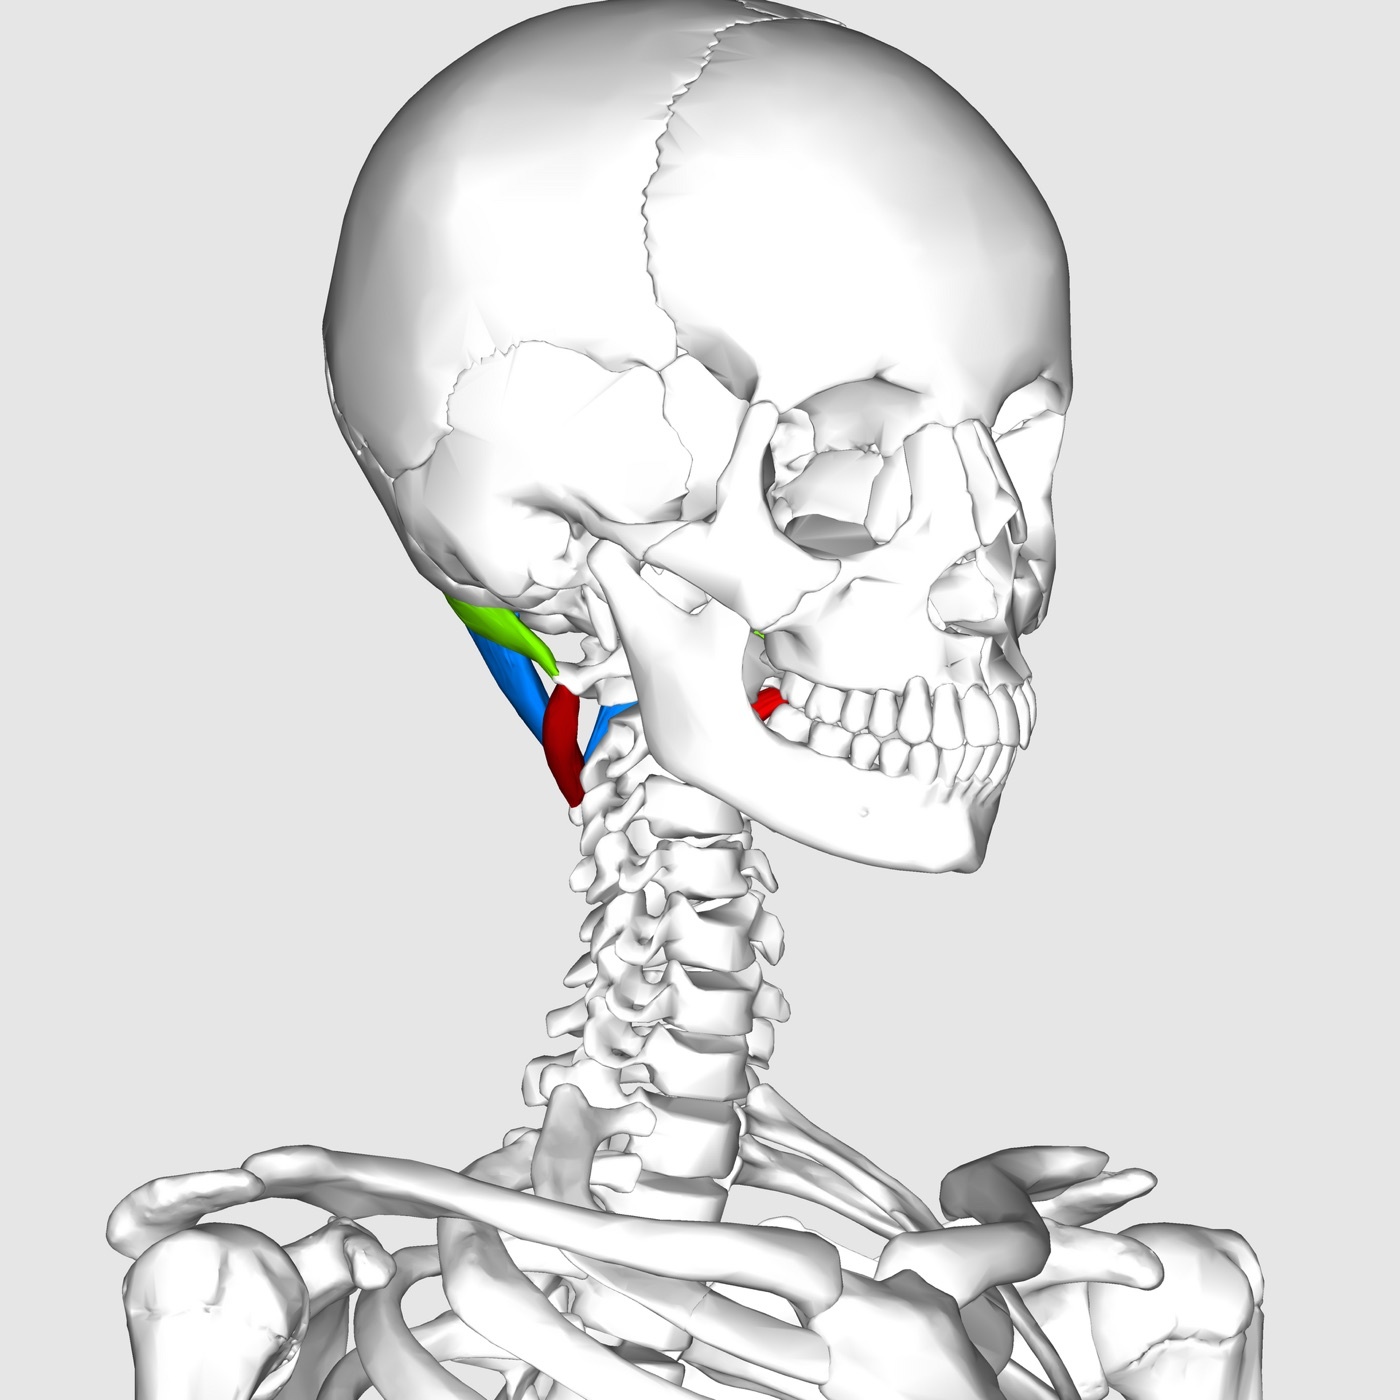
Figure 9. The suboccipital muscles, which bound the suboccipital triangle: obliquus capitis superior (green), rectus capitis posterior major (blue) and obliquus capitis inferior (red); the vertebral artery loops over the posterior arch of the atlas within this region. Anatomography (BodyParts3D, DBCLS), CC BY-SA 2.1 jp, via Wikimedia Commons.
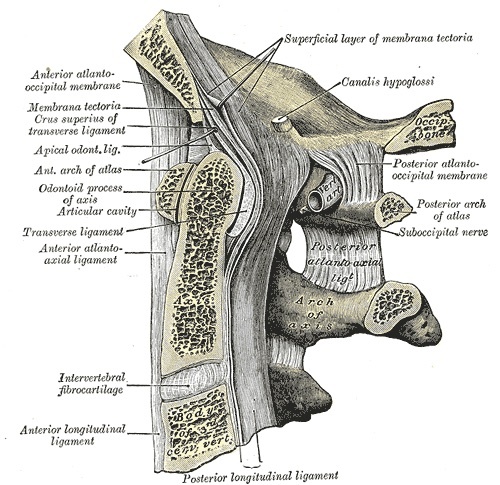
Figure 10. Median sagittal section through the occiput and the upper three cervical vertebrae, showing the craniocervical (occipito-atlanto-axial) ligaments, the dens and the tectorial membrane. Gray’s Anatomy (1918), public domain, via Wikimedia Commons.
Part V - Approaches to the Thoracic Spine
Two approaches give access to the thoracic spine, and they sit at opposite poles. The posterolateral (costotransversectomy) approach is extrapleural. Because it does not enter the chest, it suits limited exposures in high-risk patients, and it was first developed for draining tuberculous abscesses; against this it offers a poorer exposure than a formal thoracotomy.[23] The patient lies prone with bolsters along the rib cage, the incision curves about 8 cm lateral to the spinous process over the involved rib, and there is no internervous plane (the trapezius is split and the segmentally innervated paraspinals are cut). The rib to be resected is dissected subperiosteally, divided 6 to 8 cm from the midline and its medial end twisted out, the costotransverse ligament and transverse process are removed, and the retropleural space is entered by blunt dissection to reach the vertebral body. The dangers are the dura (close any leak), the segmental intercostal vessels (which lie on the inferior border of the rib), and the pleura (a breach causes a pneumothorax needing a chest tube).[24]
The anterior (transthoracic) approach gives unrivalled exposure of the vertebral bodies from T2 to T12 but is reserved for major anterior work (corpectomy, deformity, infection, decompression) and is best done with a thoracic surgeon.[25] The patient lies in the lateral decubitus position with an axillary pad, and the side matters. A right-sided approach is preferred because it avoids the aortic arch and the aorta, and avoids having to ligate both sets of segmental arteries (at the thoracolumbar junction a left-sided approach is often preferred, standard teaching). The chest is entered through the fifth intercostal space (or the sixth for T10-T12), dividing latissimus dorsi and serratus anterior and entering the pleura above the rib to spare the intercostal nerve and vessels that run along its lower border. The lung is deflated and retracted, the pleura incised lateral to the oesophagus, which is mobilised with Penrose drains, and the segmental vessels ligated.[26]
The cardinal danger of the transthoracic approach is spinal cord ischaemia. Because the cord’s segmental blood supply varies, no more than two sequential segmental (intercostal) vessels should be ligated close to the vertebral bodies; ligating them more laterally, near the aorta, is held to preserve the collateral supply (standard teaching).[27] The named feeder behind this rule is the artery of Adamkiewicz (the great anterior radicular artery, usually arising on the left between T8 and L1, standard teaching). The intercostal vessels are vulnerable both during rib resection and during the vertebral exposure; the lung is re-expanded every 30 minutes and fully before closure. To reach the thoracolumbar junction the diaphragm is taken down and the arcuate ligament removed from the transverse process of L1, after which the diaphragm is reattached.[28]
Part VI - Posterior Approach to the Lumbar Spine
The posterior approach is the commonest lumbar exposure, giving access to the cauda equina, the discs and the posterior elements for discectomy, root exploration, decompression, fusion and tumour.[29] The patient lies prone on bolsters that keep the abdomen free, which drains the vertebral venous plexus into the inferior vena cava and reduces bleeding, with meticulous padding (the eyes must not be dependent, to avoid postoperative blindness; the ulnar, median and common peroneal nerves and the brachial plexus are protected); hips are flexed for decompression to open the interlaminar space, or neutral for fusion to preserve lordosis. The level is gauged from the line between the iliac crests (the L4-5 interspace), but this is only a rough guide, so a needle radiograph or identification of the sacrum confirms it.[30] The internervous plane is the midline between the two erector spinae masses, segmentally supplied by the posterior rami.
The dissection strips the paraspinal muscles subperiosteally off the spinous processes and laminae as a single mass with a Cobb elevator, extending laterally over the mamillary process onto the transverse processes when a posterolateral fusion is planned; the ligamentum flavum is removed off the leading edge of the inferior lamina to reach the epidural fat and the blue-white dura, and the canal is entered by staying lateral to the dura and retracting it and the root medially.[31] The minimally invasive version splits the segmentally innervated erector spinae with dilating tubes (the muscle-sparing plane is the Wiltse multifidus-longissimus interval, standard teaching) and has become the modern route for a single-level disc or root decompression, at the cost of a higher dural-tear rate.
The dangers posteriorly are the dura and nerve roots (a thin spatula protects the dura as the ligamentum flavum is taken; the cardinal rule is to remove bone rather than over-retract), the thin-walled epidural venous plexus, and the segmental vessels with the posterior primary rami that run together between the transverse processes near the facet, which is why dissection stays midline where no vessel crosses.[32] An instrument passed through the anterior annulus can injure the iliac vessels lying on the front of the body. Two points of applied anatomy belong in the viva: the ligamentum flavum (the key deep structure, paired and meeting but not fusing in the midline) and the root rule that the nerves exit beneath their pedicle. The high-yield clinical extension, that a paracentral disc compresses the traversing root while a foraminal disc compresses the exiting root, is standard teaching.[33]
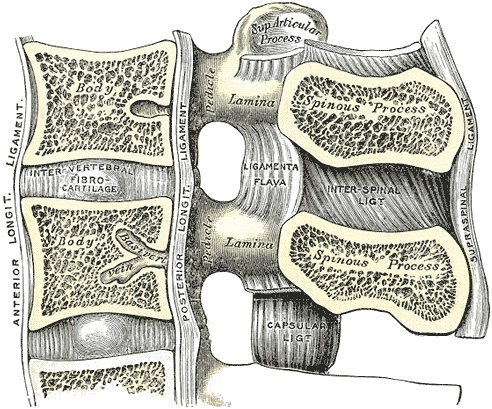
Figure 11. Median sagittal section of two lumbar vertebrae and their ligaments, showing the intervertebral disc, the anterior and posterior longitudinal ligaments, the ligamenta flava and the interspinous and supraspinous ligaments. Gray’s Anatomy (1918), public domain, via Wikimedia Commons.
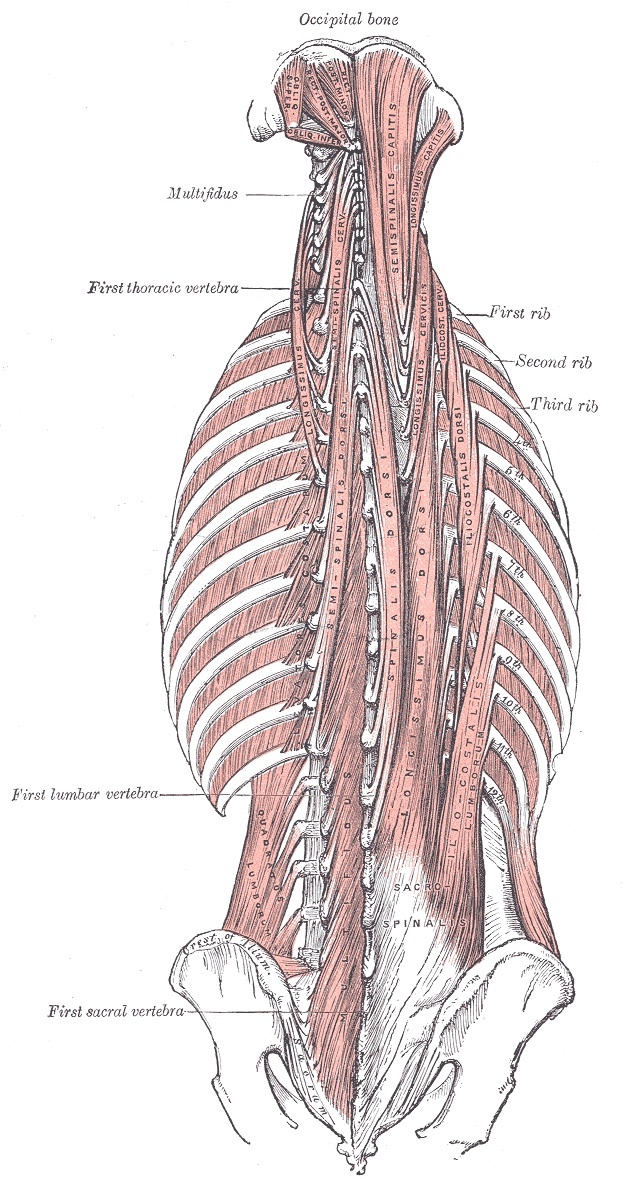
Figure 12. The deep paraspinal musculature of the posterior trunk: the erector spinae (iliocostalis, longissimus, spinalis), semispinalis and multifidus. The posterior midline approach strips these segmentally innervated muscles off the posterior elements. Gray’s Anatomy (1918), public domain, via Wikimedia Commons.
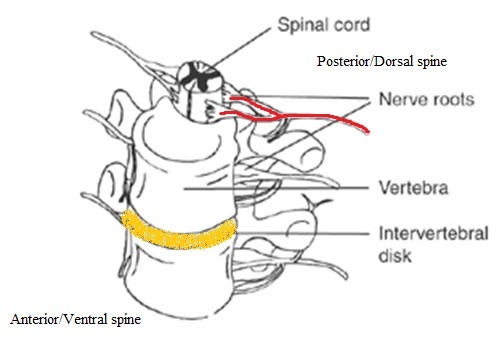
Figure 13. Diagram of a lumbar motion segment showing the nerve roots and their relationship to the vertebra and intervertebral disc; the exiting root passes beneath its pedicle. Page tfw, CC BY-SA 3.0, via Wikimedia Commons.
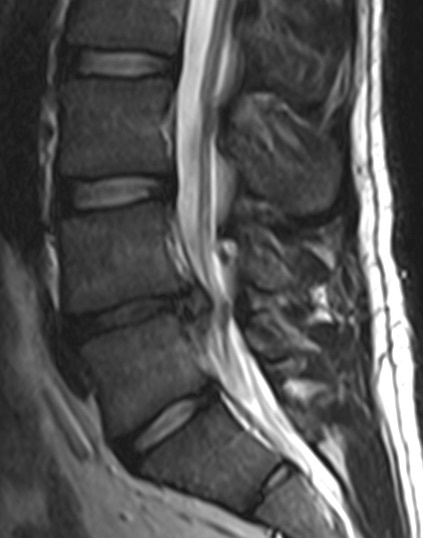
Figure 14. Sagittal lumbar MRI showing a disc extrusion at L4-L5 compressing the adjacent nerve root, the lesion the posterior approach is most often used to treat. Edave, CC BY-SA 3.0, via Wikimedia Commons.
Part VII - Anterior and Anterolateral Approaches to the Lumbar Spine
The front of the lumbar spine is reached by three related routes. The anterior transperitoneal approach, supine through a midline incision, is reserved mainly for fusing L5-S1 (and L4-5 if the great vessels are mobilised); the bowel is packed away in Trendelenburg, the posterior peritoneum is opened over the sacral promontory, and the disc is reached.[34] The anterior retroperitoneal approach is a paramedian, retro-rectus route, again mainly for L5-S1. The anterolateral retroperitoneal approach, through a flank incision dividing the three abdominal wall muscles, gives access to all the vertebrae from L1 to the sacrum and lets a psoas abscess be drained without contaminating the peritoneum; it is also the route for corpectomy and biopsy of the upper lumbar bodies.[35]
The dangers here are vascular and autonomic, and they are heavily examined. The superior hypogastric (presacral) sympathetic plexus lies over the lower aorta and the sacral promontory, and its injury at L5-S1 causes retrograde ejaculation in men; it is protected by a strict midline incision over the sacrum, blunt peanut dissection, saline infiltration to lift and identify it, and selective bipolar cautery, with the soft tissue moved as a unit.[36] The great vessels are mobilised by ligating the segmental lumbar vessels, which must never be cut flush with the aorta (a flush cut leaves a hole in the aorta). The left side is the “arterial side” preferred for L4-5 because arteries are tougher than the thin-walled veins; the trap is that on the left side of the vascular V the vein lies closest to the surgeon. When exposing L4-5, the ascending iliolumbar vein must be ligated before the iliac vein is retracted, or it avulses and bleeds.[37] The ureter is carried forward with the mobilised peritoneum and identified by the peristalsis it shows when pinched; it is mobilised only as much as necessary, to avoid an ischaemic stricture. The genitofemoral nerve on the psoas and the sympathetic chain on the lateral body are preserved.[38]
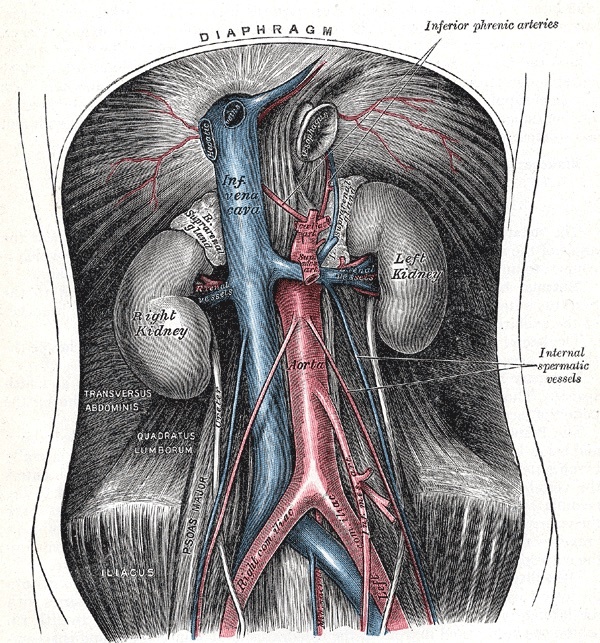
Figure 15. The abdominal aorta and inferior vena cava descending to the iliac bifurcation, with the kidneys and renal vessels: the prevertebral great vessels mobilised in the anterior and anterolateral approaches to the lumbar spine. Gray’s Anatomy (1918), public domain, via Wikimedia Commons.
Part VIII - Posterior Approach for Scoliosis and Rib Excision
The posterior approach to the thoracic and lumbar spine is the workhorse for scoliosis surgery, long posterior fusions, posterior tumour and biopsy, and fracture stabilisation, and its safety comes from the same truly internervous midline plane.[39] The patient lies prone on bolsters long enough to clear both the chest and the abdomen, again to empty the vertebral venous plexus; the midline incision is drawn between the C7-T1 spinous processes and the gluteal cleft, kept in the midline for cosmesis even when the spinous processes are rotated out of it by the curve.[40] The paraspinal muscles are stripped subperiosteally out to the tips of the transverse processes bilaterally for instrumentation, working distal-to-proximal in the thoracic spine (because the spinous processes angle caudally and the rotators favour that direction) and either way in the lumbar spine.
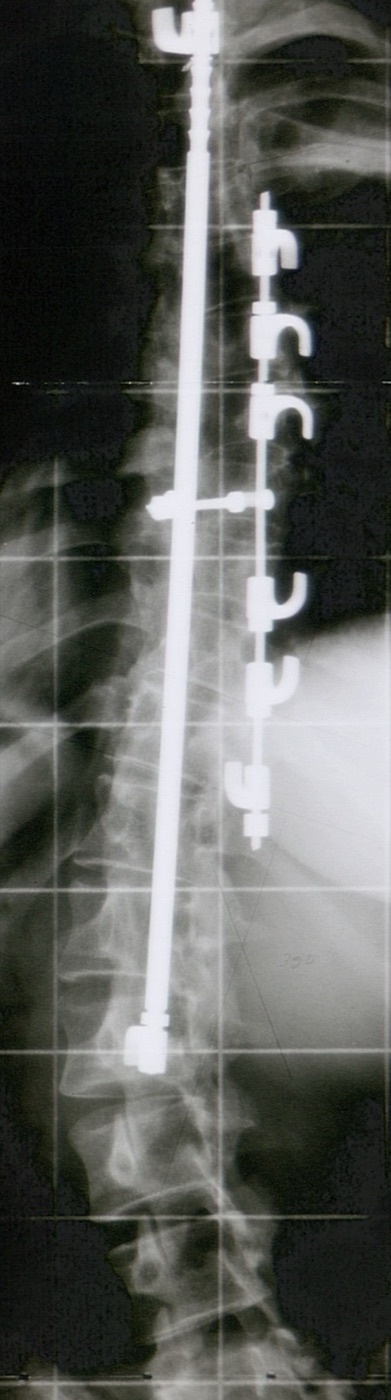
Figure 16. Radiograph after posterior spinal fusion for thoracic scoliosis, showing posterior (Harrington-rod) instrumentation. Mehlauge, CC BY-SA 3.0, via Wikimedia Commons.
The dangers are the posterior primary rami (partly denervating the paraspinals if dissection strays too far laterally with cautery), the segmental vessels off the aorta between the transverse processes (cauterised or tied, or they bleed under pressure postoperatively), the facet joints and the dura.[41] The applied anatomy gives the high-yield landmarks: the lumbar facets lie in the sagittal plane and the thoracic facets in the frontal plane, with T12 the transition (its descending facet lumbar, its ascending facet thoracic); the mamillary process on the ascending facet is the key lumbar landmark and the medial edge of the ascending process is the bone closest to the nerve root; and the L1 transverse process is rigid and short whereas the twelfth rib is mobile, long and tubular, which distinguishes them.[42]
After deformity correction, a residual rib hump is flattened by rib excision through the same midline incision, working in the internervous plane between trapezius (spinal accessory nerve) and latissimus dorsi (thoracodorsal nerve).[43] The dissection stays subperiosteal so the intercostal neurovascular bundle on the lower border of the rib is spared, ventilation is stopped to drop the pleura away, and each rib is resected medial to its deformity but sparing the head and neck. The dangers are pneumothorax and haemothorax (a chest tube is inserted if the pleura is breached or the wound communicates with the resection bed), and the loss of more than four ribs may cause a sympathetic pleural effusion.
References
-
The single source for this topic is Hoppenfeld, de Boer and Buckley, Surgical Exposures in Orthopaedics: The Anatomic Approach (5th ed., 2016), chapter 6 (The Spine), pages 486 to 653. Every claim is page-cited to that chapter. A few widely taught facts that Hoppenfeld does not state (the eponym “Smith-Robinson,” the artery of Adamkiewicz by name, the Wiltse plane, the traversing-versus-exiting root rule) are flagged as standard teaching rather than given a false citation.
-
Hoppenfeld p.594. “The key to understanding the anatomy of the anterior approach to the cervical spine lies in appreciating the three fascial layers of the neck.”
-
Hoppenfeld p.490, p.504, p.555, p.627. The corollary safety rule, repeated throughout, is that it is “safer to remove bone than to retract nerve roots or dura excessively” (Hoppenfeld p.496).
-
Hoppenfeld p.585, p.605, p.612. Where there is no internervous plane the muscles divided are segmentally innervated (paraspinals, abdominal wall) so that division in the line of the incision causes no significant denervation.
-
These are developed in each part below with their page citations. The single most examined danger of the whole topic is the recurrent laryngeal nerve in the anterior cervical approach (Hoppenfeld p.583).
-
Hoppenfeld p.594-595.
-
Hoppenfeld p.594-595, p.599. The carotid sheath contains the common carotid artery (dividing at the upper border of the thyroid cartilage), the internal jugular vein and the vagus nerve (Hoppenfeld p.598).
-
Hoppenfeld p.587, p.595. The level landmarks in the midline are the hyoid (C3), the thyroid cartilage (C4-5), the cricoid (C6) and the carotid (Chassaignac) tubercle, the largest anterior tubercle, on the C6 transverse process (Hoppenfeld p.584-585, p.595).
-
Hoppenfeld p.571-572, p.582. The greater occipital nerve (posterior ramus of C2) and the third occipital nerve (posterior ramus of C3) cross the posterior field laterally and are spared by midline dissection.
-
Hoppenfeld p.565-566. The cervical spinous processes from C2 to C6 are bifid; C7 (the vertebra prominens) is the largest, non-bifid, and the chief palpable landmark.
-
Hoppenfeld p.582-585. The exposure described is the classic anteromedial (Smith-Robinson) approach, though Hoppenfeld names only Cloward; the “Smith-Robinson” eponym is standard teaching.
-
Hoppenfeld p.583, p.599. The left recurrent laryngeal nerve loops under the aortic arch; the right loops under the right subclavian artery and ascends at a higher level.
-
Hoppenfeld p.585-587. The practical plane is between the visceral column medially and the sternocleidomastoid plus carotid sheath laterally, then between the longus colli muscles in the midline.
-
Hoppenfeld p.587-593. The anterior longitudinal ligament appears as a gleaming white midline structure once the prevertebral region is reached.
-
Hoppenfeld p.583, p.593, p.599.
-
Hoppenfeld p.594, p.597. Subperiosteal lateral release of the longus colli enlarges the exposure but risks the sympathetic chain.
-
Hoppenfeld p.552-553.
-
Hoppenfeld p.554-555.
-
Hoppenfeld p.555-562.
-
Hoppenfeld p.562-564. The posterior primary rami supplying the paraspinal muscles are rarely endangered and, being segmental and overlapping, tolerate the loss of one or two without clinical effect.
-
Hoppenfeld p.573-575.
-
Hoppenfeld p.576-582. The posterior atlanto-occipital and atlantoaxial membranes are the homologues of the ligamentum flavum at this level.
-
Hoppenfeld p.603-604.
-
Hoppenfeld p.605-611. The retropleural plane is safe only when the pleura is thickened by disease.
-
Hoppenfeld p.611-612.
-
Hoppenfeld p.612-615.
-
Hoppenfeld p.614. The azygos vein and oesophagus overlie the vertebral bodies and must be mobilised; the sympathetic chain lies on the anterolateral bodies.
-
Hoppenfeld p.617-618. Opening two body cavities at the thoracolumbar junction raises the risk of the operation.
-
Hoppenfeld p.488.
-
Hoppenfeld p.488-489, p.503. The line between the posterior superior iliac spines crosses S2.
-
Hoppenfeld p.490-496, p.498-502.
-
Hoppenfeld p.494-496, p.505-506.
-
Hoppenfeld p.505, p.507. Hoppenfeld states that the nerves exit at the inferior aspect of the pedicle and shows a herniation impinging a root without naming traversing versus exiting roots.
-
Hoppenfeld p.507-516.
-
Hoppenfeld p.518-519, p.537-538. The anterolateral approach follows the surface of the psoas medially to the bodies; the internervous plane is absent (the segmentally innervated abdominal wall muscles are divided in line with the incision).
-
Hoppenfeld p.516, p.525, p.534. More distal injury to the parasympathetic pelvic nerves (S2-S4) causes erectile dysfunction.
-
Hoppenfeld p.515-517, p.525, p.534. The median sacral artery crosses the L5-S1 region and is tied off.
-
Hoppenfeld p.516, p.536, p.542. The lumbar plexus within the psoas, the danger of the modern lateral transpsoas (XLIF) approach, is not part of Hoppenfeld’s anterolateral exposure and is standard teaching.
-
Hoppenfeld p.626.
-
Hoppenfeld p.626-628. Bleeding is greater in the thoracic region because trapezius and rhomboid fibres attach directly to the narrow spinous-process tips, so dissection must stay exactly in the midline.
-
Hoppenfeld p.628, p.637-638. Hoppenfeld covers cord-level safety here only as “the dura must be protected; any epidural tear must be closed”; instrumentation hazards and neuromonitoring are standard teaching.
-
Hoppenfeld p.630, p.633, p.637-646. These bony landmarks underlie pedicle-screw entry points (standard teaching for the exact entry-point recipe).
-
Hoppenfeld p.646-651. The cut rib ends are waxed and can be cut into matchsticks for the midline fusion graft.
-
Hoppenfeld p.490, p.555, p.627.
-
Hoppenfeld p.585-587.
-
Hoppenfeld p.583, p.593, p.599.
-
Hoppenfeld p.594-595.
-
Hoppenfeld p.577, p.582.
-
Hoppenfeld p.603, p.611-614.
-
Hoppenfeld p.612, p.614.
-
Hoppenfeld p.488-489.
-
Hoppenfeld p.491, p.496, p.505.
-
Hoppenfeld p.516, p.525, p.534.
-
Hoppenfeld p.627, p.630, p.637-638.
-
Hoppenfeld p.647-648, p.651.