Contents
- Orientation
- Part I - Applied Surgical Anatomy of the Elbow
- Part II - Posterior Approaches to the Elbow
- Part III - Medial Approaches to the Elbow
- Part IV - Lateral and Anterior Approaches to the Elbow
- References
Orientation
The elbow is harder to expose than it looks. Yes, it is a hinge, but it is a hinge built from three articulations that share one synovial cavity, wrapped in strong collateral ligaments, and ringed on every side by a nerve the surgeon has to respect. Hoppenfeld builds the whole chapter on one organising fact: the key neurovascular structures run anterior and posterior to the joint. That means the medial and lateral approaches are comparatively safe but give limited access, while the anterior and posterior approaches give the best access but put those structures at risk. Of the seven approaches, the posterior approach with an olecranon osteotomy gives the best possible view of all the joint surfaces, and it is the workhorse for fixing complex distal-humeral fractures.[1]
This summary follows the order a surgeon actually thinks in. It opens with the applied anatomy, because each approach is really just a disciplined journey between named muscle groups, and those journeys only make sense once you have fixed in your mind the four muscle groups, the internervous planes between them, and the courses of the ulnar, median, radial, and musculocutaneous nerves. It then works through the approaches by side: the posterior approaches (with and without an olecranon osteotomy), the medial approaches (the anteromedial approach and the posteromedial approach to the coronoid), and the lateral and anterior approaches (the anterolateral approach, the anterior approach to the cubital fossa, and the posterolateral approach to the radial head). For every approach the two highest-yield items are the internervous plane and the dangers, and both are flagged throughout.[2]
Two recurring themes are worth stating once. First, the ulnar nerve is the dominant danger of every medial and posterior exposure. It is palpable and almost subcutaneous in its groove behind the medial epicondyle, and the rule in all of these approaches is the same: find it early, sling it, and never use the sling for traction. Second, the posterior interosseous nerve (PIN) is the dominant danger of every lateral and anterior exposure of the proximal radius. It is buried in the supinator as it winds round the radial neck, so the rule is to rotate the forearm to carry the nerve away from the line of dissection, and never to cut through the muscle belly to reach bone.[3]
Part I - Applied Surgical Anatomy of the Elbow
The joint and why it is hard to expose
The elbow is the hinge (ginglymus) joint between the lower humerus and the upper radius and ulna, and it communicates with the superior radioulnar joint, so all three articulations share one synovial cavity. Being a hinge, its anterior and posterior “ligaments” are simply thickened parts of the capsule, which is all a hinge needs; the real stability comes from the strong medial and lateral collateral ligaments. The bony shape together with these strong collaterals is exactly why the joint cannot be fully explored without extensive dissection, and why complete exposure is most easily obtained from behind.[4]
The four muscle groups and the planes between them
The chapter’s central scheme is that four muscle groups cross the elbow. Anteriorly sit the elbow flexors (biceps and brachialis), supplied by the musculocutaneous nerve. Posteriorly is the elbow extensor (triceps), supplied by the radial nerve. Medially is the flexor-pronator group, arising from the medial epicondyle and supplied by the median and ulnar nerves. Laterally are the wrist and finger extensors together with the supinators, arising from the lateral epicondyle and supplied by the radial and posterior interosseous nerves.[5]
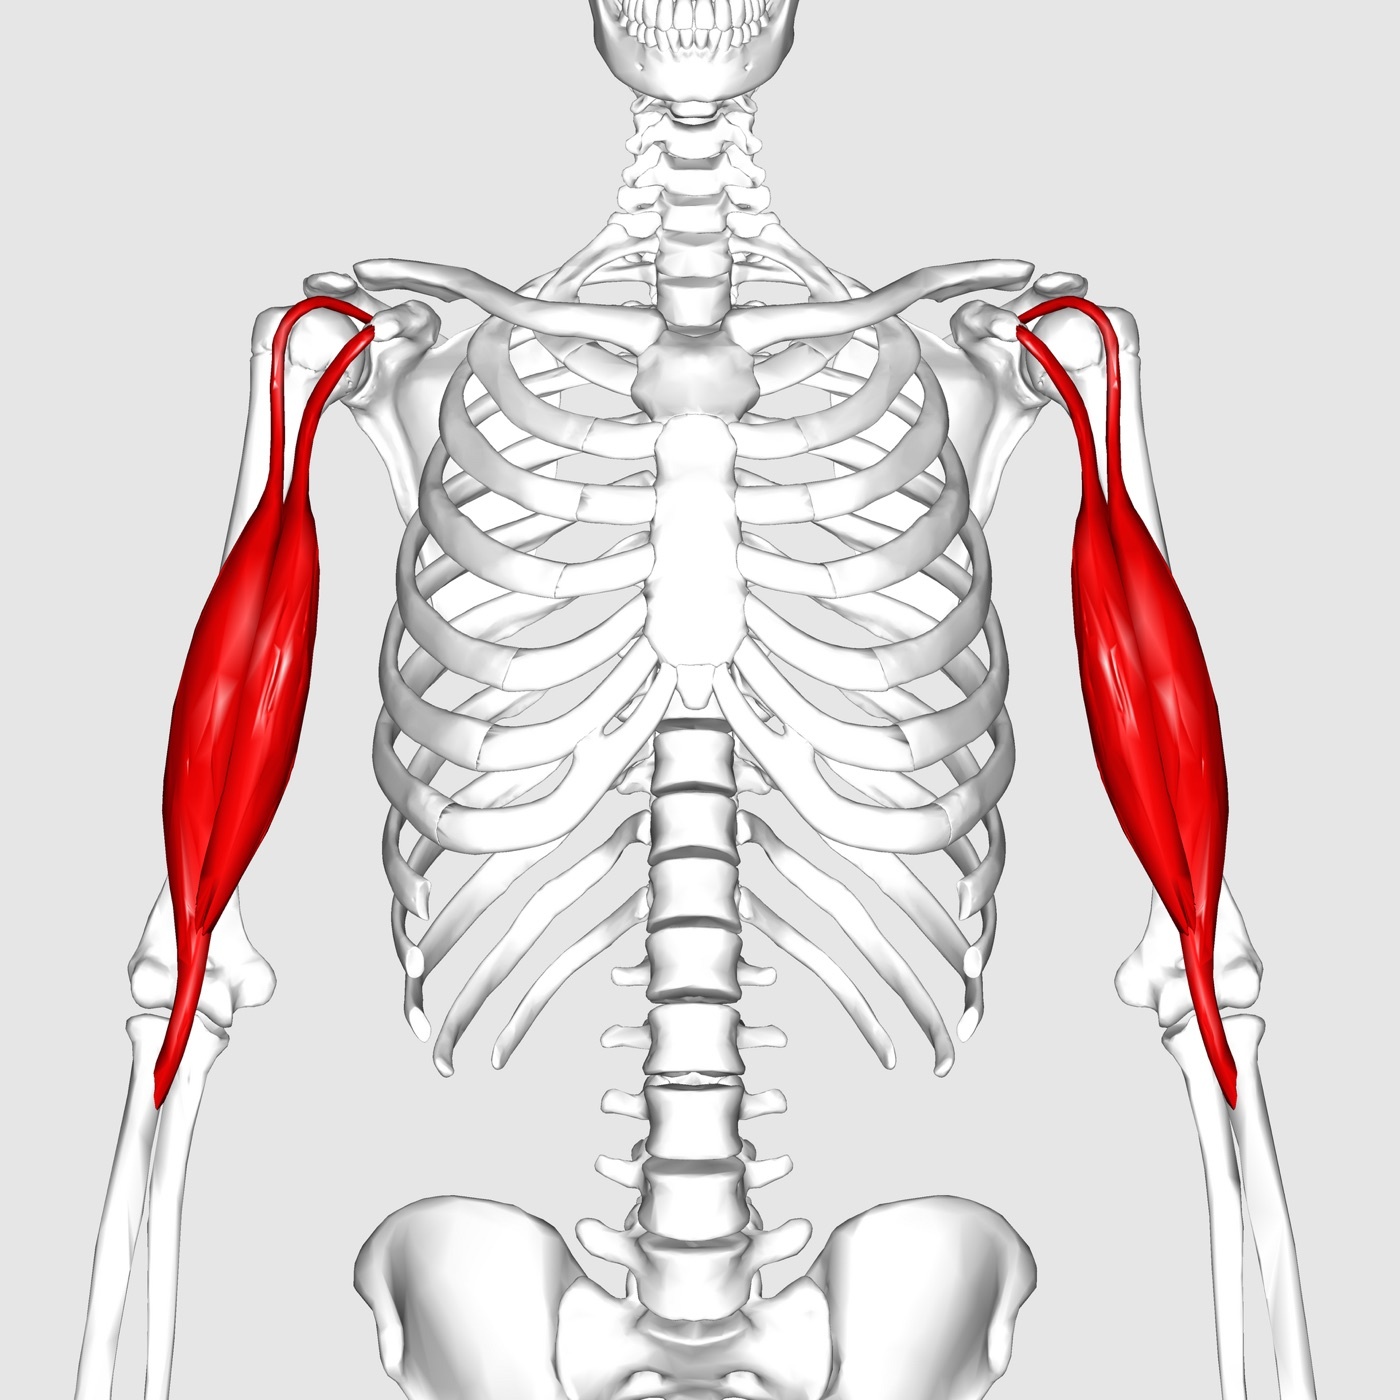
Figure 1. Biceps brachii, one of the anterior (flexor) group, on the anterior arm. Anatomography, CC BY-SA 2.1 JP, via Wikimedia Commons.
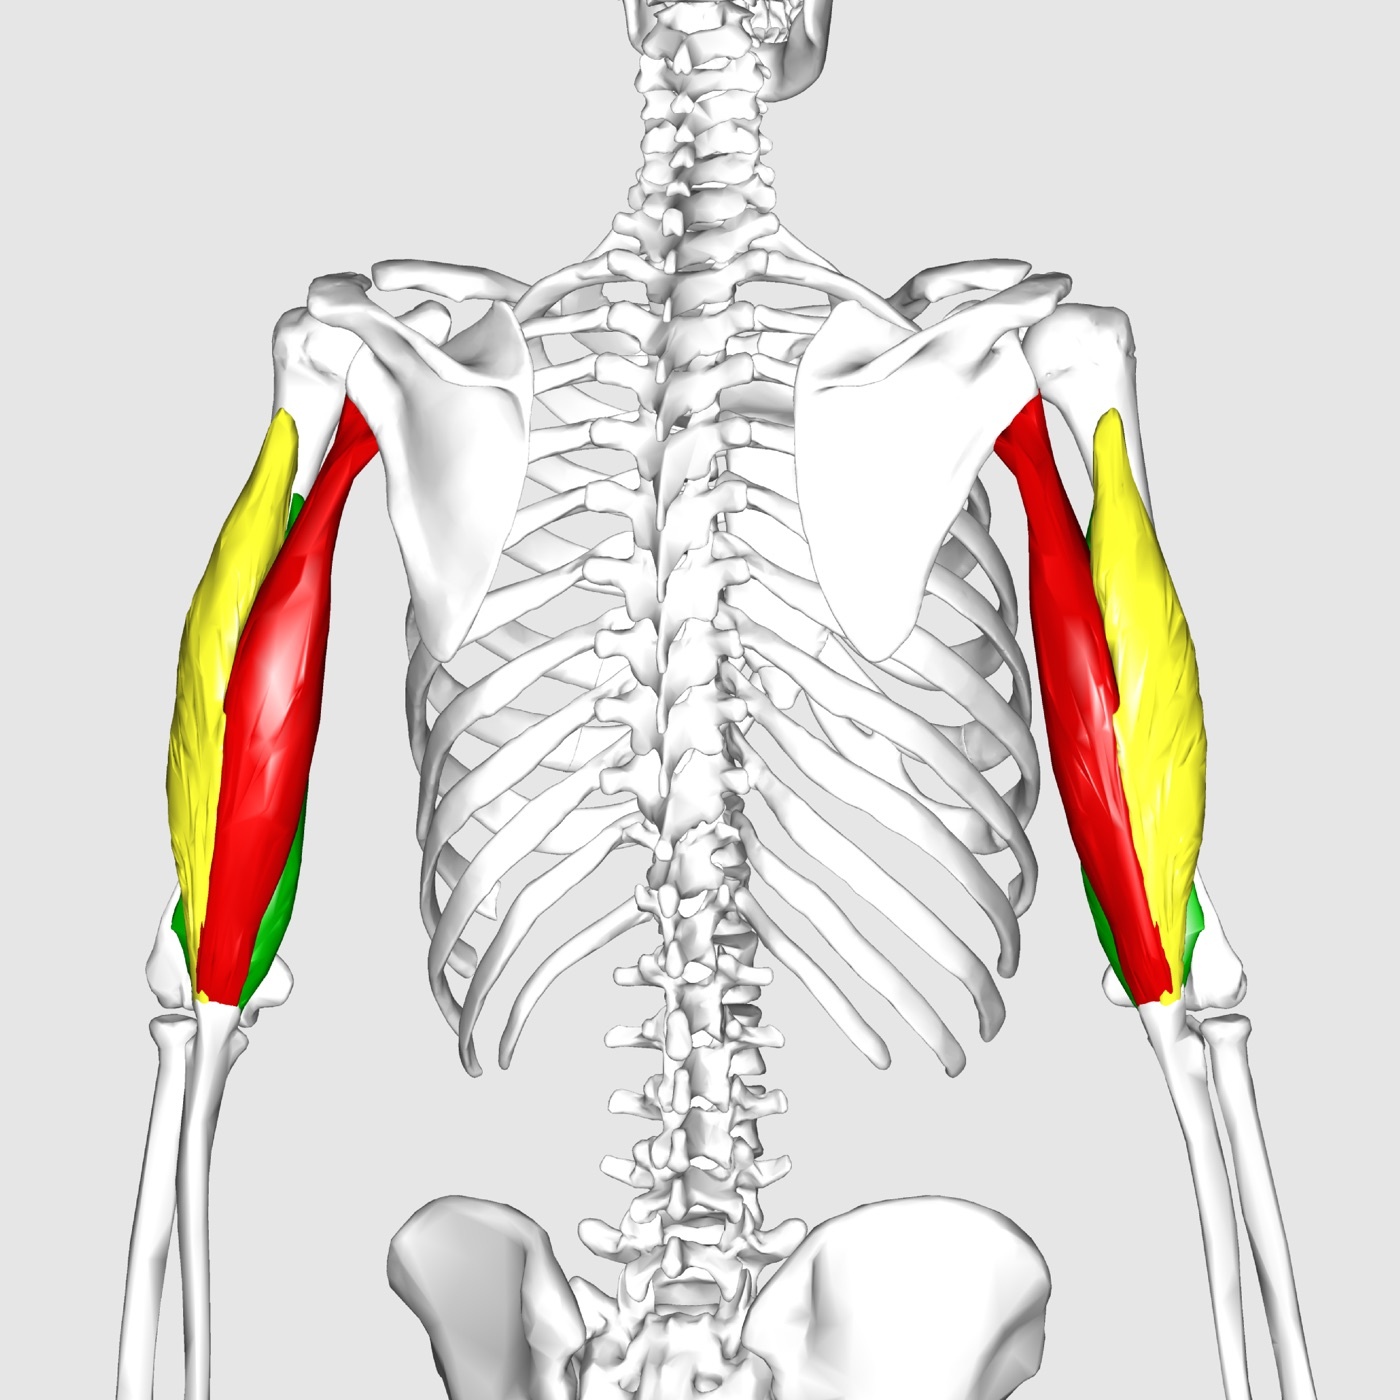
Figure 2. Triceps brachii (long, lateral and medial heads), the posterior (extensor) group, inserting on the olecranon. Anatomography, CC BY-SA 2.1 JP, via Wikimedia Commons.
Between each pair of groups lies an intermuscular plane, and three of these can be exploited surgically. Two are true internervous planes. The anterior-lateral plane runs between brachialis (musculocutaneous) and brachioradialis (radial) and is used by the anterolateral approach; the anterior-medial plane runs between brachialis (musculocutaneous) and pronator teres (median) and is used by the medial approach. The third usable plane lies within the lateral group, between anconeus (radial) and extensor carpi ulnaris (posterior interosseous nerve), and is used by the posterolateral approach to the radial head. A fourth plane, between the lateral and posterior groups (brachioradialis and triceps), is only a pseudo-internervous plane, since both are radial-supplied; it works only because the radial nerve gives off its branches well proximal to the elbow.[6]
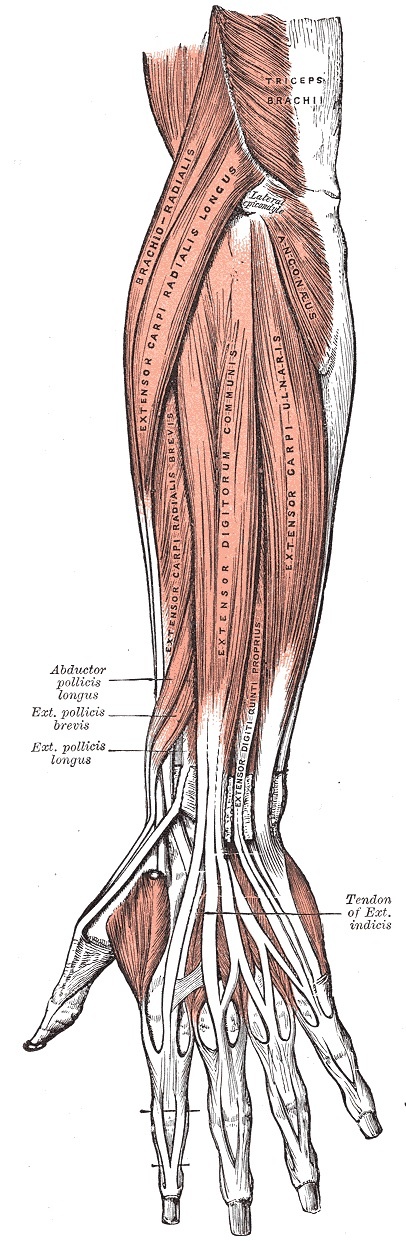
Figure 3. Superficial extensor muscles of the forearm with the mobile wad (brachioradialis, extensor carpi radialis longus and brevis) and the common extensor origin at the lateral epicondyle. Gray’s Anatomy plate 418 (public domain), via Wikimedia Commons.
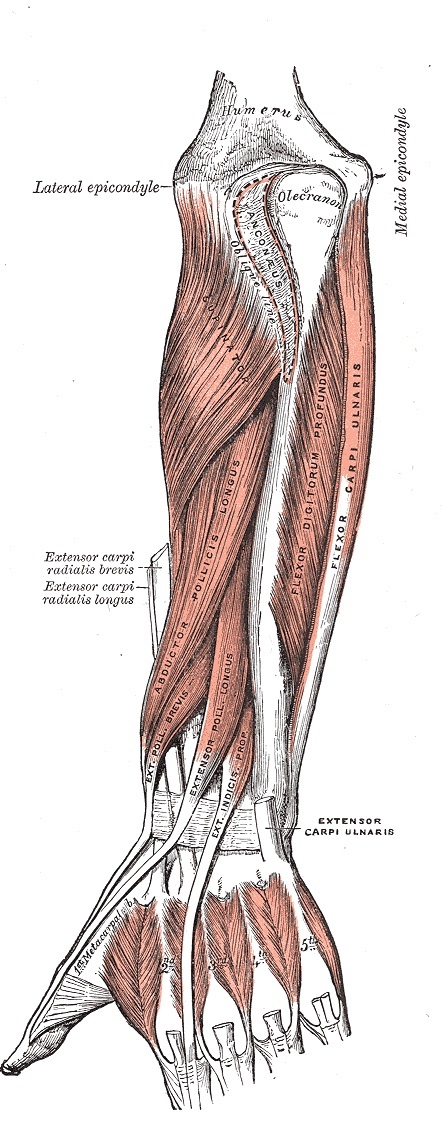
Figure 4. Deep extensor muscles of the forearm, showing the supinator and anconeus at the lateral elbow. Gray’s Anatomy plate 419 (public domain), via Wikimedia Commons.
The lateral group is conventionally subdivided into the mobile wad of three (brachioradialis, extensor carpi radialis longus, extensor carpi radialis brevis) and the common extensor origin of four (extensor digitorum, extensor digiti minimi, extensor carpi ulnaris, anconeus). On the medial side, five muscles fan out from the common flexor origin on the medial epicondyle: pronator teres, flexor carpi radialis, flexor digitorum superficialis, palmaris longus, and flexor carpi ulnaris. The first four are median-supplied; the flexor carpi ulnaris alone is ulnar-supplied. A useful surgical pearl follows from this. After a medial epicondyle osteotomy the whole flexor-pronator mass can be retracted distally only a short way, because the median nerve, passing through pronator teres, “anchors” the group.[7]
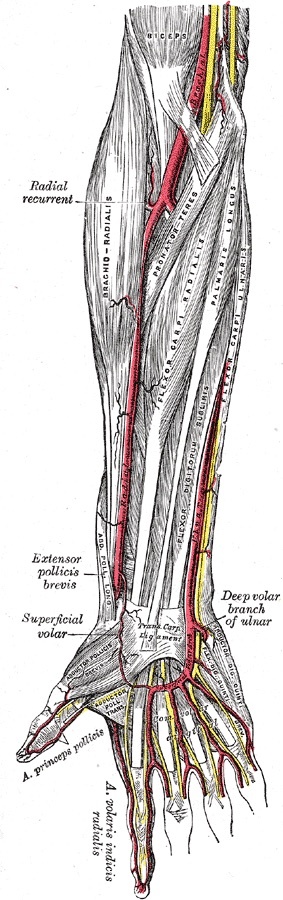
Figure 5. Front of the forearm showing the superficial flexor-pronator group (pronator teres, flexor carpi radialis, palmaris longus, flexor carpi ulnaris) and the cubital vessels. Gray’s Anatomy plate 527 (public domain), via Wikimedia Commons.
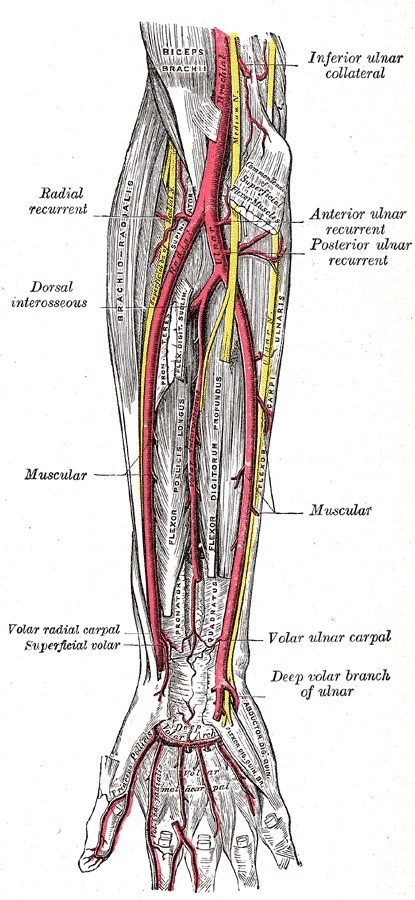
Figure 6. Deep dissection of the front of the forearm showing the deep flexors, pronators and supinator with the ulnar nerve and ulnar recurrent vessels at the medial elbow. Gray’s Anatomy plate 528 (public domain), via Wikimedia Commons.
Bones and articulations
The distal humerus has two articular areas: the lateral capitulum, shaped like a hemisphere, which meets the radial head, and the medial trochlea, shaped like a spool of thread, which meets the ulna. The trochlea projects further distally than the capitulum, and that tilt produces the carrying angle of the elbow. So the three articulations are the radiocapitellar, the ulnohumeral, and the proximal radioulnar; the proximal ulna contributes the olecranon and the coronoid, and the annular ligament encircles the radial head at the neck.[8]
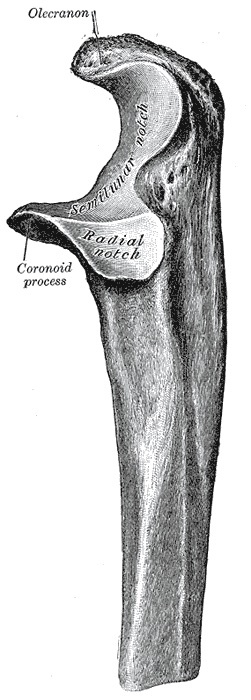
Figure 7. Proximal end of the left ulna (lateral view) showing the olecranon, trochlear (semilunar) notch, coronoid process and radial notch. Gray’s Anatomy plate 212 (public domain), via Wikimedia Commons.
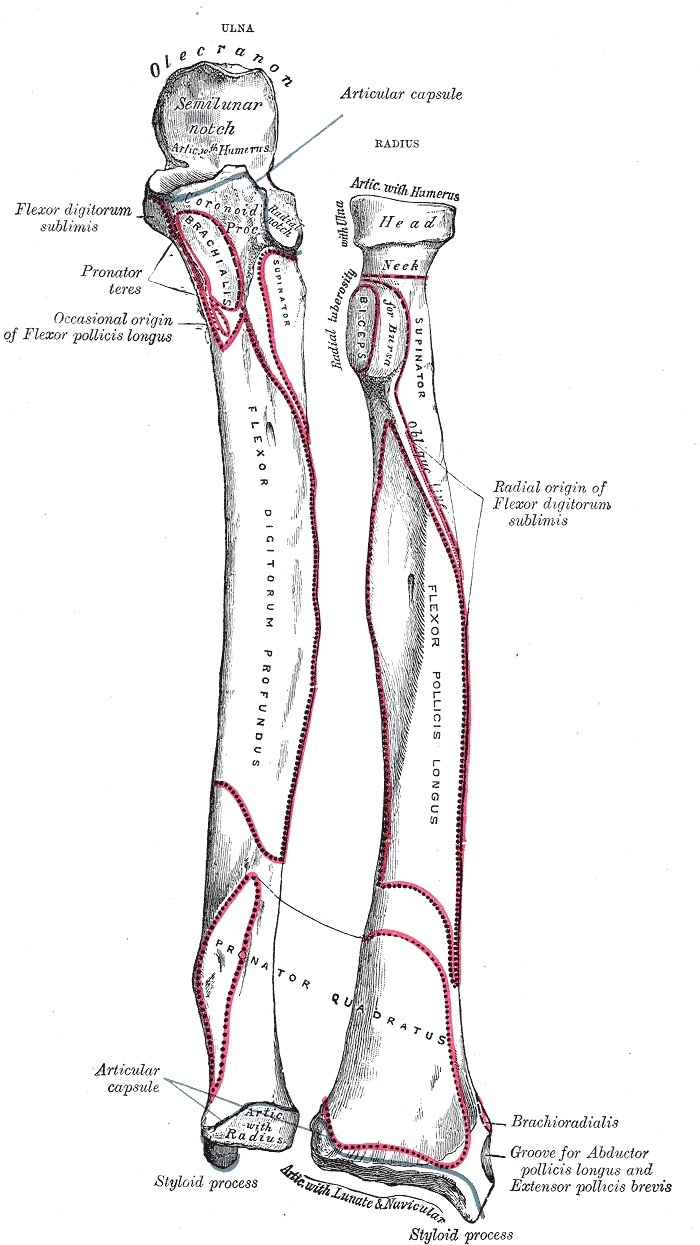
Figure 8. Anterior aspect of the bones of the left forearm: proximal ulna and the radial head and neck, with muscle attachments. Gray’s Anatomy plate 213 (public domain), via Wikimedia Commons.
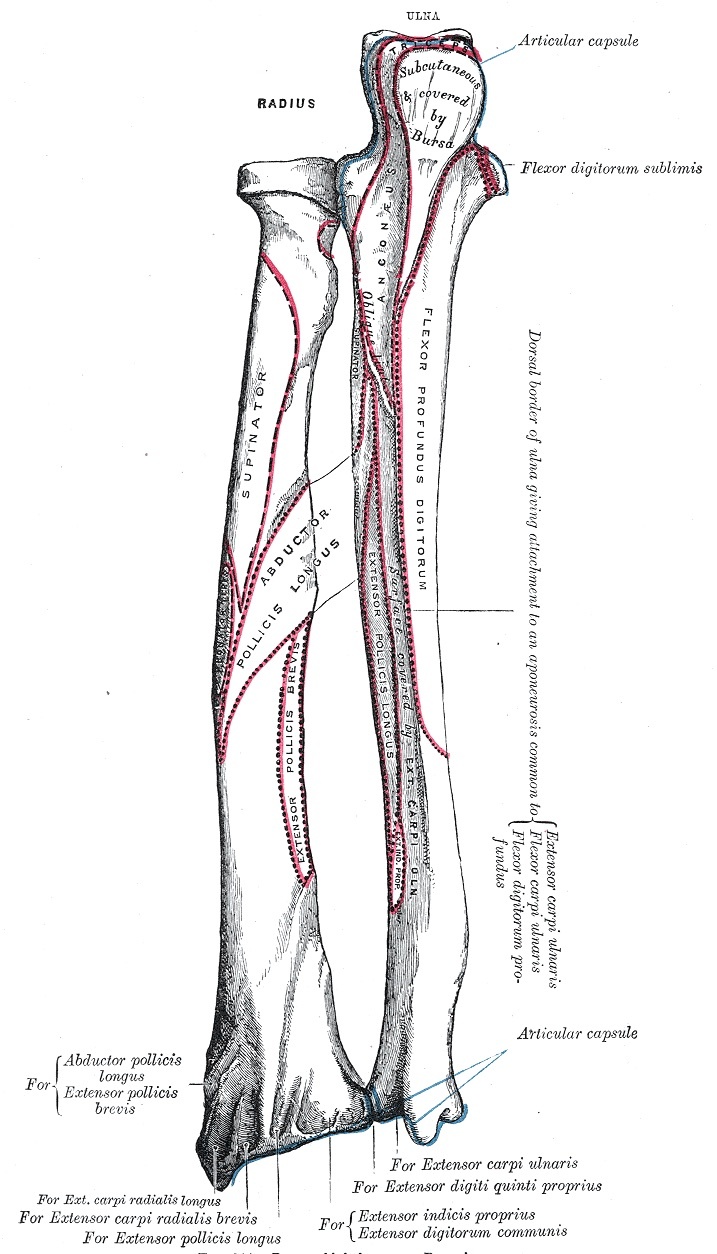
Figure 9. Posterior surface of the bones of the left forearm, showing the subcutaneous olecranon and the extensor, supinator and anconeus attachment areas. Gray’s Anatomy plate 214 (public domain), via Wikimedia Commons.
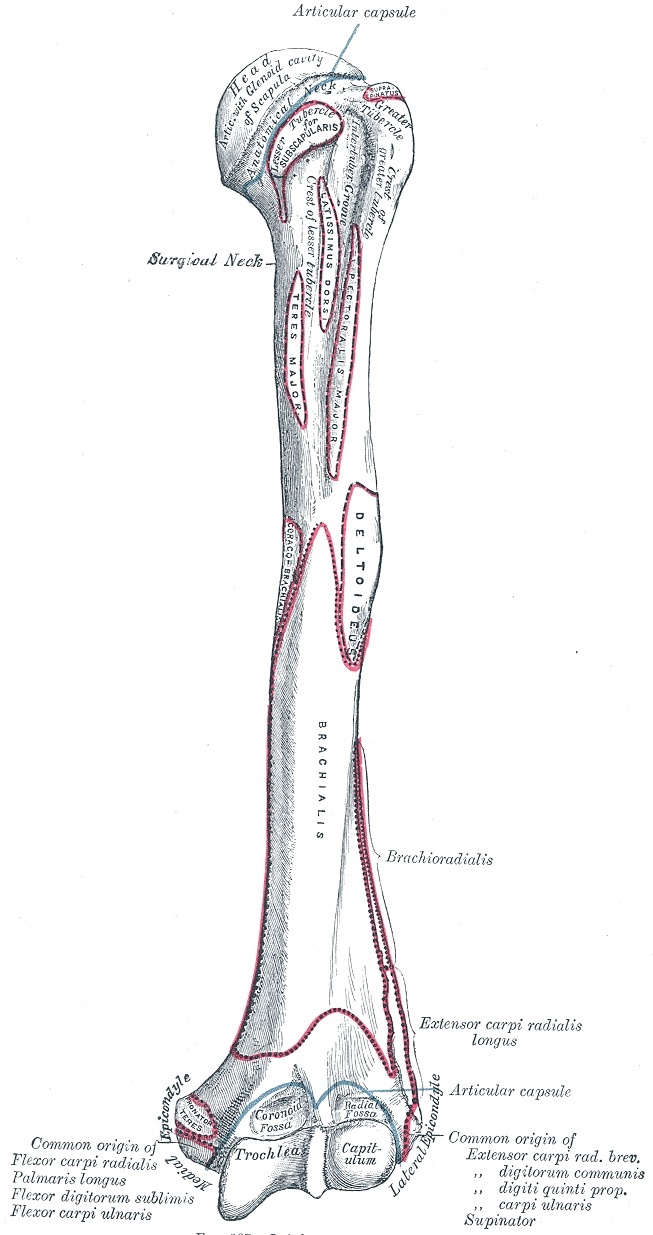
Figure 10. Anterior aspect of the left humerus; the distal end shows the trochlea, capitulum, coronoid and radial fossae, and the medial and lateral epicondyles. Gray’s Anatomy plate 207 (public domain), via Wikimedia Commons.
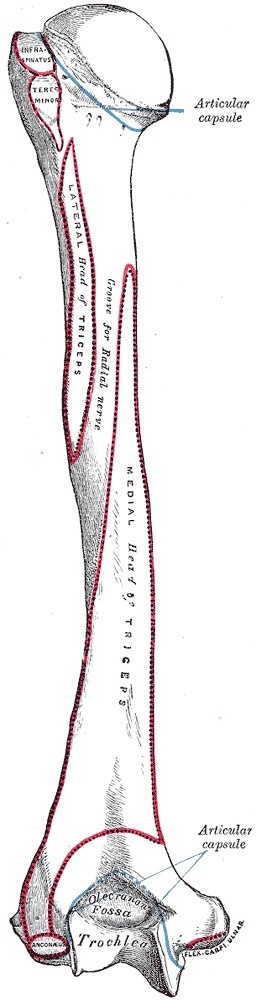
Figure 11. Posterior aspect of the left humerus; the distal end shows the olecranon fossa and trochlea, and the spiral groove for the radial nerve. Gray’s Anatomy plate 208 (public domain), via Wikimedia Commons.
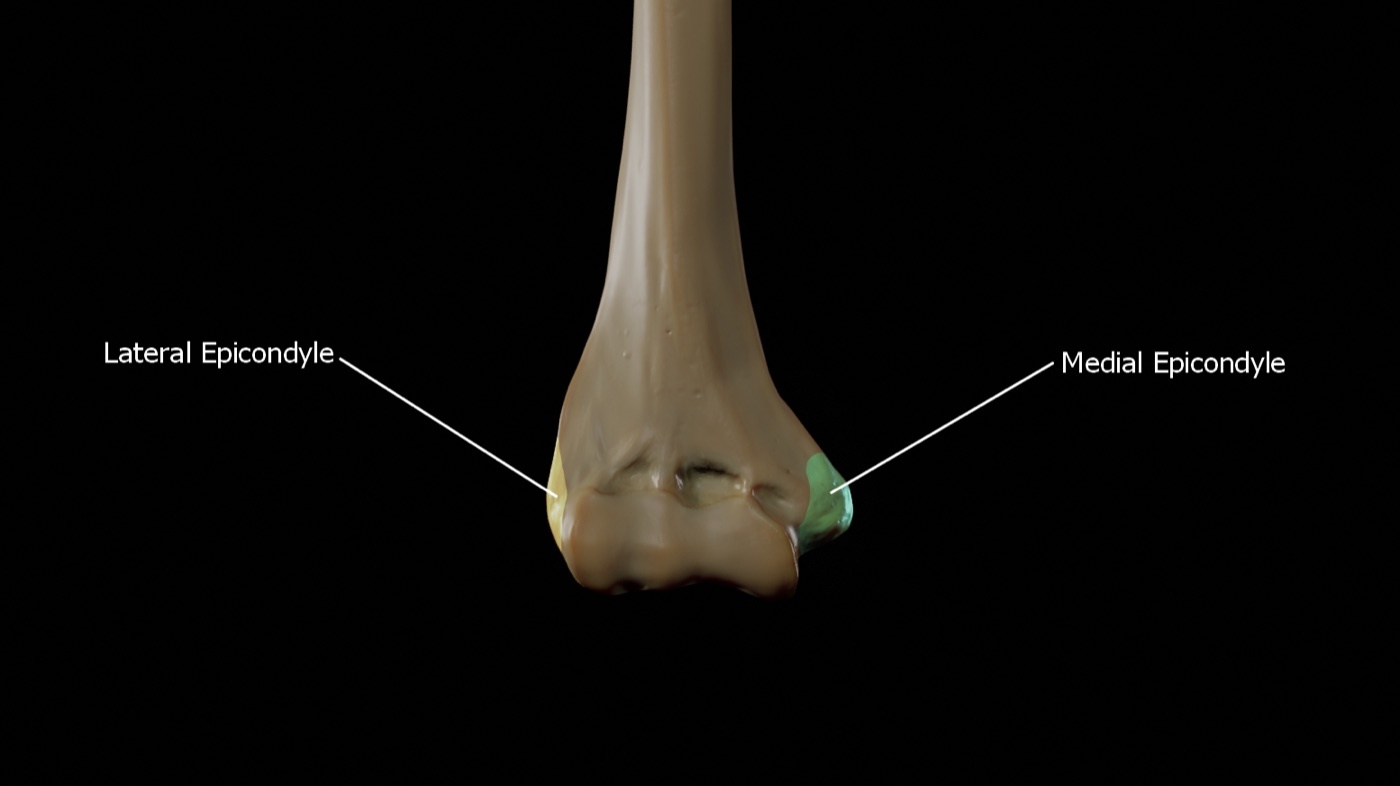
Figure 12. Distal humerus (anterior view) with the medial and lateral epicondyles and the two columns highlighted. Doctor Jana, CC BY-SA 4.0, via Wikimedia Commons.
The collateral ligaments
Hoppenfeld’s text gives the broad anatomy: the joint is supported by strong medial and lateral collateral ligaments, and the annular ligament encircles the radial head. The clinically important detail is largely standard teaching, and is flagged as such. The medial (ulnar) collateral ligament complex has an anterior bundle running from the anteroinferior medial epicondyle to the sublime tubercle of the coronoid; this anterior bundle is the primary restraint to valgus stress and is the structure injured in throwing athletes. The lateral collateral ligament complex includes the radial collateral ligament, the annular ligament, and the lateral ulnar collateral ligament (LUCL), which runs from the lateral epicondyle to the supinator crest of the ulna and is the key restraint to posterolateral rotatory instability (PLRI). These two ligaments, the MCL anterior bundle and the LUCL, are the ones whose preservation governs medial and lateral elbow surgery respectively.[9]
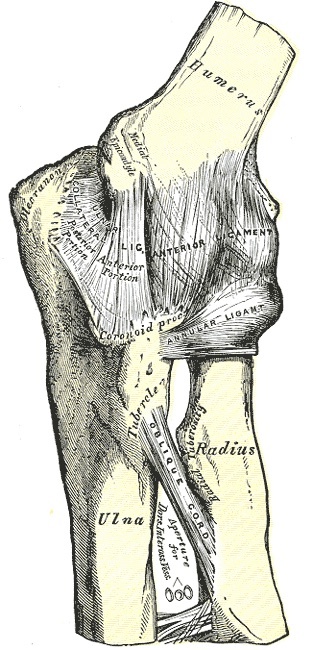
Figure 13. Left elbow joint, anterior view, showing the anterior and ulnar (medial) collateral ligaments and the oblique cord. Gray’s Anatomy plate 329 (public domain), via Wikimedia Commons.
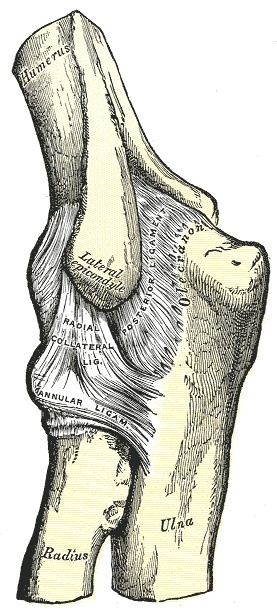
Figure 14. Left elbow joint, lateral view, showing the radial (lateral) collateral ligament, the annular ligament and the posterior ligament. Gray’s Anatomy plate 330 (public domain), via Wikimedia Commons.
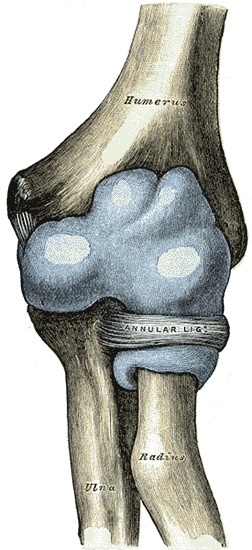
Figure 15. Distended capsule of the elbow joint, anterior aspect, with the annular ligament around the radial head. Gray’s Anatomy plate 331 (public domain), via Wikimedia Commons.
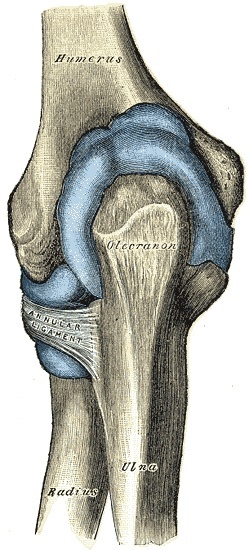
Figure 16. Distended capsule of the elbow joint, posterior aspect. Gray’s Anatomy plate 332 (public domain), via Wikimedia Commons.
The ulnar nerve
The ulnar nerve crosses the elbow in the groove on the back of the medial epicondyle, where it is easy to palpate and almost subcutaneous, and then enters the forearm by passing between the two heads of the flexor carpi ulnaris, which it supplies and where it may be entrapped (the cubital tunnel). It gives off its branches to the flexor carpi ulnaris just after it rounds the groove, then runs down the forearm on the front of the flexor digitorum profundus, supplying the profundus to the ring and little fingers. That palpable, exposed retrocondylar position is exactly why the nerve is most at risk in every medial and posterior elbow exposure and in any medial epicondyle osteotomy.[10]
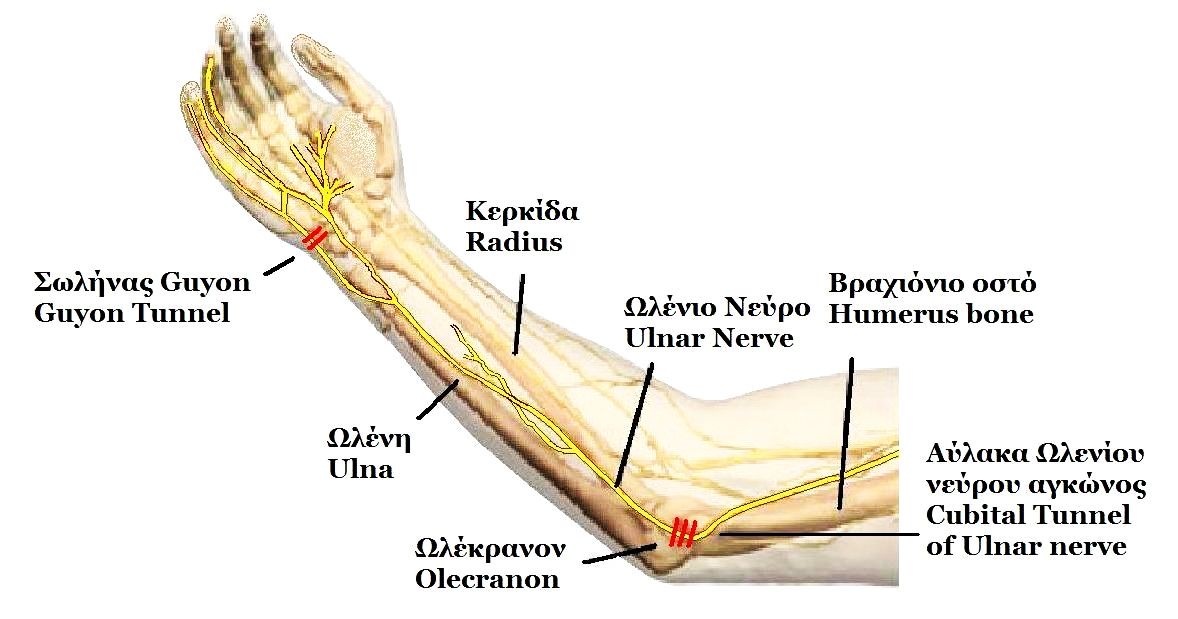
Figure 17. Course of the ulnar nerve behind the medial epicondyle through the cubital tunnel and down the forearm to Guyon’s canal. Dr Harry Gouvas (public domain), via Wikimedia Commons.
The median nerve and the brachial artery
The median nerve crosses the front of the joint on its medial side, covered by the bicipital aponeurosis (lacertus fibrosus), and leaves the cubital fossa by passing between the two heads of pronator teres. Inside the fossa it lies medial to the brachial artery. The brachial artery enters the fossa on the lateral side of the median nerve, lying on brachialis, and divides about halfway down into the radial and ulnar arteries; like the median nerve, it is endangered by supracondylar fractures of the humerus. The lacertus fibrosus is the roof that protects this deep bundle, which is the anatomical reason the old barber-surgeons could bleed patients at this site with relative safety.[11]
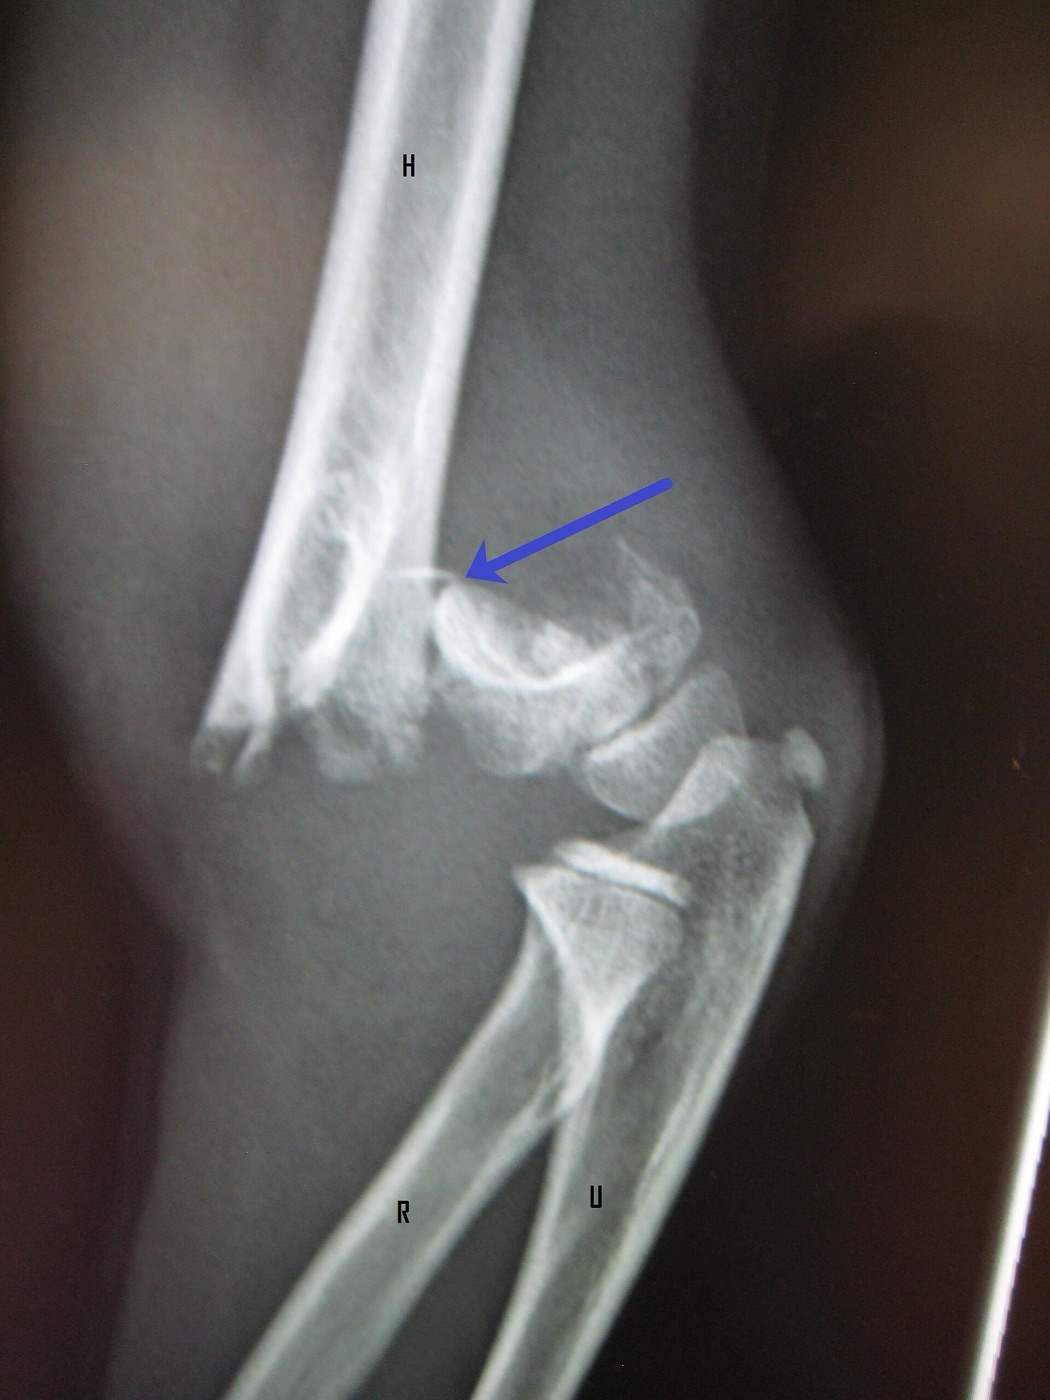
Figure 18. Paediatric supracondylar fracture of the humerus (arrow), the classic injury threatening the brachial artery and median nerve; H = humerus, R = radius, U = ulna. James Heilman MD, CC BY-SA 3.0, via Wikimedia Commons.
The radial nerve and the posterior interosseous nerve
The radial nerve crosses the front of the elbow in the interval between brachialis and brachioradialis and divides at the radiohumeral joint line into two: the posterior interosseous nerve (PIN), which dives into the supinator through the arcade of Frohse, and the superficial radial nerve, which descends the forearm under cover of the brachioradialis. (A third small branch to the extensor carpi radialis brevis leaves almost at once.) The PIN is the nerve of the lateral and anterior approaches to the proximal radius: it winds around the radial neck within the substance of the supinator, and Strachan and Ellis famously showed it to be vulnerable during radial head excision. The warning to remember is that the PIN may lie in direct contact with the bone of the radial neck opposite the bicipital tuberosity, so retractors must be kept on bone and never slung behind the neck.[12]
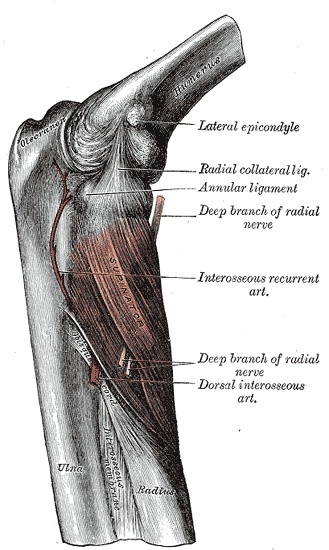
Figure 19. Deep branch of the radial nerve (posterior interosseous nerve) passing through the supinator at the lateral elbow, with the radial and annular collateral ligaments. Gray’s Anatomy plate 420 (public domain), via Wikimedia Commons.
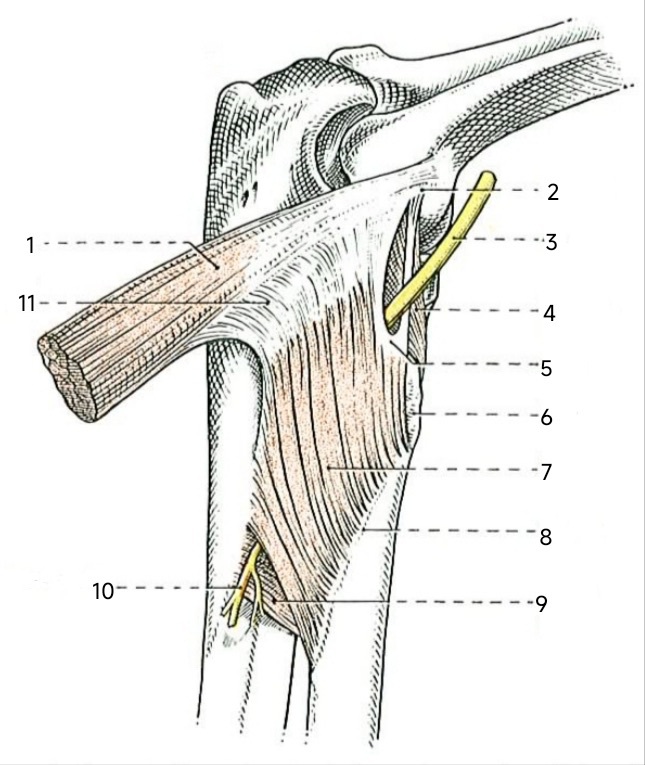
Figure 20. The supinator and the deep (posterior interosseous) branch of the radial nerve at the arcade of Frohse. Charpy, Traité d’anatomie humaine (public domain), via Wikimedia Commons.
The cubital fossa
The cubital fossa is the triangular space bounded laterally by the brachioradialis, medially by the pronator teres, and at its base by an imaginary line between the two epicondyles; its floor is the brachialis and supinator. Reading from lateral to medial, the deep contents are the biceps tendon, the brachial artery, and the median nerve. The roof is the lacertus fibrosus, which separates the superficial structures (the median cephalic and median basilic veins and the medial cutaneous nerve of the forearm) from the deep bundle (the brachial artery and median nerve). The biceps tendon is the central landmark of the fossa: the radial artery passes medial to it, the lacertus arises from it, and it rotates to insert into the bicipital tuberosity on the back of the radius, separated from the bone by a bursa.[13]
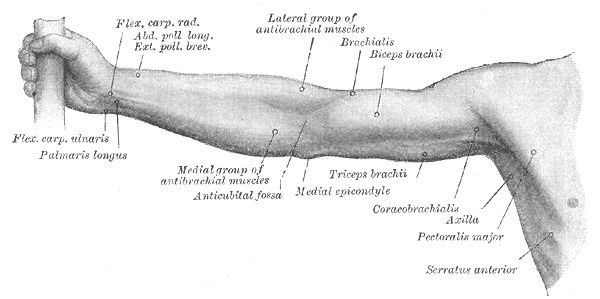
Figure 21. Surface anatomy of the front of the right upper limb, locating the cubital (antecubital) fossa, the medial epicondyle, and the flexor and extensor muscle groups. Gray’s Anatomy plate 1231 (public domain), via Wikimedia Commons.
Part II - Posterior Approaches to the Elbow
Posterior approach with olecranon osteotomy
This is the most complete exposure of the elbow, giving the best possible view of the bones of the joint. Its one real drawback is that it requires an osteotomy of the olecranon on its articular surface, which creates a second “fracture” that must itself be fixed. Its uses are ORIF of distal humeral fractures, removal of loose bodies, and treatment of distal humeral nonunion (and parts of it can lengthen the triceps for extension contracture without an osteotomy). The patient is positioned prone and intubated, the arm abducted about 90° over a sandbag with the forearm hanging, after exsanguination by elevation for three to five minutes and a high tourniquet.[14]
The incision is a longitudinal posterior line beginning about 5 cm above the olecranon, curving laterally around the tip and then back medially over the subcutaneous border of the ulna, so the suture line lies away from both the fixation hardware and the weight-bearing tip of the elbow. There is no true internervous plane, because the approach does little more than detach the extensor mechanism; it stays safe because the radial nerve enters the triceps well proximal to the dissection.[15]
The two defining steps are the ulnar nerve and the osteotomy. The ulnar nerve is identified in its groove behind the medial epicondyle, fully dissected out, and looped with tapes so it can be found at all times, but the tapes are never used for retraction, which would cause a traction lesion. If a screw will fix the osteotomy, the olecranon is drilled and tapped before it is cut. The osteotomy is a V-shaped (chevron) cut about 2 cm from the tip with its apex directed distally, made with an oscillating saw after the bone is scored longitudinally; it is cut almost through and then snapped, so the irregular surfaces key together at repair, and a chevron holds more stably after fixation than a transverse cut. The osteotomised fragment is then retracted proximally with the triceps still attached, a portion of the joint capsule stripped with it, and subperiosteal dissection lays bare all surfaces of the distal fourth of the humerus.[16]
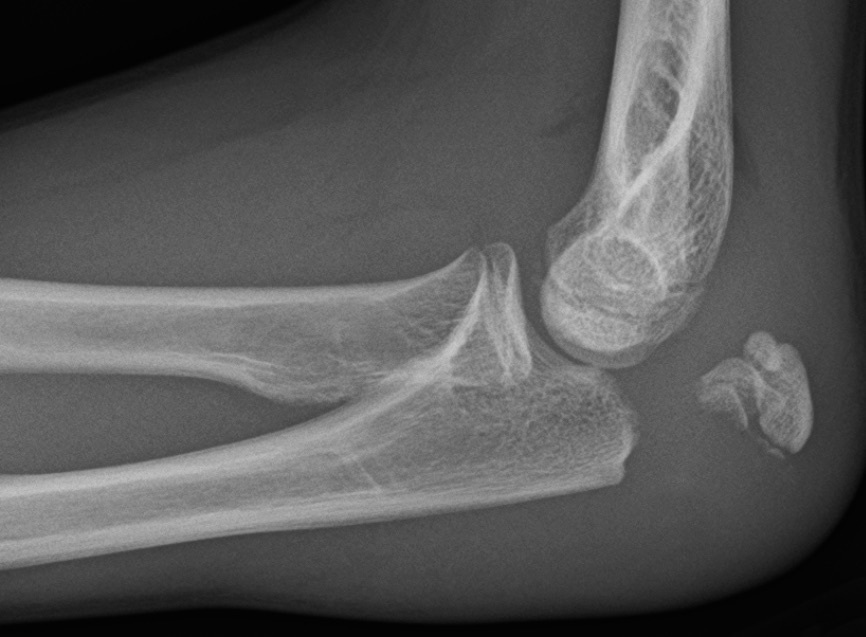
Figure 22. Lateral radiograph of an olecranon fracture; the olecranon osteotomy of the posterior approach deliberately creates and then fixes a comparable articular fracture. James Heilman MD, CC BY-SA 4.0, via Wikimedia Commons.
The dangers, beyond the ulnar nerve, are the median nerve and brachial artery lying anterior to the distal humerus (protected by keeping an epiperiosteal or subperiosteal plane on the front of the bone, which in fractures the injury has usually already done) and, proximally, the radial nerve. The single most important limit is therefore proximal: the dissection must not go above the distal third of the humerus, one handbreadth above the lateral epicondyle, because there the radial nerve crosses the lateral intermuscular septum. Distally the incision extends freely along the subcutaneous border of the ulna. The ulnar nerve is in no danger if it is identified early and not over-tractioned; it is most at risk from transverse K-wires inserted from the lateral side that overpenetrate the medial cortex, and some surgeons transpose it anteriorly at closure, especially if implant removal is anticipated.[17]
Posterior approach without olecranon osteotomy
When the olecranon must be preserved, the same posterior exposure can be achieved without cutting it. This matters most for total elbow replacement, where an intact olecranon is needed to fix the ulnar component of the prosthesis; the other uses are ORIF of distal humeral fractures and tumour excision. Every described variant ends in the same place: a flap consisting of the triceps, its olecranon insertion, and the flexor carpi ulnaris fascia, hinged laterally on the anconeus. The patient is positioned laterally rather than prone, the incision begins about 12 cm above the olecranon and runs 8 to 10 cm down the subcutaneous ulna, and again there is no true internervous plane, for the same reason as in the osteotomy approach.[18]
The key to the deep dissection, stressed repeatedly, is to keep a large, thick fascial insertion of triceps for secure reattachment to the olecranon at closure, because triceps insufficiency is the failure mode. With the elbow flexed about 30°, the extensor mechanism is reflected from medial to lateral in continuity with the forearm fascia and the ulnar periosteum, taken off the olecranon with a thin sliver of bone; the posterior capsule is then incised and the whole mechanism turned laterally, the elbow flexed to about 100° to display the joint. Throughout the medial-to-lateral release the surgeon keeps an eye on the ulnar nerve, which has been identified and slung exactly as in the osteotomy approach.[19]
Part III - Medial Approaches to the Elbow
Anteromedial approach
The anteromedial approach gives good exposure of the medial compartment of the joint and can be enlarged to reach the anterior surface of the distal fourth of the humerus. It gives poor access to the lateral side, so it should not be used for routine joint exploration. Its uses are ORIF of the coronoid (especially with repair of the medial structures), and ORIF of medial condyle and epicondyle fractures. The patient is supine with the arm abducted and the shoulder fully externally rotated so the medial epicondyle faces forward, the elbow flexed 90°, after exsanguination by five minutes of elevation and a tourniquet. The incision is a curved 8-10 cm line centred on the medial epicondyle.[20]
This approach uses a true internervous plane that changes along its length: proximally it lies between brachialis (musculocutaneous) and triceps (radial), and distally between brachialis (musculocutaneous) and pronator teres (median). The flexor-pronator mass is not split but taken down with bone. After the ulnar nerve is isolated and the pronator-brachialis interval defined, a medial epicondyle osteotomy reflects the epicondyle distally with its attached flexors. A periosteal elevator goes beneath the medial collateral ligament so the ligament stays attached to the bone fragment, since dividing the MCL would cause valgus instability; the joint is then entered by incising capsule and ligament, both to be repaired at closure.[21]
The ulnar nerve is the central danger and must be dissected out, isolated, and retracted inferiorly before the epicondyle is osteotomised. The median nerve and the brachial artery are also at risk. The median nerve enters pronator teres near the midline, so over-vigorous distal retraction of the epicondyle and its flexors can produce a traction lesion of the median nerve and of its anterior interosseous branch. This same median-nerve tether sets the distal limit of the approach: the epicondyle can only be pulled down as far as the median branches allow, so the exposure reaches the brachialis insertion on the coronoid but no further down the ulna. Proximally the approach extends by developing the triceps-brachialis plane onto the distal humerus.[22]
Posteromedial approach to the coronoid process
This is the dedicated coronoid exposure, giving excellent access to the anteromedial coronoid, the medial collateral ligament, and the sublime tubercle. The important caveat is that it is not an internervous approach and cannot be extended: it runs straight through the bed of the ulnar nerve, so that nerve is the structure most at risk. The patient is positioned laterally with the elbow flexed and the forearm hanging over a padded table, a position chosen on purpose because flexion relaxes the brachialis (which inserts on the coronoid) and gravity helps reduce proximal ulna fractures. The incision is an 8 cm curve beginning just behind the medial epicondyle and running onto the medial forearm.[23]
The dissection mobilises the ulnar nerve out of its groove and develops the plane between the two heads of the flexor carpi ulnaris (both ulnar-supplied, which is why this is not a true internervous plane), with the deeper interval lying between the ulnar-innervated flexors and the median-innervated deep head of pronator teres. This reaches the sublime tubercle, the smooth prominence on the medial lip of the coronoid that the ulnar nerve actually lies against, so the bone is exposed only once the nerve is lifted from its canal. The medial collateral ligament is identified just below the sublime tubercle (its anterior-bundle footprint) and the medial coronoid is stripped; the small ulnar heads of pronator teres and flexor carpi ulnaris are detached only if full exposure is needed. The branches of the ulnar nerve to the flexor carpi ulnaris are preserved, and the small vessels running with the nerve in the cubital tunnel often need ligation. When the coronoid fracture is part of a “terrible triad” with a radial head fracture and lateral collateral ligament rupture, a lateral approach is preferred instead.[24]
Part IV - Lateral and Anterior Approaches to the Elbow
Anterolateral approach
The anterolateral approach exposes the lateral half of the joint, especially the capitulum and the proximal third of the anterior radius. It is in effect the distal continuation of the anterolateral approach to the humerus and the proximal continuation of the anterior approach to the radius, so the three together could expose the limb from shoulder to wrist. Its uses include ORIF of the capitulum, excision of proximal radial tumours, drainage of joint infection, decompression of the proximal posterior interosseous and superficial radial nerves at the arcade of Frohse, and reinsertion of an avulsed biceps tendon. The patient is supine with the arm on an arm board, exsanguinated by three to five minutes of elevation and a tourniquet. The incision is curved, beginning 5 cm above the flexion crease over the lateral border of the biceps, curving laterally at the joint to avoid crossing the crease at a right angle, and continuing down the medial border of the brachioradialis.[25]
The internervous plane is between brachialis (musculocutaneous) and brachioradialis (radial) proximally and between brachioradialis (radial) and pronator teres (median) distally. The radial nerve is identified at the joint level deep in the oblique brachioradialis-brachialis interval, then followed distally to its trifurcation into the PIN (into the supinator), the superficial radial nerve (behind the brachioradialis), and the motor branch to the extensor carpi radialis brevis. To expose the proximal radius the forearm is fully supinated, which carries the supinator origin anteriorly and the PIN laterally away from the line of incision. The supinator is then detached from its radial origin subperiosteally; the muscle belly is never cut through to reach bone.[26]
The dangers are the radial nerve, the PIN, the lateral cutaneous nerve of the forearm, and the recurrent radial vessels. The radial nerve must be identified before the brachioradialis-brachialis interval is fully developed. The PIN is the central danger, vulnerable as it winds round the radial neck within the supinator. The lateral cutaneous nerve of the forearm (the sensory continuation of the musculocutaneous nerve) is found and preserved in the interval between biceps and brachialis. The recurrent branches of the radial artery (the “leash of Henry”) must be ligated so the brachioradialis can be mobilised; this is tedious work, but ligating them also prevents a postoperative haematoma that could cause an ischaemic contracture. The approach extends proximally onto the distal humerus (remembering the radial nerve one handbreadth above the lateral epicondyle) and distally down the whole anterior radius along radial-versus-median internervous planes.[27]
Anterior approach to the cubital fossa
This is the least commonly used elbow approach, reserved largely for exploring and repairing the neurovascular structures of the cubital fossa after laceration (median nerve, brachial artery, radial nerve, biceps tendon), and for biceps reinsertion or capsular release. Because it lays the neurovascular bundle so bare, those structures are easily injured if care is not taken. The patient is supine in the anatomic position, exsanguinated and tourniqueted. The incision is the curved “boat-race” (lazy-S) line beginning 5 cm above the crease on the medial side of the biceps (the mirror of the anterolateral incision), curving across the front of the elbow and down the medial border of the brachioradialis to avoid crossing the crease at a right angle.[28]
The distal internervous plane is between brachioradialis (radial) and pronator teres (median). The proximal interval, between brachialis and pronator teres, is not a clean internervous plane, because brachialis carries a small radial contribution on top of its musculocutaneous supply. After the skin flaps are mobilised and the crossing veins ligated, the lacertus fibrosus is identified and divided close to the biceps tendon, the gateway step, taking care not to nick the brachial artery running immediately beneath it. The brachial artery is then traced, with the median nerve lying medial to it and the brachial venae comitantes alongside.[29]
Hoppenfeld names three crucial dangers: the lateral cutaneous nerve of the forearm (preserved in the biceps-brachialis interval, vulnerable during deep-fascia incision in the distal arm), the radial artery lying immediately deep to the lacertus fibrosus (so the aponeurosis is incised carefully), and the PIN around the radial neck in the supinator (protected, again, by supinating the forearm and by keeping any retractor off the lateral aspect of the proximal radius). The approach extends proximally by following the brachial artery and median nerve up the medial border of the biceps, and distally by tracing the median nerve between the two heads of pronator teres, sparing its motor branches to the flexor-pronator mass.[30]
Posterolateral approach to the radial head (Kocher)
The posterolateral approach is the standard route to the radial head, useful for all radial-head surgery: ORIF of radial head and neck fractures, radial head excision, and prosthetic radial head replacement. It uses the lateral internervous plane between the anconeus (radial nerve) and the extensor carpi ulnaris (posterior interosseous nerve), classically the Kocher interval. The patient is supine with the arm over the chest and, importantly, the forearm pronated from the outset. The radial head is located by palpating 2.5 cm distal to the lateral epicondyle into a depression that moves under the finger on pronation and supination. The incision runs from the posterior aspect of the lateral epicondyle to a point about 6 cm distal to the olecranon tip, or alternatively a 5 cm longitudinal line over the radial head.[31]
The interval is found distally, where it is clear, since the two muscles share a common aponeurosis proximally; in trauma, when bleeding obscures the interval, it is safe to dissect straight down onto the reliably palpable lateral epicondyle. Two nerves govern the deep dissection. The forearm is fully pronated to carry the PIN medially, as far from the field as possible, and the capsule is incised longitudinally and laterally, never too far anteriorly, because the radial nerve runs over the front of the anterolateral capsule. The dissection must not pass below the annular ligament, because the PIN lies just beyond it within the supinator; and because the PIN may actually touch the bone of the radial neck opposite the bicipital tuberosity, retractors are kept strictly on bone and never slung behind the neck.[32]
The central danger is the PIN, which is safe only as long as the dissection stays proximal to the annular ligament; the radial nerve trunk is safe as long as the joint is opened laterally and not anteriorly. The approach effectively cannot be extended distally, because the upper radial shaft lies beyond the annular ligament in the PIN’s territory; for more distal exposure the surgeon converts to a Thompson approach in which the PIN is formally identified. One point Hoppenfeld does not name but that is central to modern practice is preservation of the lateral collateral / lateral ulnar collateral ligament: keeping the capsulotomy anterior to the equator of the radial head avoids detaching the LUCL and causing posterolateral rotatory instability, and hardware is placed in the radial head’s non-articular “safe zone” (about a 110° arc) to avoid blocking forearm rotation.[33]
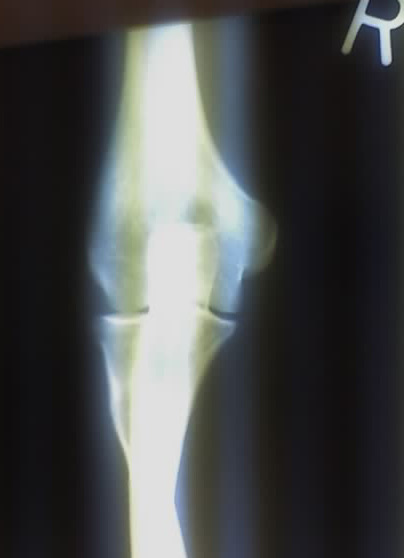
Figure 23. Normal anteroposterior radiograph of the right elbow (distal humerus, radial head and proximal ulna). Aspersions, CC BY-SA 2.5, via Wikimedia Commons.
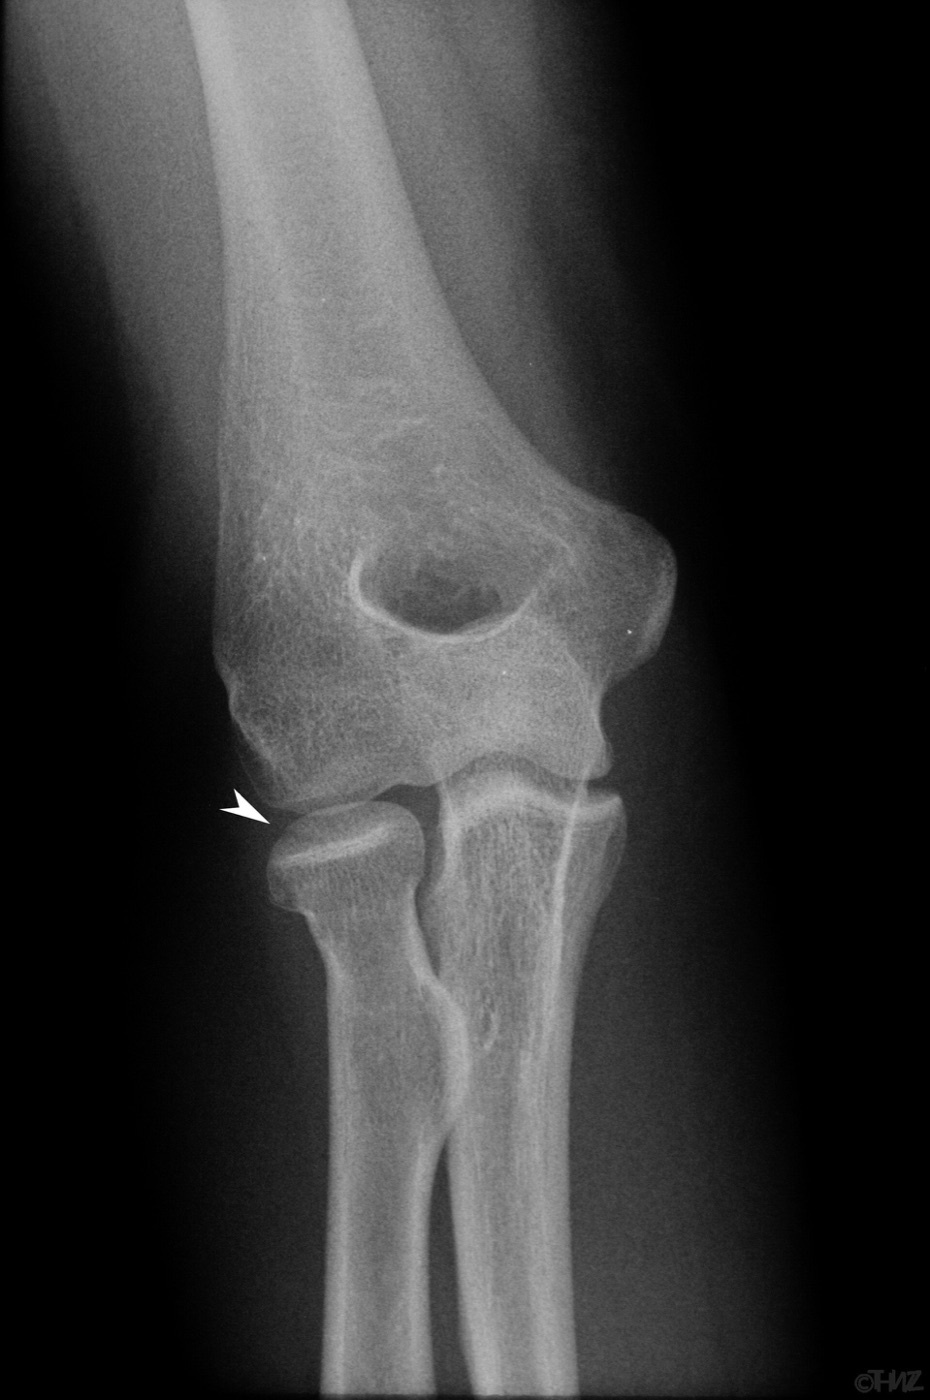
Figure 24. Anteroposterior radiograph of a minimally displaced radial head fracture (arrowhead), the typical indication for the posterolateral (Kocher) approach. Thomas Zimmermann, CC BY-SA 3.0 DE, via Wikimedia Commons.
References
-
The key neurovascular bundles pass anterior and posterior to the elbow, so medial/lateral approaches are safer but limited and anterior/posterior approaches give better access but endanger those structures; the posterior approach with osteotomy “provides the best possible exposure to all surfaces of the elbow” and is most often used for ORIF of complex fractures (Hoppenfeld, Surgical Exposures in Orthopaedics, 5th ed., ch.3, p.231).
-
The chapter presents the applied anatomy in a single later section “because the keys to the surgical anatomy are the neurovascular bundles that pass across the elbow joint; their positions are important in all the approaches” (Hoppenfeld p.231). The seven approaches: posterior with osteotomy (p.231), posterior without osteotomy (p.239), anteromedial (p.244), posteromedial to the coronoid (p.251), anterolateral (p.256), anterior to the cubital fossa (p.266), and posterolateral to the radial head (p.275), followed by applied anatomy (p.282-294).
-
The ulnar nerve is palpable in the groove behind the medial epicondyle and is the central danger of medial/posterior approaches, found early and slung but never retracted by the tape (Hoppenfeld p.234, p.247, p.253); the PIN lies within the supinator as it winds around the radial neck and is the central danger of lateral/anterior approaches to the proximal radius, protected by forearm rotation and by never cutting through the muscle belly (Hoppenfeld p.265, p.279).
-
The elbow is a hinge (ginglymus) joint that communicates with the superior radioulnar joint; its anterior/posterior ligaments are merely thickened capsule, while strong medial and lateral collateral ligaments provide stability; the bony shape plus the strong collaterals make complete exposure difficult, and “complete exposure is obtained most easily through a posterior approach” (Hoppenfeld p.283).
-
The four muscle groups: anterior flexors (musculocutaneous nerve); posterior extensor/triceps (radial nerve); medial flexor-pronator group from the medial epicondyle (median and ulnar nerves); lateral extensors/supinators from the lateral epicondyle (radial and posterior interosseous nerves) (Hoppenfeld p.283).
-
Three explorable planes: anterior vs lateral (brachialis/brachioradialis, musculocutaneous vs radial - anterolateral approach); anterior vs medial (brachialis/pronator teres, musculocutaneous vs median - medial approach); within the lateral group (anconeus/extensor carpi ulnaris, radial vs posterior interosseous nerve - posterolateral radial-head approach). The plane between the lateral and posterior groups (brachioradialis/triceps) is a pseudo-internervous plane usable only because the radial nerve branches well proximal to the elbow (Hoppenfeld p.283-284).
-
Lateral group = mobile wad of three (brachioradialis, ECRL, ECRB) plus the common extensor origin of four (extensor digitorum, extensor digiti minimi, ECU, anconeus) (Hoppenfeld p.288-289). Five flexor-pronator muscles arise from the common flexor origin (pronator teres, flexor carpi radialis, flexor digitorum superficialis, palmaris longus, flexor carpi ulnaris); the first four are median-supplied and the FCU is ulnar-supplied; after medial epicondyle osteotomy the median nerve passing through pronator teres “anchors” the group and prevents more than short distal retraction (Hoppenfeld p.285-286).
-
The distal humerus has a lateral capitulum (“reminiscent of a hemisphere”) articulating with the radial head and a medial trochlea (“resembles a spool of thread”) articulating with the ulna; the trochlea projects more distally, producing the carrying angle; the three articulations are radiocapitellar, ulnohumeral, and proximal radioulnar, the last encircled by the annular portion of the radiohumeral ligament (Hoppenfeld p.283, p.292). The two-column architecture of the distal humerus and the coronoid/radial/olecranon fossae, and the normal carrying angle of about 5-15° of valgus, are standard teaching not detailed in this extract.
-
The extract states the joint has strong medial and lateral collateral ligaments and that the anterior/posterior ligaments are thickened capsule, and it demonstrates the annular portion of the radiohumeral ligament (Hoppenfeld p.283, p.292). The bundle detail is standard teaching not spelled out in this extract: the MCL anterior bundle (medial epicondyle to the sublime tubercle of the coronoid) is the primary valgus restraint; the lateral ulnar collateral ligament (lateral epicondyle to the supinator crest) is the key restraint to posterolateral rotatory instability (PLRI).
-
The ulnar nerve crosses the joint in the groove behind the medial epicondyle (palpable), passes between the two heads of flexor carpi ulnaris (which it supplies, and where it may be entrapped), gives FCU branches just past the olecranon-epicondyle groove, then runs on the flexor digitorum profundus supplying the ring and little fingers; its exposed retrocondylar position places it at risk in all medial/posterior approaches and in medial epicondyle osteotomy (Hoppenfeld p.284-285, p.288, p.292).
-
The median nerve crosses the medial front of the joint under the lacertus fibrosus and leaves between the two heads of pronator teres, lying medial to the brachial artery; the brachial artery enters on the lateral side of the median nerve, lies on brachialis, and divides halfway down the fossa into the radial and ulnar arteries; both the median nerve and the brachial artery may be damaged in supracondylar fractures; the lacertus fibrosus roofs and protects the deep bundle (Hoppenfeld p.284-285, p.289). The supracondylar process and ligament of Struthers (an anomalous spur that can entrap the median nerve and brachial artery) are standard teaching not mentioned in this extract.
-
The radial nerve crosses the front of the elbow between brachialis and brachioradialis and divides at the radiohumeral joint line into the PIN (entering the supinator through the arcade of Frohse) and the superficial radial nerve (under the brachioradialis), with a motor branch to ECRB leaving almost immediately; the PIN winds around the radial neck within the supinator and is vulnerable during radial head excision (Strachan & Ellis, JBJS Br 1971;53:320-323, cited Hoppenfeld p.293); it may touch the radial neck opposite the bicipital tuberosity, so retractors are kept on bone (Hoppenfeld p.279, p.284, p.291-292). The “pronate to protect the PIN” rule for the radial shaft and the ~3-4 cm distance from the radiocapitellar joint are standard teaching.
-
The cubital fossa is bounded laterally by brachioradialis, medially by pronator teres, and at its base by a line between the epicondyles (floor brachialis + supinator, standard teaching); deep contents lateral to medial are the biceps tendon, brachial artery, and median nerve; the lacertus fibrosus roofs it, separating superficial veins/medial cutaneous nerve of the forearm from the deep artery and median nerve; the biceps tendon rotates to insert into the bicipital tuberosity, separated by a bursa (Hoppenfeld p.284-285, p.289).
-
The posterior approach with osteotomy gives the best view of the joint bones; its drawback is an articular-surface olecranon osteotomy that must be internally fixed; uses = ORIF of distal humeral fractures, removal of loose bodies, distal humeral nonunion (and triceps lengthening for extension contracture); position prone and intubated, arm abducted ~90° over a sandbag, forearm hanging, exsanguinate 3-5 min then high tourniquet (Hoppenfeld p.231-232).
-
Incision = longitudinal posterior line from 5 cm above the olecranon, curving laterally around the tip and back medially over the subcutaneous ulna, to keep the scar off the hardware and the weight-bearing tip; no true internervous plane (the approach detaches the extensor mechanism), safe because the radial nerve enters triceps proximal to the dissection (Hoppenfeld p.233-234).
-
Identify the ulnar nerve in its retrocondylar groove, dissect it out, and loop it with tapes for constant identification but never retract with the tapes (traction-lesion risk); if a screw is to be used, drill and tap the olecranon before the osteotomy; make a V-shaped osteotomy ~2 cm from the tip, apex directed distally, with an oscillating saw, scoring the bone first and snapping the last cortex so it keys together (a V is more stable than a transverse cut); retract the fragment proximally with the triceps attached, strip a portion of capsule, and expose all surfaces of the distal fourth of the humerus subperiosteally (Hoppenfeld p.234, p.237). The chevron entering the non-articular bare area is standard teaching.
-
Dangers: median nerve and brachial artery anterior to the distal humerus (keep a subperiosteal/epiperiosteal anterior plane; in fractures often already stripped by injury); radial nerve proximally
- do not dissect above the distal third of the humerus, one handbreadth above the lateral epicondyle, where it crosses the lateral intermuscular septum; distally extend along the subcutaneous ulna; the ulnar nerve is safe if identified early and not over-tractioned, most at risk from lateral transverse K-wires overpenetrating the medial cortex, and is optionally transposed anteriorly at closure, especially if implant removal is anticipated (Hoppenfeld p.238-239). A pitfall: the oscillating saw removes ~1 mm of bone, making truly anatomic reduction of an osteotomy (as opposed to a fracture) difficult.
-
The posterior approach without osteotomy preserves bony anatomy and is widely used for total elbow replacement (an intact olecranon is needed to fix the distal/ulnar prosthetic component), as well as ORIF and tumour excision; all variants create a flap of triceps + olecranon insertion + flexor carpi ulnaris fascia based laterally on the anconeus; position lateral, incision from 12 cm above the olecranon with an 8-10 cm distal limb along the subcutaneous ulna; no true internervous plane (radial nerve enters triceps proximal to the field) (Hoppenfeld p.231, p.240-241).
-
Keep a large, thick fascial triceps insertion for reattachment (triceps insufficiency is the failure mode); with the elbow flexed ~30°, reflect the extensor mechanism medial to lateral in continuity with the forearm fascia and ulnar periosteum, taking it off the olecranon with a sliver of bone, then incise the posterior capsule and turn the mechanism laterally, flexing the elbow to ~100° to expose the joint; the ulnar nerve is identified and slung as before and watched throughout the medial release (Hoppenfeld p.240-241, p.243). Transosseous reattachment of the triceps cuff and the Bryan-Morrey triceps-reflecting variant are standard teaching.
-
The anteromedial approach exposes the medial compartment and can be enlarged onto the anterior distal fourth of the humerus, but gives poor lateral access and should not be used for routine exploration; uses = ORIF of the coronoid (esp. with repair of the medial supporting structures) and of medial condyle/epicondyle fractures; position supine, arm abducted with the shoulder fully externally rotated so the medial epicondyle faces anteriorly, elbow flexed 90°, exsanguinate by 5 min elevation then tourniquet; incision curved 8-10 cm centred on the medial epicondyle (Hoppenfeld p.245-246).
-
True internervous plane: proximally brachialis (musculocutaneous) vs triceps (radial), distally brachialis (musculocutaneous) vs pronator teres (median); the flexor-pronator mass is taken down by a medial epicondyle osteotomy that reflects the epicondyle distally with its flexors, keeping the MCL attached to the fragment (a periosteal elevator placed beneath it) because dividing the MCL causes valgus instability; the joint is entered by incising capsule and ligament and repaired at closure (Hoppenfeld p.246-248, p.250).
-
Dangers: the ulnar nerve must be dissected out, isolated, and retracted inferiorly before the medial epicondyle osteotomy; the median nerve (entering pronator teres near the midline) and its anterior interosseous branch suffer traction lesions if the epicondyle and flexors are retracted too vigorously distally; the median branches “anchor” the group, so distal reach stops at the brachialis insertion on the coronoid; proximal extension develops the triceps-brachialis plane onto the distal humerus (Hoppenfeld p.245, p.248, p.251). The medial antebrachial cutaneous nerve crossing the incision is standard teaching.
-
The posteromedial approach gives excellent exposure of the anteromedial coronoid, the MCL, and the sublime tubercle; it does not use an internervous plane and cannot be extended, and it runs through the bed of the ulnar nerve (the structure most at risk); position lateral with the elbow flexed and forearm hanging over a padded table (flexion relaxes brachialis, gravity aids reduction of proximal ulna fractures); incision 8 cm curved, beginning just posterior to the medial epicondyle onto the medial forearm (Hoppenfeld p.252-253).
-
Mobilise the ulnar nerve from its groove and develop the plane between the two heads of flexor carpi ulnaris (both ulnar-supplied - not a true internervous plane), with the deep interval between the ulnar flexors and the median-supplied deep head of pronator teres; reach the sublime tubercle, against which the ulnar nerve lies directly, so the bone is exposed only after lifting the nerve from its canal; identify the MCL just below the sublime tubercle and strip the medial coronoid, detaching the small ulnar heads of PT/FCU only if needed; preserve the ulnar nerve’s FCU branches; small cubital-tunnel vessels often need ligation; prefer a lateral approach when the coronoid fracture is associated with a radial head fracture and/or LCL rupture (Hoppenfeld p.252-253, p.255).
-
The anterolateral approach exposes the lateral half of the joint, especially the capitulum and the proximal third of the anterior radius, linking the anterolateral humeral and anterior radial approaches; uses = ORIF of the capitulum, excision of proximal radial tumours, drainage of infection, decompression of the proximal PIN/superficial radial nerve at the arcade of Frohse, and biceps reinsertion; position supine on an arm board, exsanguinate 3-5 min then tourniquet; incision curved, from 5 cm above the flexion crease over the lateral border of biceps, curving laterally at the joint then down the medial border of brachioradialis (Hoppenfeld p.256-258).
-
Internervous plane: proximally brachialis (musculocutaneous) vs brachioradialis (radial), distally brachioradialis (radial) vs pronator teres (median); identify the radial nerve in the oblique brachioradialis-brachialis interval and follow it to its trifurcation into PIN (into supinator), superficial radial nerve (behind brachioradialis), and motor branch to ECRB; to expose the proximal radius, fully supinate the forearm to move the supinator origin anteriorly and the PIN laterally, then detach the supinator subperiosteally without cutting the muscle belly (Hoppenfeld p.259-261, p.265). In the anterolateral elbow approach Hoppenfeld specifies supination to move the PIN away from the field; the “pronate to protect the PIN” rule belongs to the radial-shaft (Henry/Thompson) approaches and is standard teaching - the unifying principle is to rotate the forearm so the PIN leaves the line of dissection.
-
Dangers: identify the radial nerve before fully developing the interval; the PIN is the central danger as it winds round the radial neck within the supinator; preserve the lateral cutaneous nerve of the forearm in the biceps-brachialis interval; ligate the recurrent radial vessels (“leash of Henry,” standard-teaching name) to mobilise brachioradialis and to prevent a postoperative haematoma/ischaemic contracture; extend proximally onto the distal humerus (radial nerve one handbreadth above the lateral epicondyle) and distally down the anterior radius via radial/median planes (Hoppenfeld p.260-261, p.265-266).
-
The anterior approach to the cubital fossa is the least commonly used elbow approach, used for repair of lacerations to the median nerve, brachial artery, radial nerve, and biceps tendon, for biceps reinsertion, and for anterior capsular release; it exposes the neurovascular bundle so directly that the structures are easily damaged; position supine in the anatomic position, exsanguinate then tourniquet; incision a curved “boat-race”/lazy-S line from 5 cm above the crease on the medial side of biceps, across the front and down the medial border of brachioradialis (Hoppenfeld p.266-267, p.272).
-
Distal internervous plane brachioradialis (radial) vs pronator teres (median); the proximal brachialis/pronator teres interval is not a clean internervous plane (brachialis has a small radial contribution in addition to musculocutaneous - standard teaching reconciling the dual innervation); mobilise skin flaps and ligate crossing veins, then divide the lacertus fibrosus close to the biceps tendon (the gateway step), protecting the brachial artery immediately beneath; trace the brachial artery with the median nerve medial to it and the venae comitantes alongside (Hoppenfeld p.267, p.269-270).
-
Three crucial dangers: the lateral cutaneous nerve of the forearm (preserved in the biceps-brachialis interval; at risk during deep-fascia incision in the distal arm); the radial artery immediately deep to the lacertus fibrosus (incise the aponeurosis carefully); the PIN around the radial neck in the supinator (supinate the forearm; never put a retractor on the lateral proximal radius); extend proximally along the brachial artery/median nerve up the medial biceps and distally tracing the median nerve between the two heads of pronator teres, sparing its flexor-pronator motor branches (Hoppenfeld p.271-274).
-
The posterolateral approach is the standard route to the radial head (ORIF of radial head/neck fractures, radial head excision, prosthetic replacement); internervous plane between anconeus (radial nerve) and extensor carpi ulnaris (posterior interosseous nerve) - the Kocher interval (eponym standard teaching); position supine, arm over the chest, forearm pronated; locate the radial head 2.5 cm distal to the lateral epicondyle in a depression that moves on pronation/supination; incision from the posterior lateral epicondyle to ~6 cm distal to the olecranon tip, or a 5 cm longitudinal line over the radial head (Hoppenfeld p.275-277).
-
Find the interval distally (the muscles share a common aponeurosis proximally); in trauma, dissect straight onto the palpable lateral epicondyle; fully pronate the forearm to carry the PIN medially away from the field; incise the capsule longitudinally and laterally, not too far anteriorly, because the radial nerve runs over the front of the anterolateral capsule; do not dissect below the annular ligament (the PIN lies beyond it in the supinator); the PIN may touch the radial neck opposite the bicipital tuberosity, so keep retractors on bone and never behind the neck (Hoppenfeld p.277-279).
-
The PIN is the central danger, safe only proximal to the annular ligament; the radial nerve trunk is safe if the joint is opened laterally not anteriorly; the approach cannot be extended distally (the upper radial shaft is beyond the annular ligament in the PIN’s territory), so convert to a Thompson approach for more distal exposure (Hoppenfeld p.275, p.279). Preservation of the LUCL (keep the capsulotomy anterior to the radial head equator to avoid PLRI) and the radial head’s ~110° non-articular safe zone for hardware are standard teaching not named in this extract.
-
Medial/lateral approaches are safe but limited; complete exposure is best posteriorly; the posterior approach with osteotomy gives the best view but requires an articular-surface olecranon osteotomy that must be fixed (Hoppenfeld p.231-232, p.283).
-
Identify, dissect, and sling the ulnar nerve (never retract with the tape - traction lesion); predrill and tap before cutting; V-shaped osteotomy ~2 cm from the tip, apex distal, scored and snapped to key together; chevron more stable than transverse (Hoppenfeld p.234). The bare-area entry is standard teaching.
-
Anteromedial plane: brachialis/triceps proximally, brachialis/pronator teres distally; flexor-pronator mass taken down by medial epicondyle osteotomy with the MCL kept on the fragment to avoid valgus instability (Hoppenfeld p.246-248).
-
The median nerve anchors the flexor-pronator group through pronator teres, limiting distal reach to the brachialis insertion on the coronoid; over-retraction risks median/anterior interosseous traction lesions (Hoppenfeld p.248, p.251, p.286).
-
The posteromedial coronoid approach goes through the ulnar nerve’s bed, between the two ulnar-supplied heads of FCU, so it is not internervous and cannot be extended; the ulnar nerve is lifted from its canal to reach the sublime tubercle it sits against, preserving its FCU branches (Hoppenfeld p.252-253, p.255).
-
The sublime tubercle is the smooth medial-coronoid prominence and the MCL anterior-bundle footprint; the ulnar nerve lies against it (Hoppenfeld p.253). That the anterior bundle is the primary valgus restraint is standard teaching.
-
Anterolateral approach: supinate the forearm to move the supinator origin anteriorly and the PIN laterally (Hoppenfeld p.261, p.265); Kocher approach: pronate the forearm to move the PIN medially (Hoppenfeld p.279); never cut the supinator belly. The “pronate to protect the PIN” radial-shaft rule is standard teaching.
-
Capsulotomy lateral and not too anterior (radial nerve over the anterolateral capsule) and not below the annular ligament (PIN beyond it in the supinator); retractors on bone (PIN may touch the radial neck opposite the bicipital tuberosity) (Hoppenfeld p.279).
-
Cubital fossa contents lateral to medial: biceps tendon, brachial artery, median nerve; roofed by the lacertus fibrosus separating deep from superficial structures; the brachial artery lies immediately deep to the lacertus (Hoppenfeld p.284-285, p.289-290).
-
The three crucial dangers: lateral cutaneous nerve of the forearm, radial artery deep to the lacertus, and the PIN around the radial neck in the supinator (Hoppenfeld p.272).
-
The recurrent radial vessels are ligated to mobilise brachioradialis and to prevent a postoperative haematoma/ischaemic contracture (Hoppenfeld p.265). The “leash of Henry” name is standard teaching.
-
Posterior approach: proximal limit at the distal third of the humerus, one handbreadth above the lateral epicondyle (radial nerve crossing the lateral intermuscular septum), distally extensile along the subcutaneous ulna (Hoppenfeld p.238-239); Kocher approach: not extensile distally onto the upper radial shaft (beyond the annular ligament, PIN territory), convert to a Thompson approach (Hoppenfeld p.275, p.279). The Thompson conversion is standard teaching.