Contents
- Orientation
- Part I - Applied Surgical Anatomy of the Arm
- The organising idea: two compartments, three shared nerves and arteries
- The radial nerve - the key surgical landmark
- Brachialis: the worked example of dual innervation
- The musculocutaneous nerve
- The median nerve and brachial artery
- The ulnar nerve
- Bony anatomy relevant to the approaches
- Clinical correlations to carry into the viva
- Part II - Anterior (Anterolateral) Approach to the Humeral Shaft
- Part III - Posterior Approach to the Humerus
- Part IV - Approaches to the Distal Humerus
- References
Orientation
The arm, meaning the segment between shoulder and elbow, looks on a first reading like one of the simpler regions of the limb to expose. It has a single long bone, two clean muscle compartments, and no joint in its middle to complicate the dissection. That impression is misleading, and the reason has a name: the radial nerve. Almost everything that makes humeral surgery interesting, and everything that makes it dangerous, follows from the way this one nerve wraps obliquely around the back of the bone, slips through the lateral intermuscular septum, and then runs down between two muscles on the front of the arm before it ever reaches the elbow. Hoppenfeld states the principle plainly at the head of the chapter: in every approach to the humerus, the radial nerve is the structure at greatest risk.[1]
This summary is built for the viva and for the operating room behind it. It opens with the applied anatomy, because the approaches make sense only once the path of the radial nerve (and, secondarily, the median, ulnar, and musculocutaneous nerves and their companion arteries) is fixed in the mind. It then works through the approaches in the order a surgeon meets them: the anterior (anterolateral) approach to the humeral shaft, including its minimally invasive variant; the posterior approach to the humerus; and the three approaches to the distal humerus, namely anterolateral, lateral, and medial. For each approach the highest-yield items are the internervous plane and the dangers, and these are flagged throughout, because they are what examiners ask about and what protects the patient.[2]
One recurring theme is worth stating once at the outset. Two of the muscles of the arm have a dual nerve supply, the brachialis (musculocutaneous and radial) and the medial head of triceps (radial and ulnar), and in both cases that duality is not a piece of trivia but the anatomical permission to split the muscle longitudinally without denervating either half. The anterior approach exploits the first; the posterior approach exploits the second. Keep that idea in hand and the dissections become logical rather than arbitrary.[3]
Part I - Applied Surgical Anatomy of the Arm
The organising idea: two compartments, three shared nerves and arteries
The neurovascular structures of the arm do not stay obediently in one operative field. They cross from compartment to compartment as they descend, and that crossing is precisely where they are caught by the surgeon’s knife or retractor. Hoppenfeld therefore recommends viewing the arm not as a collection of separate structures but as two muscle compartments, flexor (anterior) and extensor (posterior), that share three major nerves and three major arteries between them. Learn where each nerve changes compartment and you have learned where it is in danger.[4]
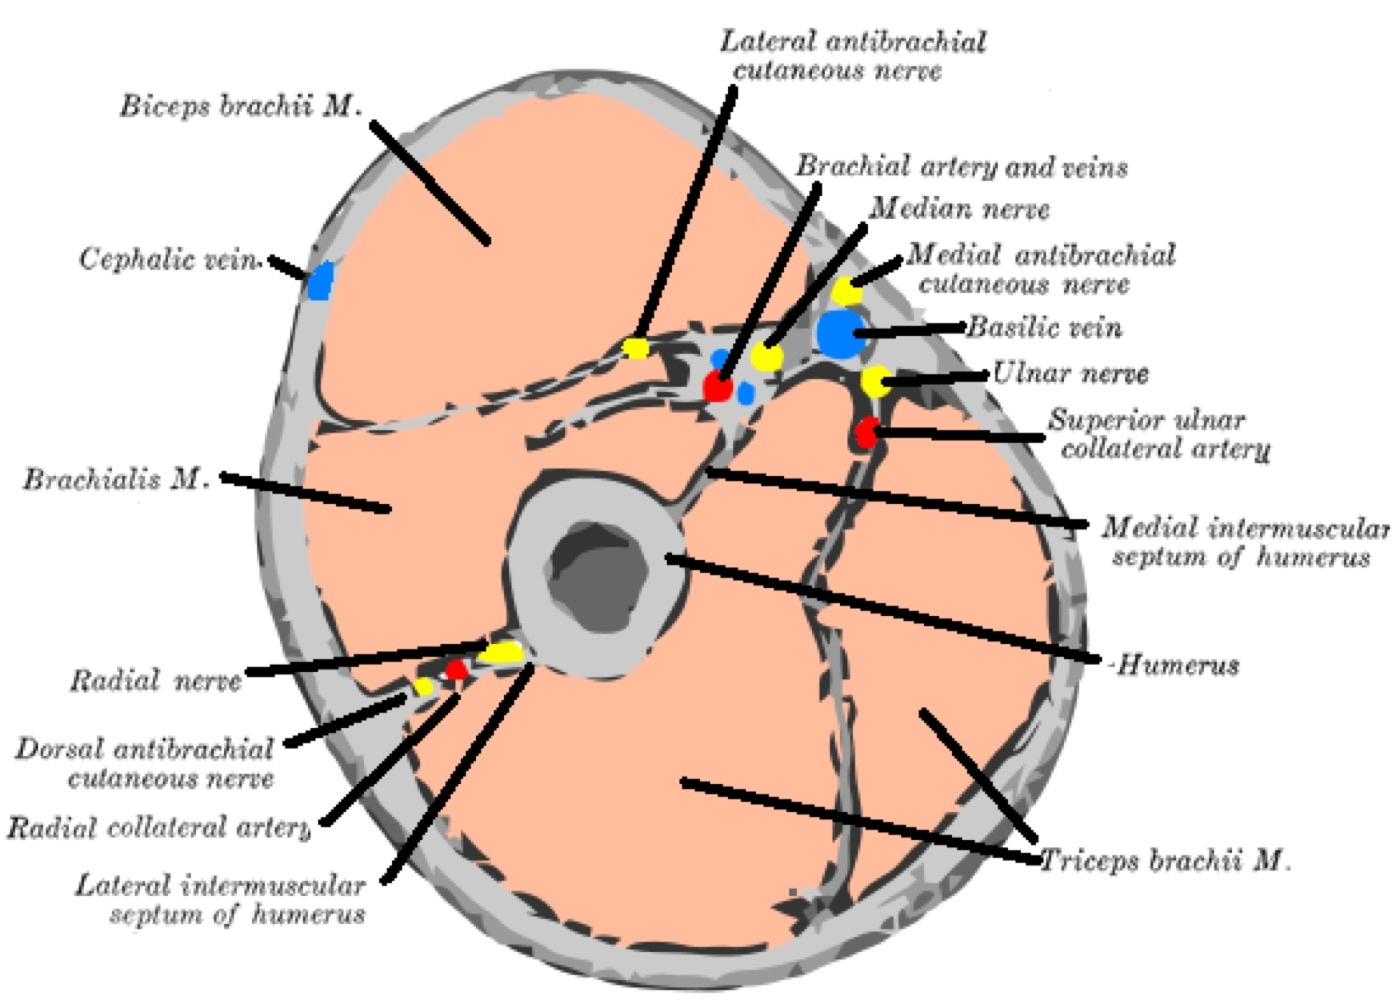
Figure 1. Transverse section of the mid-arm showing the anterior (flexor) and posterior (extensor) compartments, the medial and lateral intermuscular septa, and the positions of the radial, median and ulnar nerves with the brachial artery. Gray’s Anatomy plate 413 (public domain), via Wikimedia Commons.
The anterior (flexor) compartment contains three muscles: the coracobrachialis, the biceps brachii, and the brachialis. Two of them (biceps and brachialis) flex the elbow, and the compartment is, broadly, the territory of the musculocutaneous nerve. The posterior (extensor) compartment contains a single muscle, the triceps brachii, supplied by the radial nerve. In the distal two-thirds of the arm the two compartments are walled off from each other by the medial and lateral intermuscular septa, and it is the holes that nerves punch through these septa that matter most: the radial nerve pierces the lateral septum to enter the front of the arm, and the ulnar nerve pierces the medial septum to leave it.[5]
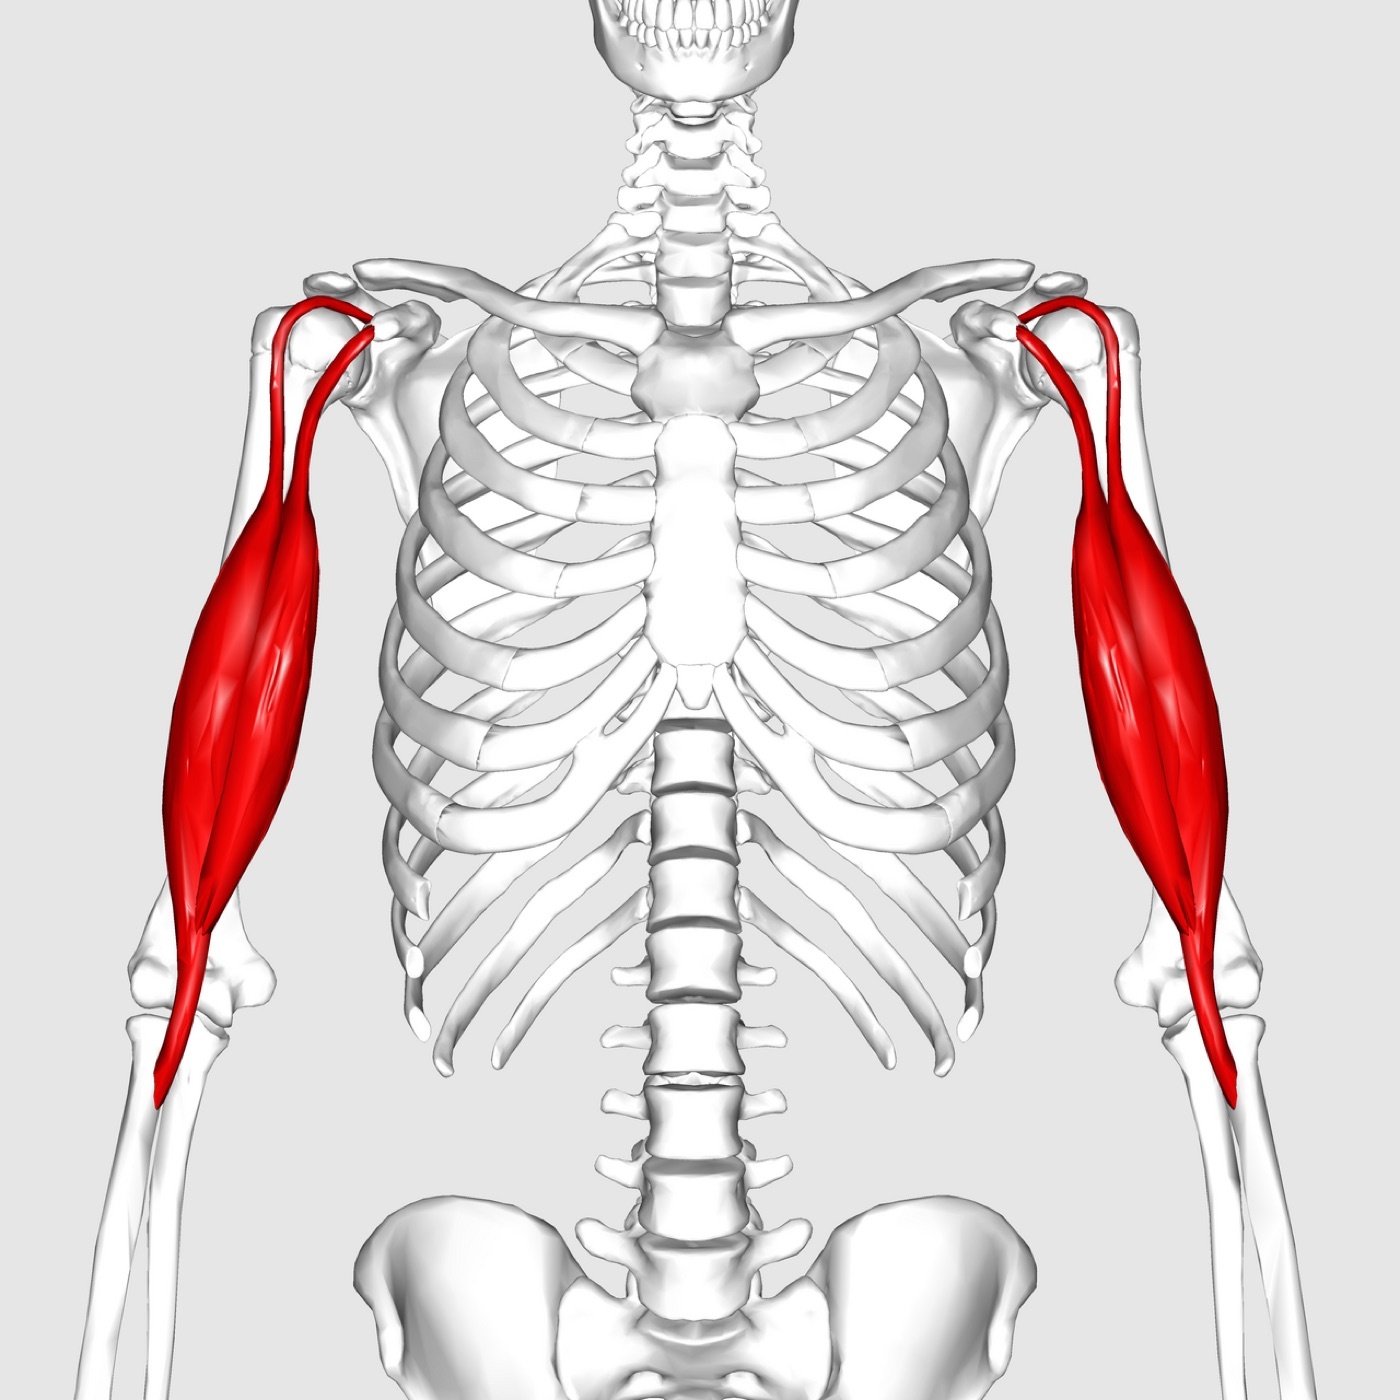
Figure 2. Biceps brachii (anterior compartment), highlighted on an articulated skeleton. Anatomography, CC BY-SA 2.1 JP, via Wikimedia Commons.
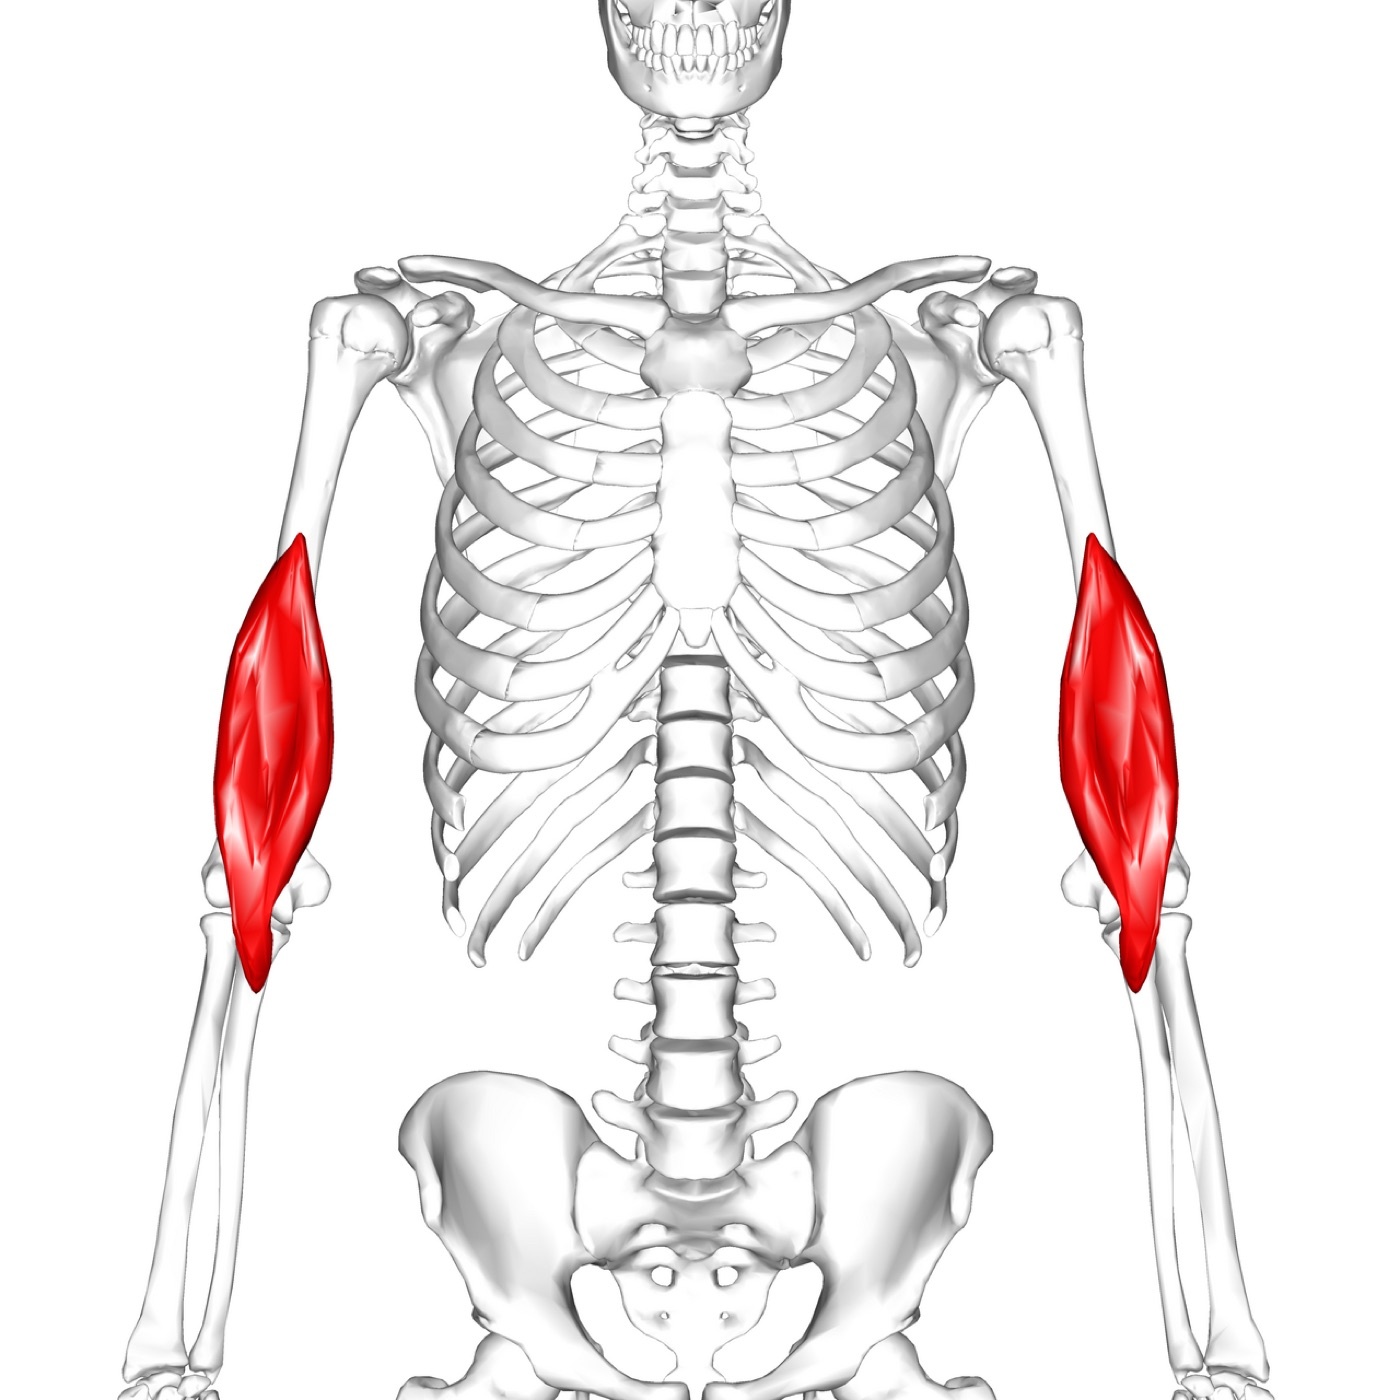
Figure 3. Brachialis, the deep flexor of the elbow and workhorse of the anterior compartment, highlighted. Anatomography, CC BY-SA 2.1 JP, via Wikimedia Commons.
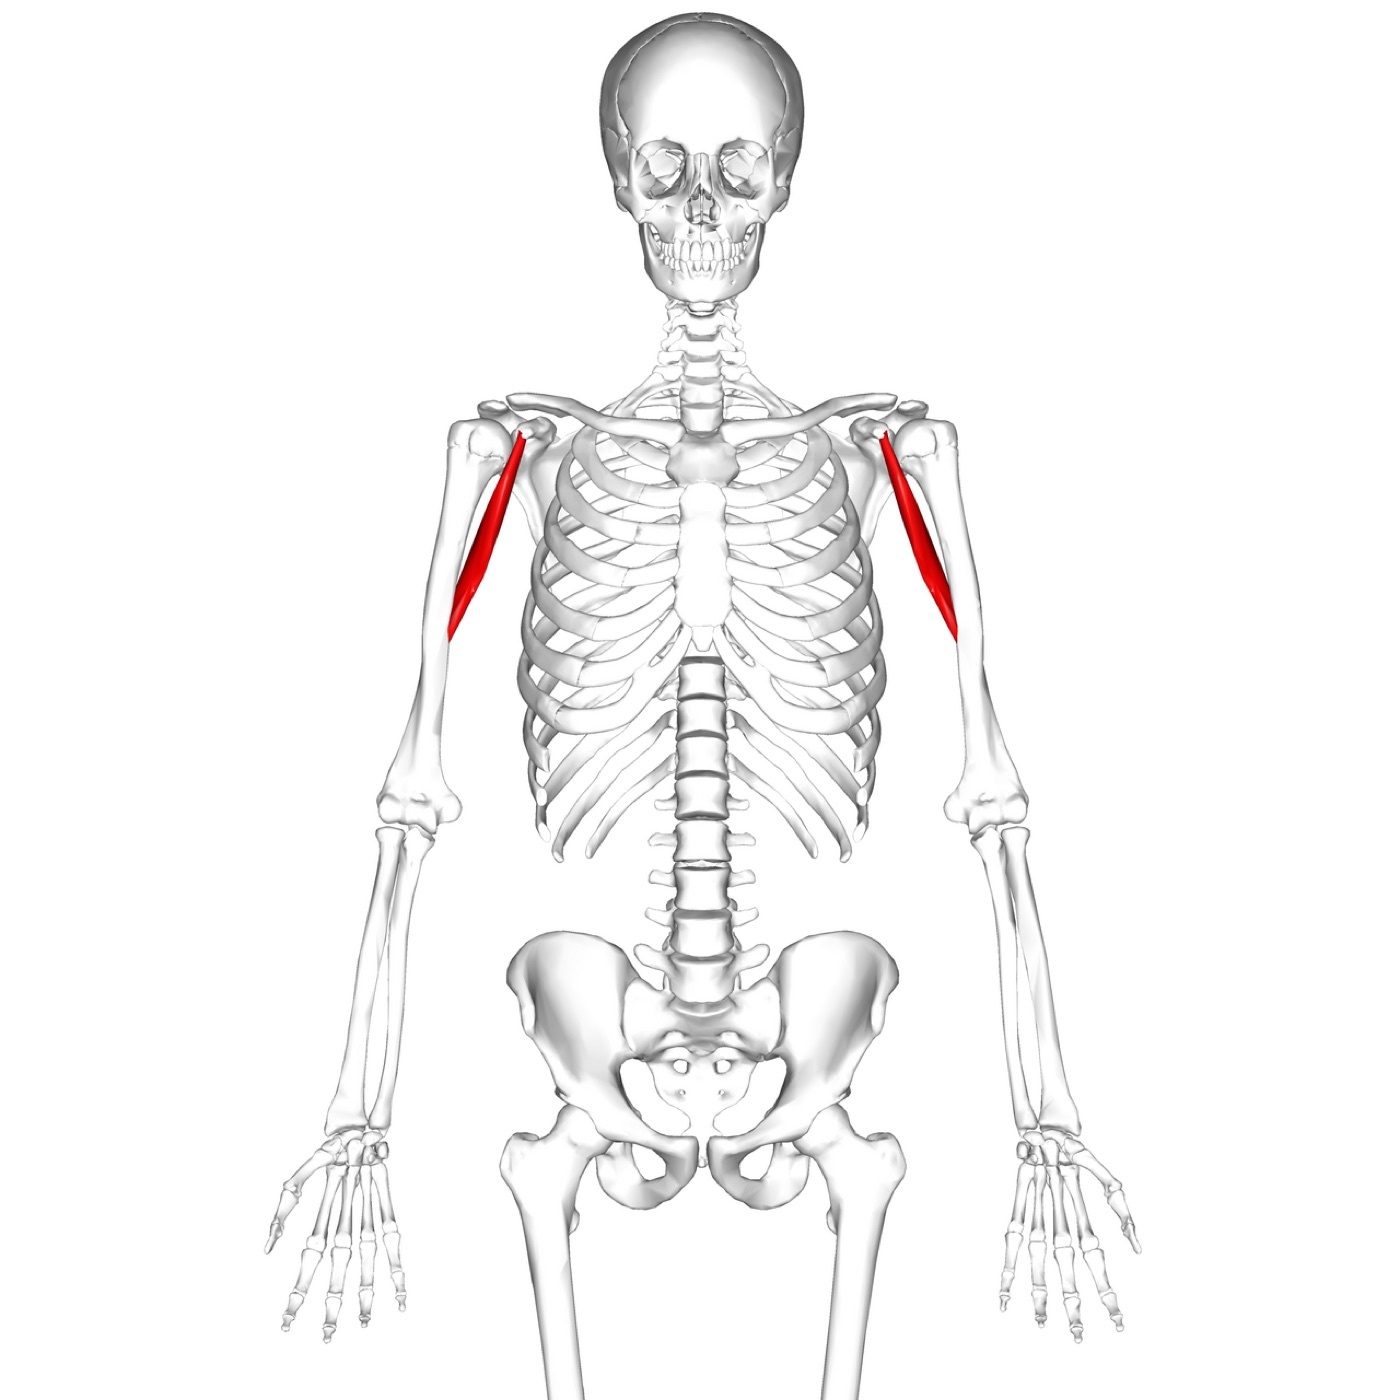
Figure 4. Coracobrachialis in the upper anterior compartment, the muscle pierced by the musculocutaneous nerve, highlighted. Anatomography, CC BY-SA 2.1 JP, via Wikimedia Commons.
A single sentence from the text captures the vascular logic of the whole region and is worth memorising verbatim in substance: the vascular organisation of the arm is simple because each nerve takes one artery with it. The median nerve travels with the brachial artery, the radial nerve with the profunda brachii (deep brachial) artery, and the ulnar nerve with the ulnar collateral artery. All three arteries then anastomose freely around the elbow, which is why the collateral circulation of the elbow is so robust.[6]
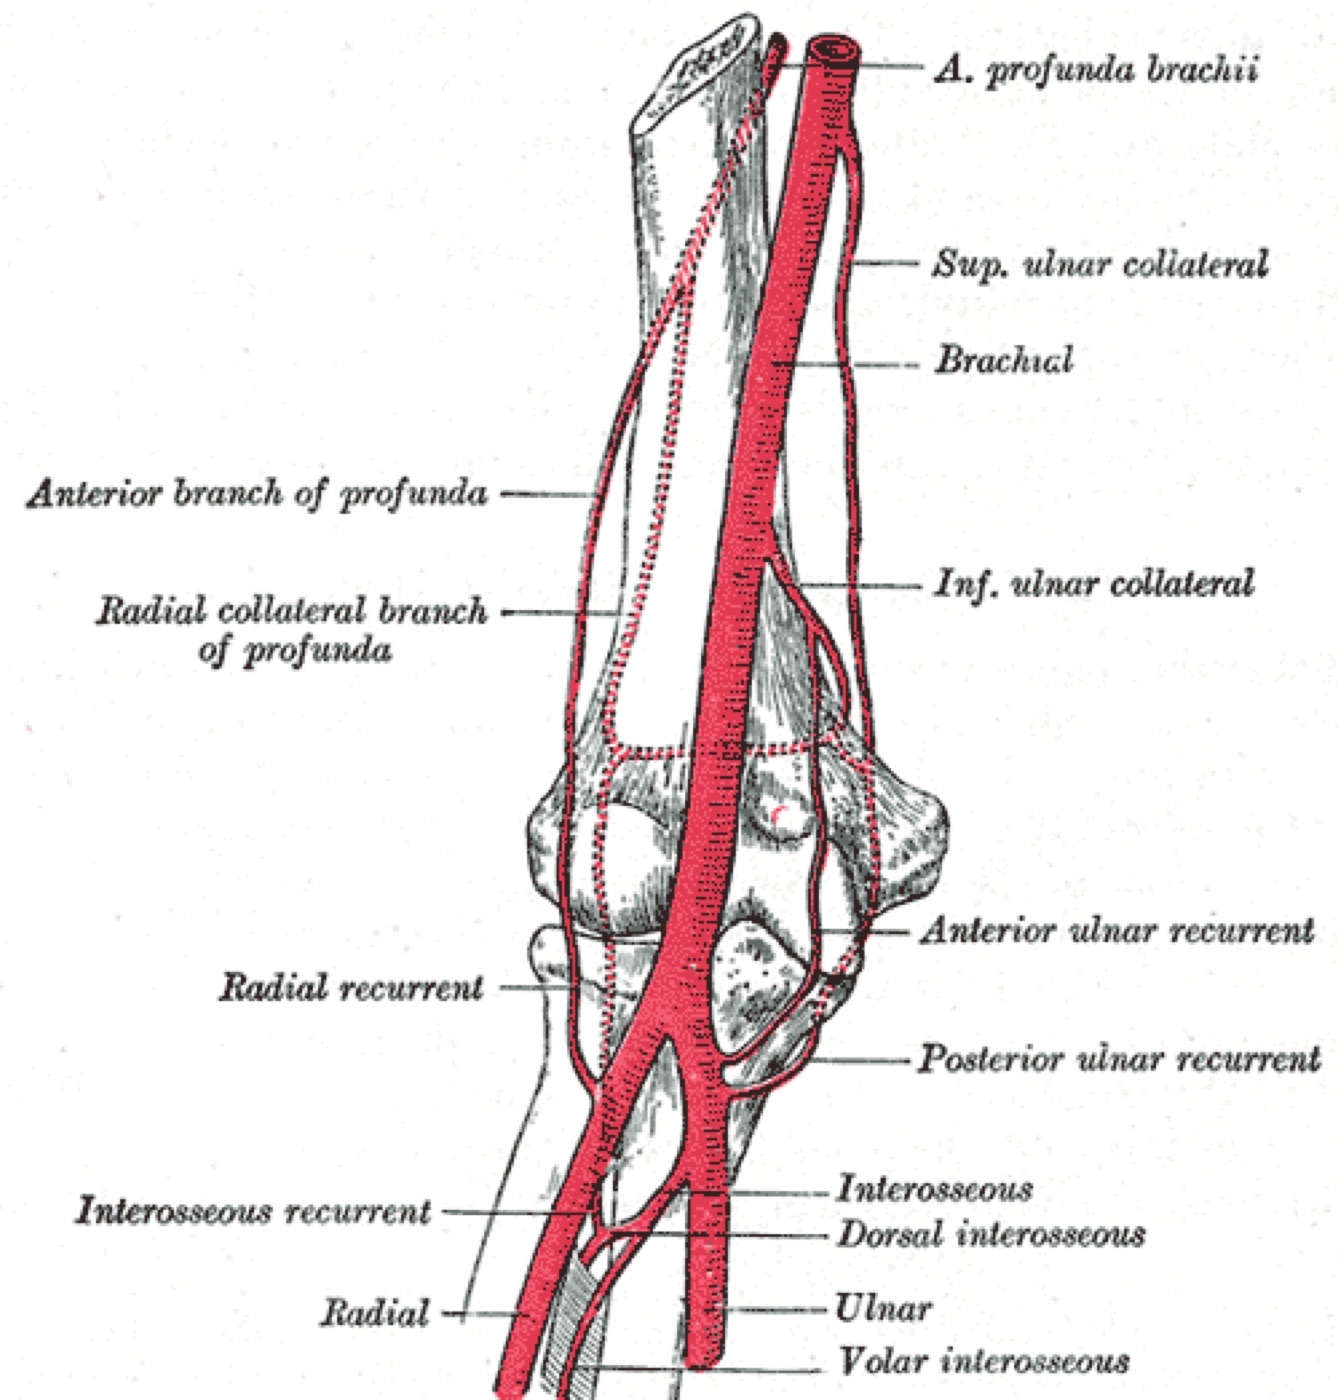
Figure 5. Arteries of the arm and elbow, including the profunda brachii artery that accompanies the radial nerve, and the collateral and recurrent vessels that anastomose around the elbow. Gray’s Anatomy plate 526 (public domain), via Wikimedia Commons.
The radial nerve - the key surgical landmark
The radial nerve is the continuation of the posterior cord of the brachial plexus. It begins behind the axillary artery at the shoulder and runs along the posterior wall of the axilla, lying on the subscapularis, latissimus dorsi, and teres major. It then passes through the triangular interval (the gap bounded above by teres major, and on either side by the long head of triceps and the shaft of the humerus) to reach the back of the arm, carrying the profunda brachii artery with it.[7]
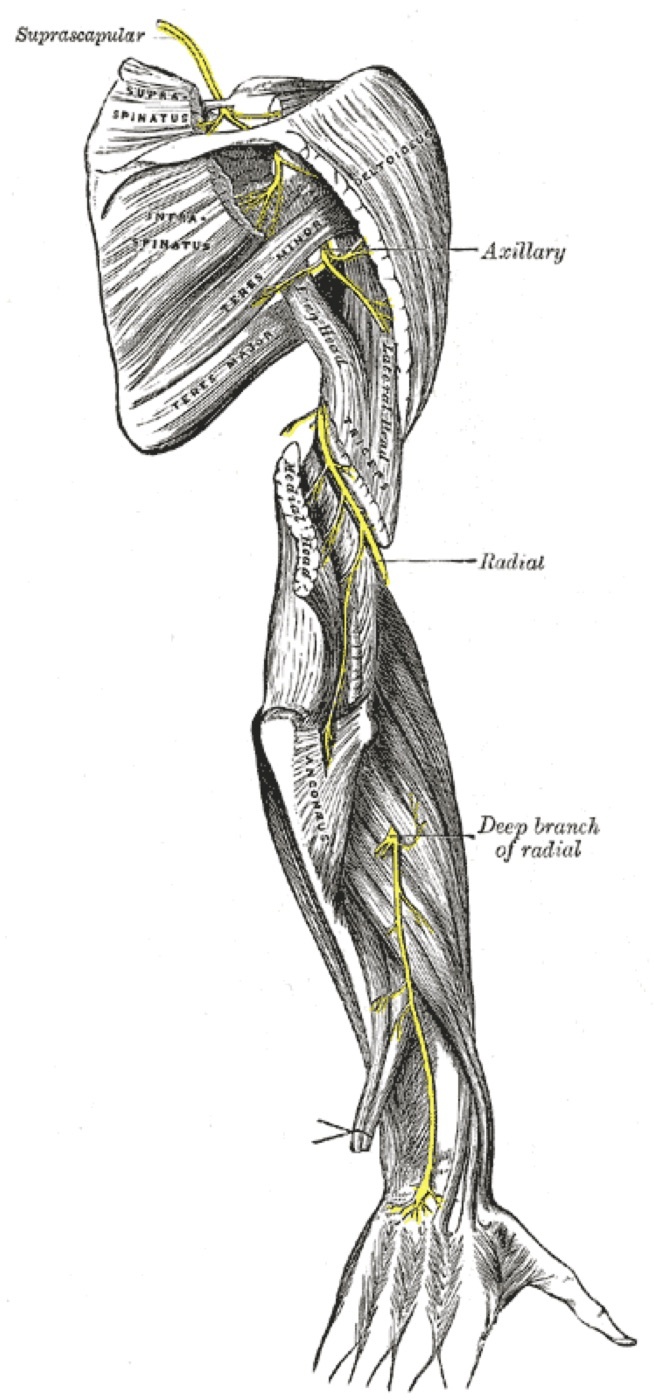
Figure 6. The radial nerve coursing across the back of the arm, with the suprascapular and axillary nerves: the structure at greatest risk in posterior and lateral approaches to the humerus. Gray’s Anatomy plate 818 (public domain), via Wikimedia Commons.
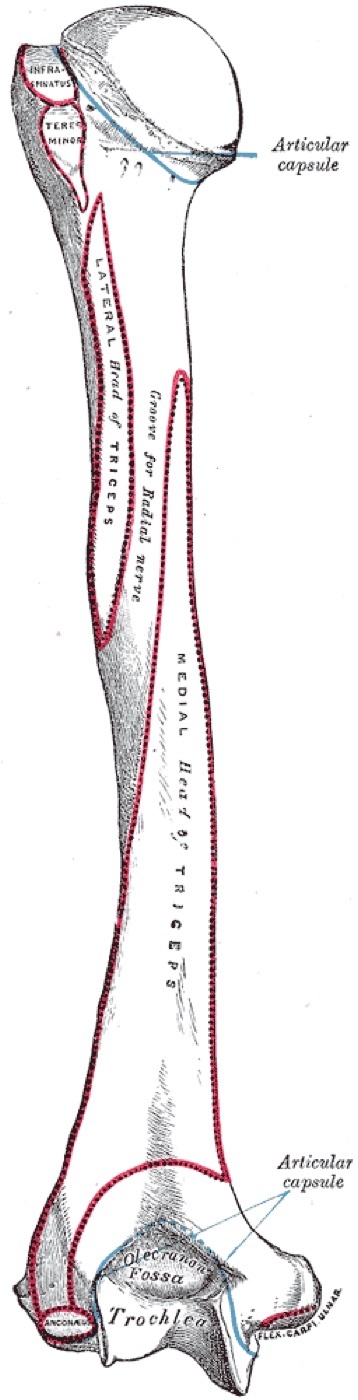
Figure 7. Posterior view of the left humerus showing the spiral (radial) groove and the triceps head origins. Gray’s Anatomy plate 208 (public domain), via Wikimedia Commons.
In the arm proper the nerve lies in the spiral (radial) groove on the posterior surface of the humerus, sandwiched between the origins of the lateral and medial (deep) heads of the triceps. This is the anatomical fact behind almost every danger in humeral surgery: the nerve is here held directly against bone over the middle third of the shaft, with no muscle cushion between it and a drill, screw, retractor, or fracture spike. As it crosses, it gives branches to the lateral head and to the lateral part of the medial head of triceps.[8]
Having crossed the back of the bone, the radial nerve pierces the lateral intermuscular septum and enters the anterior compartment in the distal third of the arm, where it comes to lie in the groove between the brachialis and the brachioradialis. It continues across the front of the elbow and then divides; its main continuation is the posterior interosseous nerve, which dives into the supinator beneath the arcade of Frohse, the anatomical site of posterior-interosseous-nerve entrapment (radial tunnel syndrome). The point where the nerve pierces the septum is its second site of surgical vulnerability and, notably, the level at which it can be caught by lateral-to-medial distal locking bolts of a humeral nail.[9]
The two danger points should be stated as a pair, because they recur in every approach: (1) the spiral groove against the posterior mid-shaft, and (2) the point where the nerve pierces the lateral intermuscular septum to run between brachialis and brachioradialis distally. The distal plane is oblique, not vertical, with brachioradialis overlying brachialis, which is why the nerve is easy to miss if one expects a tidy longitudinal interval.[10]
Brachialis: the worked example of dual innervation
The brachialis is the true workhorse of elbow flexion (Hoppenfeld calls it exactly that), with the biceps coming into play mainly when extra strength or speed is required. Its surgical importance lies in its dual nerve supply: the medial part by the musculocutaneous nerve, the lateral part by the radial nerve. Because each half has its own nerve, the muscle can be split straight down its midline and neither half is denervated. This is the entire basis of the distal portion of the anterior approach, and because the musculocutaneous supply is dominant, even sacrificing the radial twigs to the lateral part has little functional cost.[11]
The musculocutaneous nerve
The musculocutaneous nerve is the motor supply of the flexor compartment. It pierces the coracobrachialis, then runs down on the surface of the brachialis between it and the biceps, supplying both elbow flexors. Its terminal branch emerges at the lateral border of the biceps just above the elbow crease as the lateral cutaneous nerve of the forearm (lateral antebrachial cutaneous nerve), a purely sensory continuation that is at risk whenever the biceps-brachialis interval is opened to its distal extent.[12]
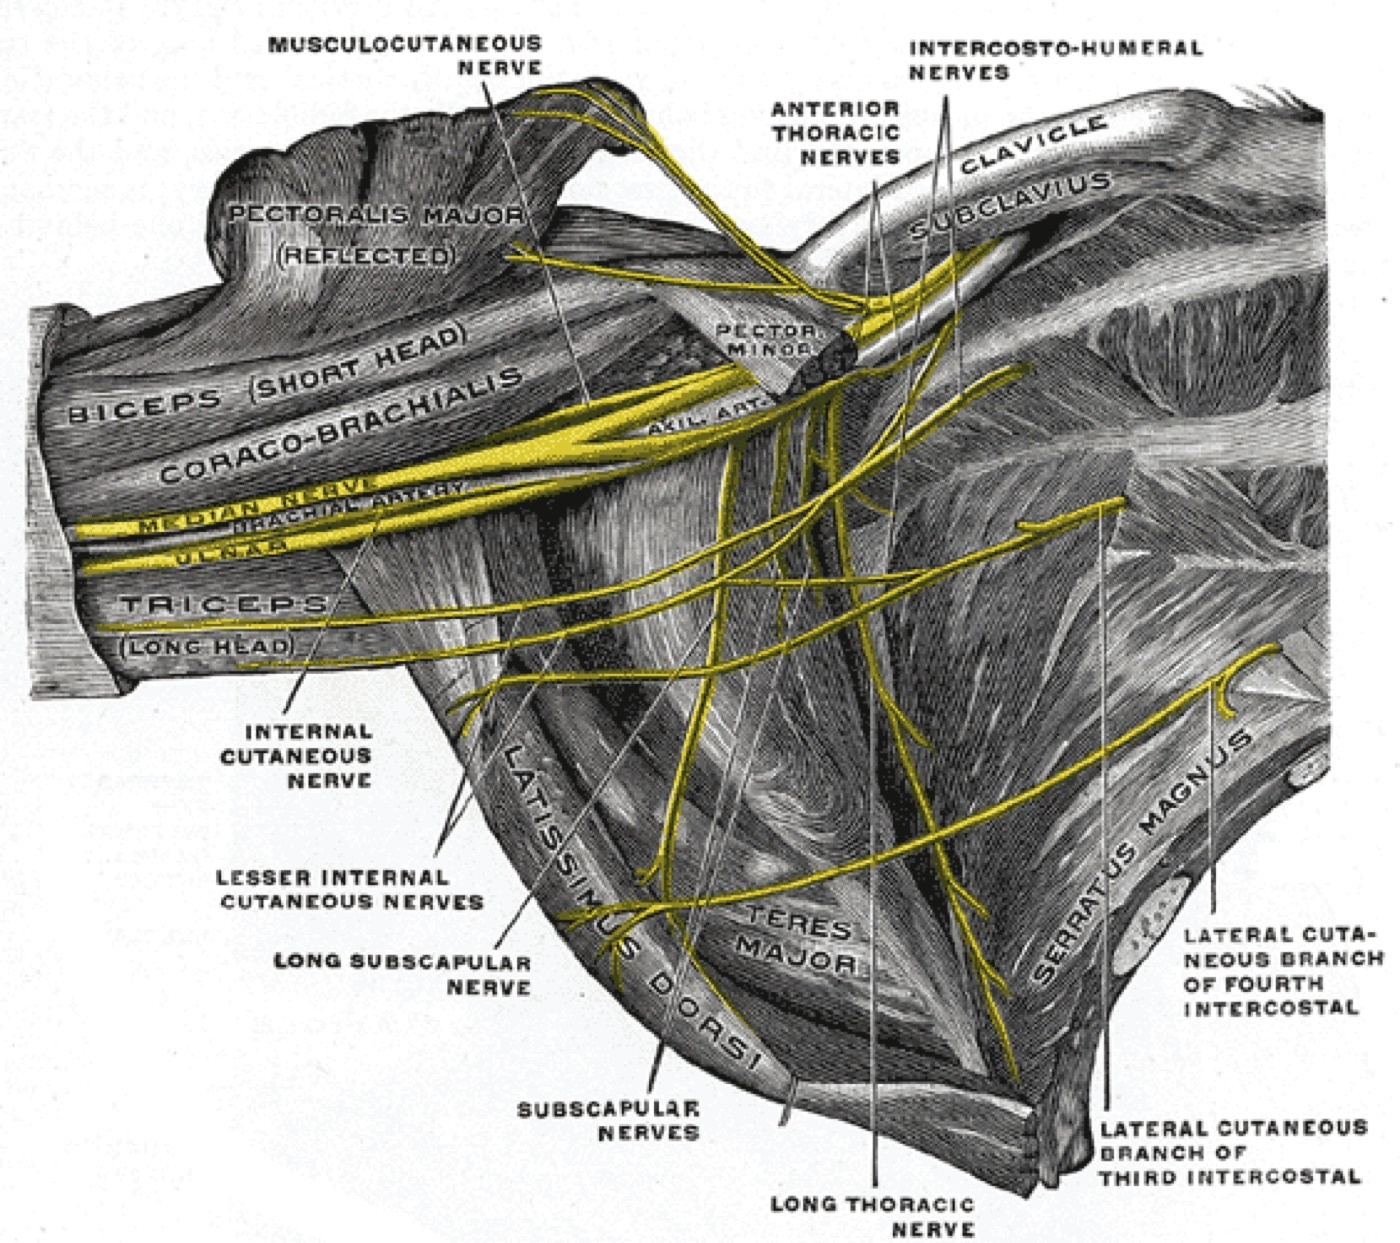
Figure 8. The infraclavicular brachial plexus in the axilla, showing the musculocutaneous nerve running toward coracobrachialis and biceps, the median nerve with the brachial artery, and the ulnar nerve. Gray’s Anatomy plate 809 (public domain), via Wikimedia Commons.
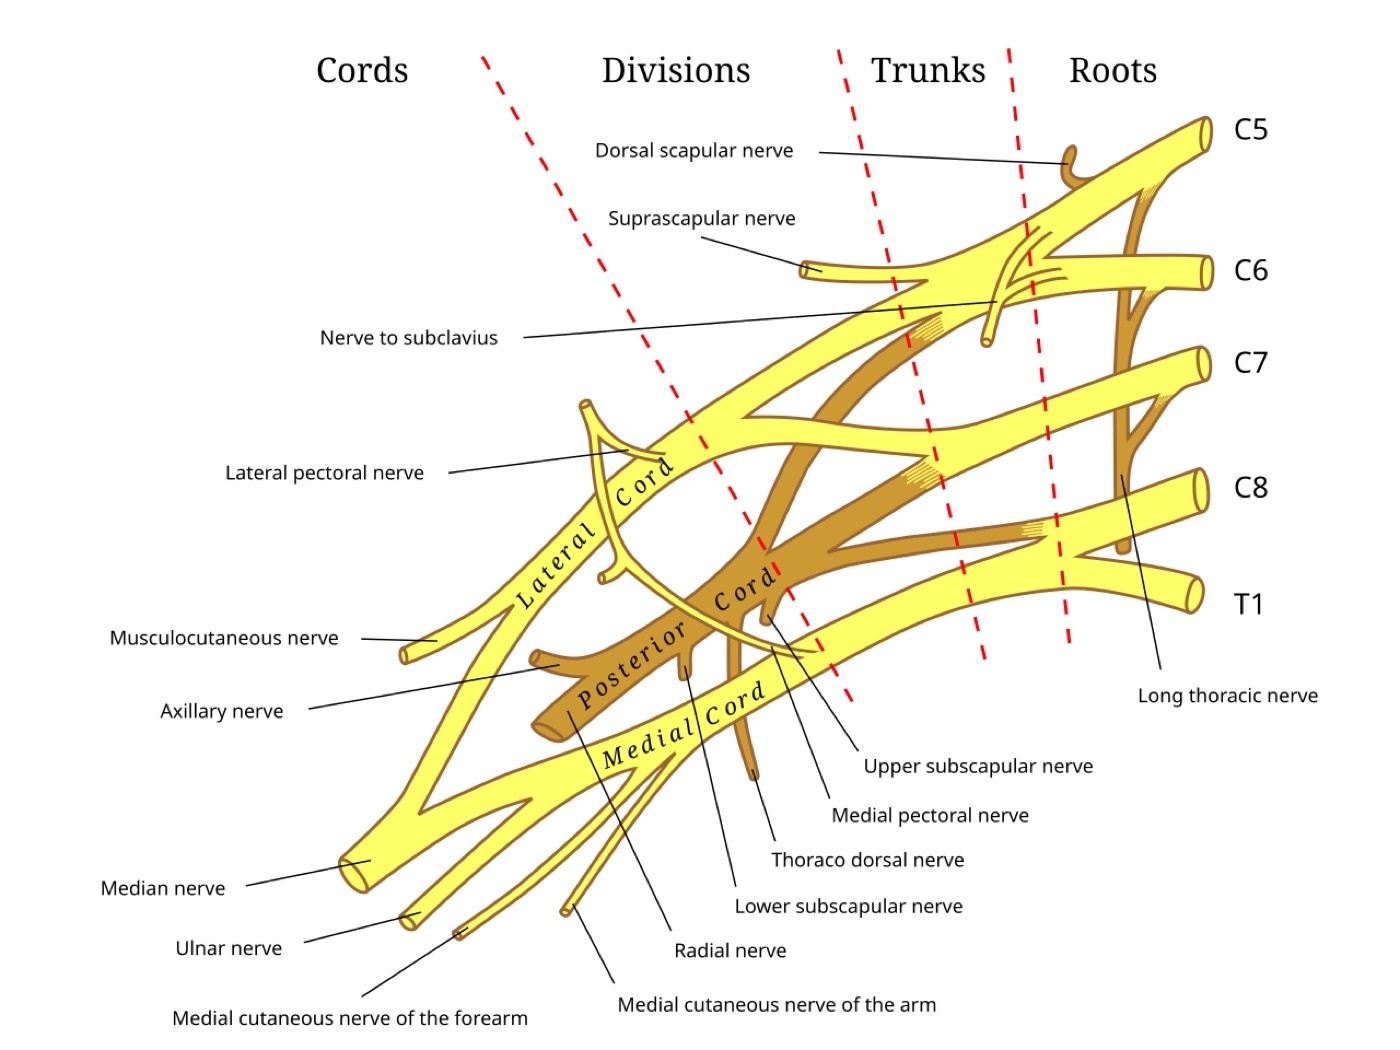
Figure 9. Schematic of the brachial plexus: roots (C5-T1), trunks, divisions and cords, with the five terminal branches, the musculocutaneous, axillary, median, ulnar and radial nerves. After Gray’s Anatomy (public domain), via Wikimedia Commons.
The median nerve and brachial artery
The median nerve and the brachial artery are the medial neurovascular bundle of the arm, and both are notable for what they do not do: like the ulnar nerve, the median nerve gives no muscular branches in the arm. The median nerve stays in the anterior compartment throughout, lying anteromedial to the humerus. It crosses the brachial artery from lateral to medial as it descends, so that it begins lateral to the artery in the upper arm and ends medial to it in the cubital fossa.[13]
The brachial artery runs down the medial border of the arm with the median nerve, under the biceps and onto the brachialis, covered medially only by deep fascia, which is why it is palpable along its whole length. It lies medial to the humerus in the upper two-thirds of the arm; at the elbow it curves laterally to lie over the anterior surface of the bone, exactly where it is endangered by supracondylar fractures of the humerus. The axillary artery becomes the brachial artery at the lower border of teres major.[14]
The ulnar nerve
The ulnar nerve, like the median, has no branches in the arm. It begins in the anterior compartment, lying behind the brachial artery in the upper half of the arm, and then pierces the medial intermuscular septum about two-thirds of the way down to enter the posterior compartment. There it runs on the deep surface of the medial head of triceps and comes to lie on the back of the medial epicondyle, where it is almost subcutaneous. That is the position that makes it palpable in the cubital tunnel and vulnerable in any medial-side distal humeral dissection. One subtlety worth knowing: the radial fibres destined for the medial half of the medial head of triceps “hitchhike” within the ulnar nerve for part of their course, so closely bound that they were once mistaken for ulnar branches.[15]
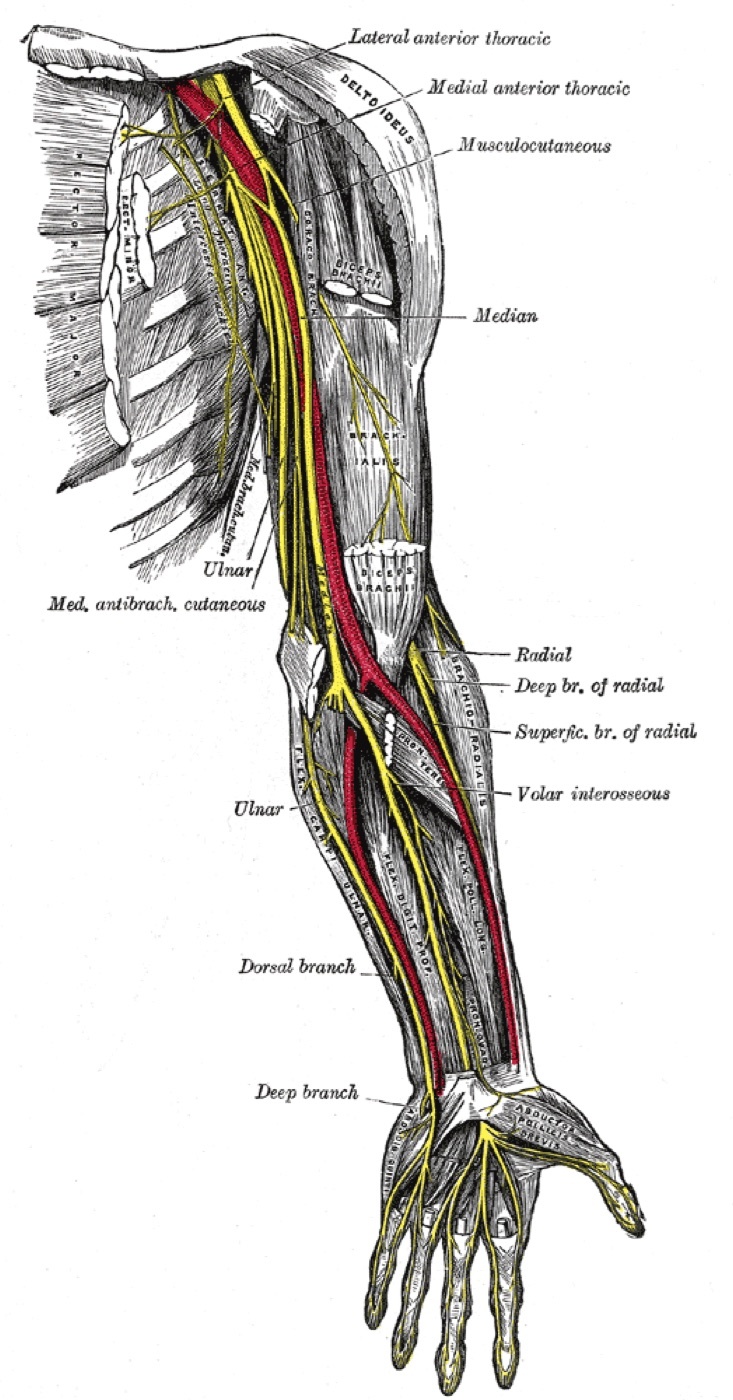
Figure 10. Nerves of the left upper limb: the brachial artery (red) with the median and ulnar nerves on the medial side of the arm, the musculocutaneous nerve, and the radial nerve with its branches. Gray’s Anatomy (public domain), via Wikimedia Commons.
Bony anatomy relevant to the approaches
The humerus is approached, in this chapter, largely through its surfaces and ridges rather than its articular ends. The landmarks that recur are: the spiral groove on the posterior surface (radial nerve); the deltoid tuberosity laterally (insertion of deltoid, a marker of the mid-shaft on the anterior approach); the medial and lateral supracondylar ridges distally; the medial epicondyle, a large subcutaneous mass behind which the ulnar nerve runs; and the lateral epicondyle, the smaller of the pair, giving origin to the common extensors. The brachialis takes origin from the lower two-thirds of the anterior surface and inserts on the coronoid and tuberosity of the ulna; the triceps origins are detailed in Part III.[16]
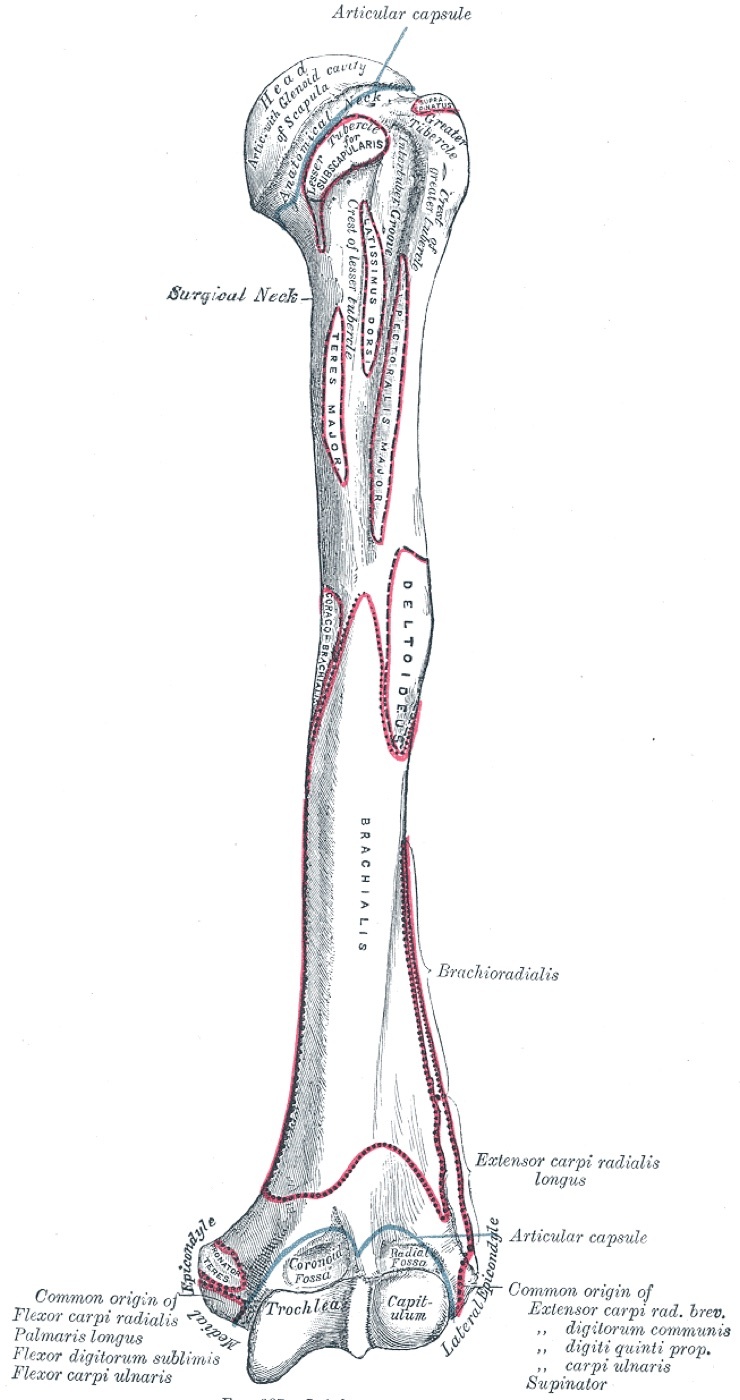
Figure 11. Anterior view of the left humerus with bony landmarks and muscle attachments. Gray’s Anatomy plate 207 (public domain), via Wikimedia Commons.
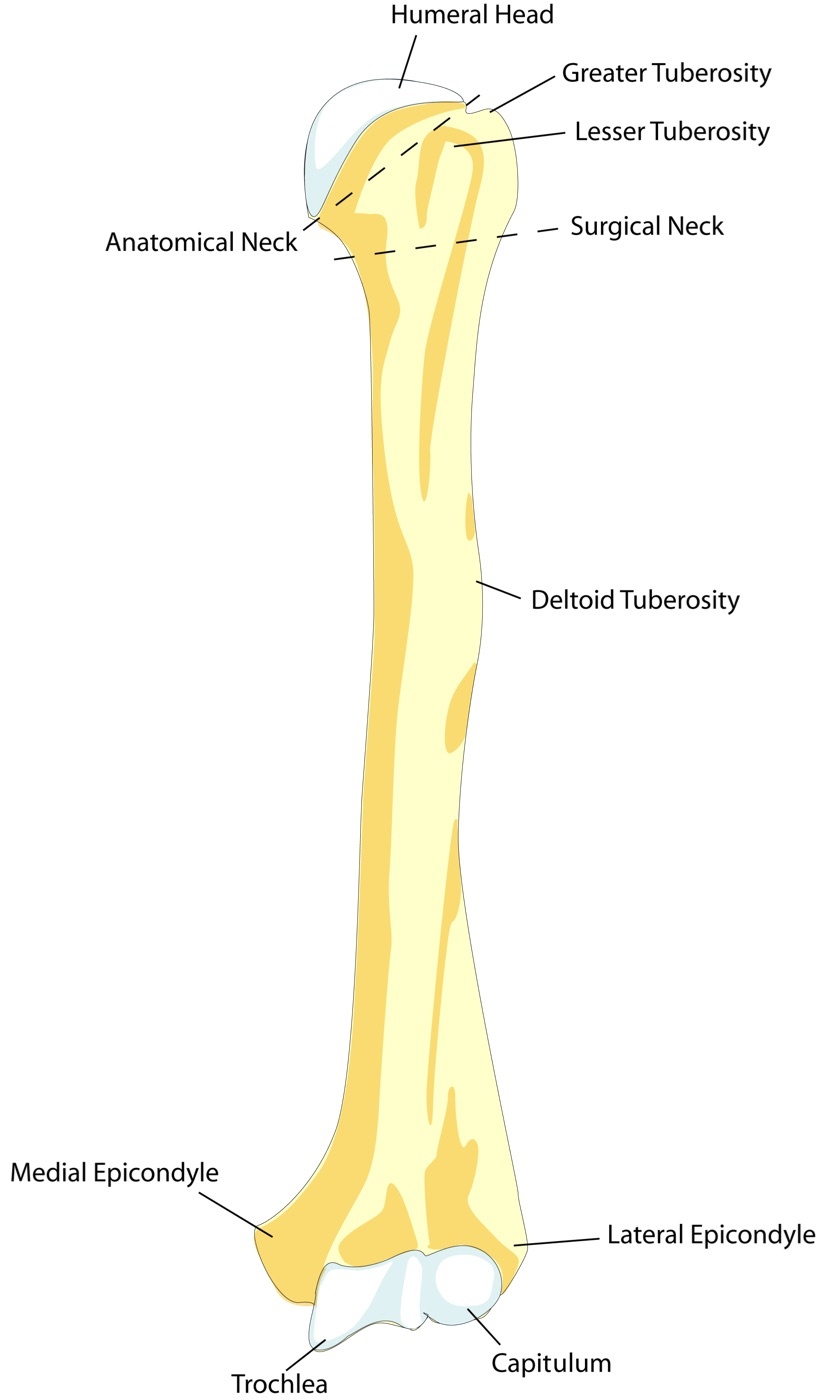
Figure 12. Anterior view of the left humerus with labelled landmarks, including the deltoid tuberosity and the medial and lateral epicondyles. BDB (public domain), via Wikimedia Commons.
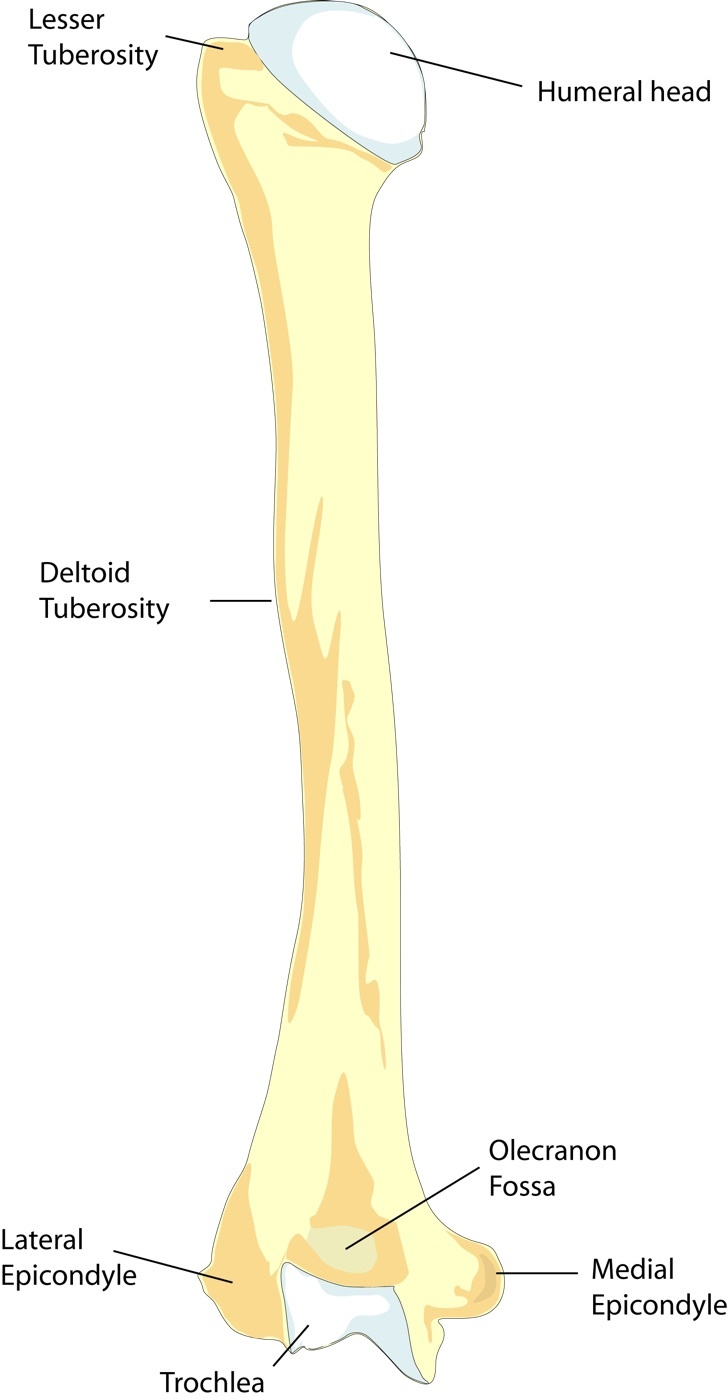
Figure 13. Posterior view of the left humerus with labelled landmarks, including the olecranon fossa and the epicondyles. BDB, CC BY-SA 3.0, via Wikimedia Commons.
A surgically important variant lives at the distal medial humerus: the supracondylar process (spur), a bony projection above the medial epicondyle connected to it by the ligament of Struthers. When present, this fibro-osseous arch can trap the median nerve (and brachial artery) against the bone, producing a picture that mimics carpal tunnel syndrome. It is distinguished from true carpal tunnel compression because the forearm flexors and the palmar cutaneous branch of the median nerve are also affected, branches that arise below the ligament but above the wrist.[17]
Clinical correlations to carry into the viva
Radial nerve palsy after humeral shaft fracture is common, but the great majority are neurapraxias that recover spontaneously, so a palsy present at the time of fracture is not by itself an indication for exploration. The situation reverses when a palsy appears after a reduction in a patient who had no deficit beforehand: that is a strong indication to explore, because the nerve may have been trapped between the fracture fragments during the manoeuvre. The classic fracture pattern in this discussion is the Holstein-Lewis fracture, a spiral fracture of the distal third of the shaft, at the level where the radial nerve pierces the lateral intermuscular septum, with the nerve at particular risk.[18]
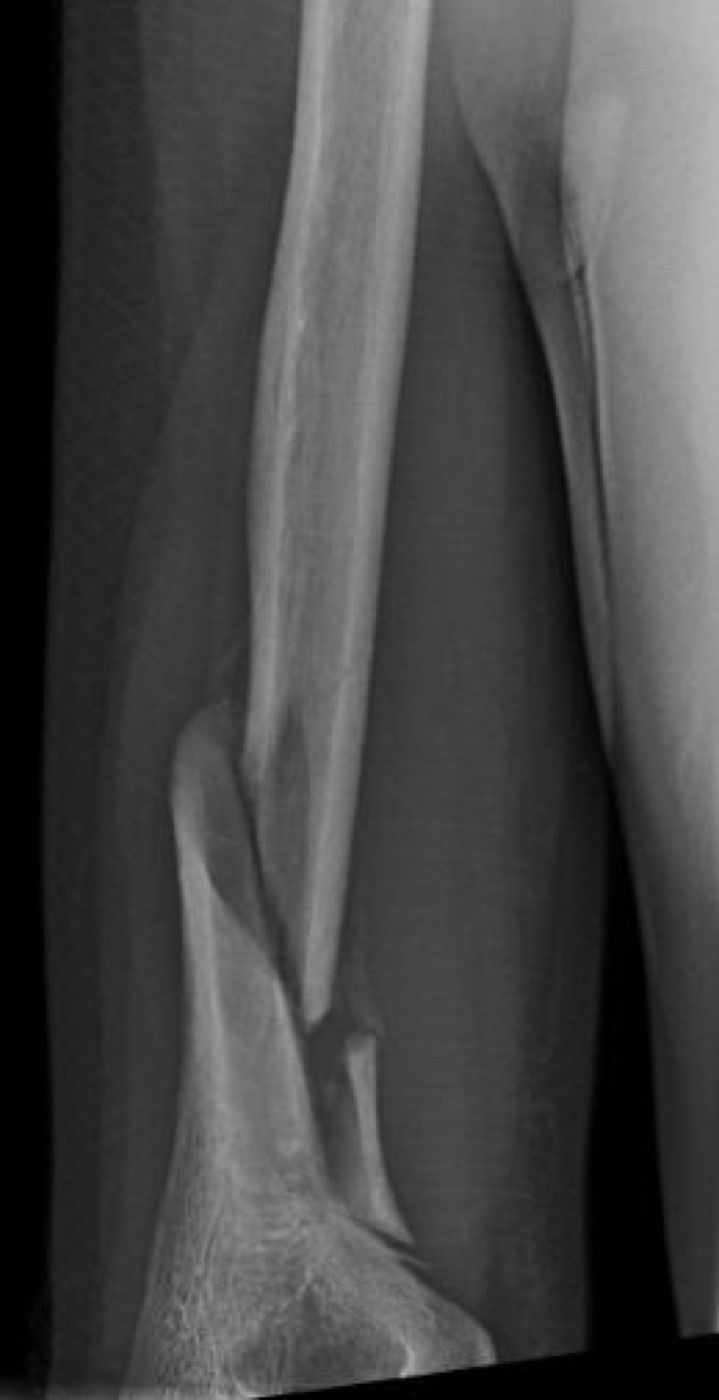
Figure 14. Holstein-Lewis fracture: a spiral fracture of the distal third of the humeral shaft, the pattern classically associated with radial nerve palsy. Public domain, via Wikimedia Commons.
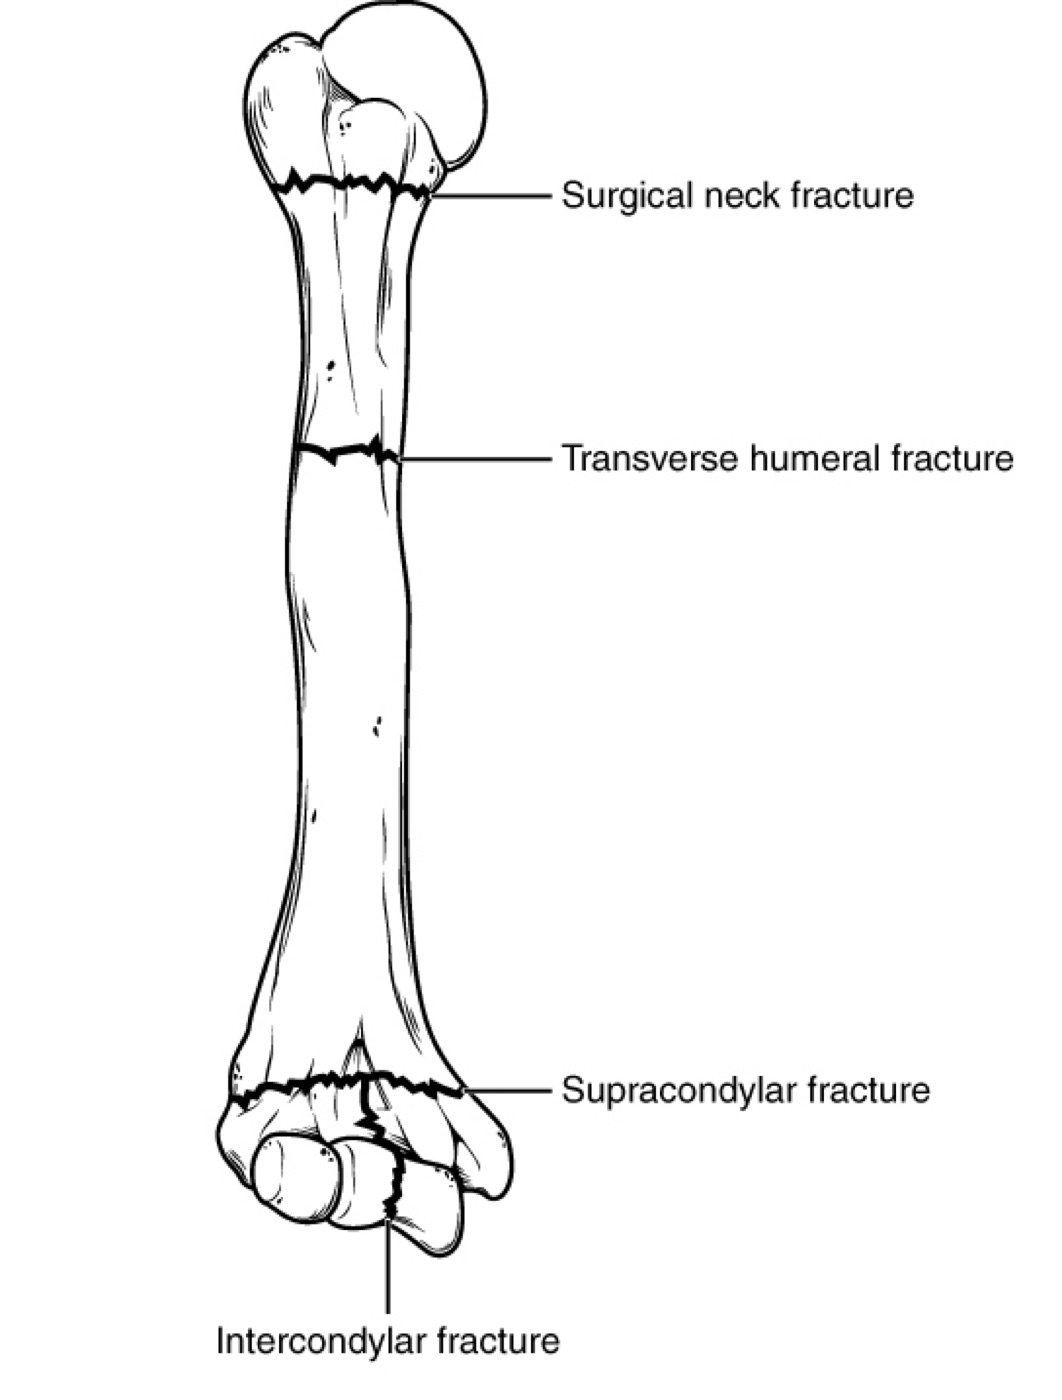
Figure 15. Common humeral fracture locations: surgical neck, transverse shaft, supracondylar and intercondylar. OpenStax College, CC BY 3.0, via Wikimedia Commons.
Part II - Anterior (Anterolateral) Approach to the Humeral Shaft
What it exposes and when to use it
The anterior approach exposes the anterior surface of the humeral shaft and is, with the posterior approach, the most versatile of the humeral exposures: between them they reach almost the whole bone. In practice only a portion of the full approach is used for any given procedure. The classic indications are internal fixation of shaft fractures, treatment of delayed union or nonunion, osteotomy, biopsy and resection of bone tumours, and treatment of osteomyelitis.[19]
Position
The patient is supine, the arm on an arm board abducted about 60°, with the table tilted away from the affected side to reduce venous pooling. Most surgeons sit facing the axilla. Importantly, no tourniquet is used: Hoppenfeld’s blunt reasoning is that it “will only get in the way” so high on the limb.[20]
Landmarks and incision
The two palpable guides are the coracoid process (felt just below the junction of the middle and outer thirds of the clavicle, palpating from lateral to medial) and the lateral border of the biceps muscle belly. The incision begins over the tip of the coracoid, runs distally and laterally in the line of the deltopectoral groove to the deltoid insertion about halfway down the shaft, then continues distally along the lateral border of the biceps and stops about 5 cm above the elbow flexion crease.[21]
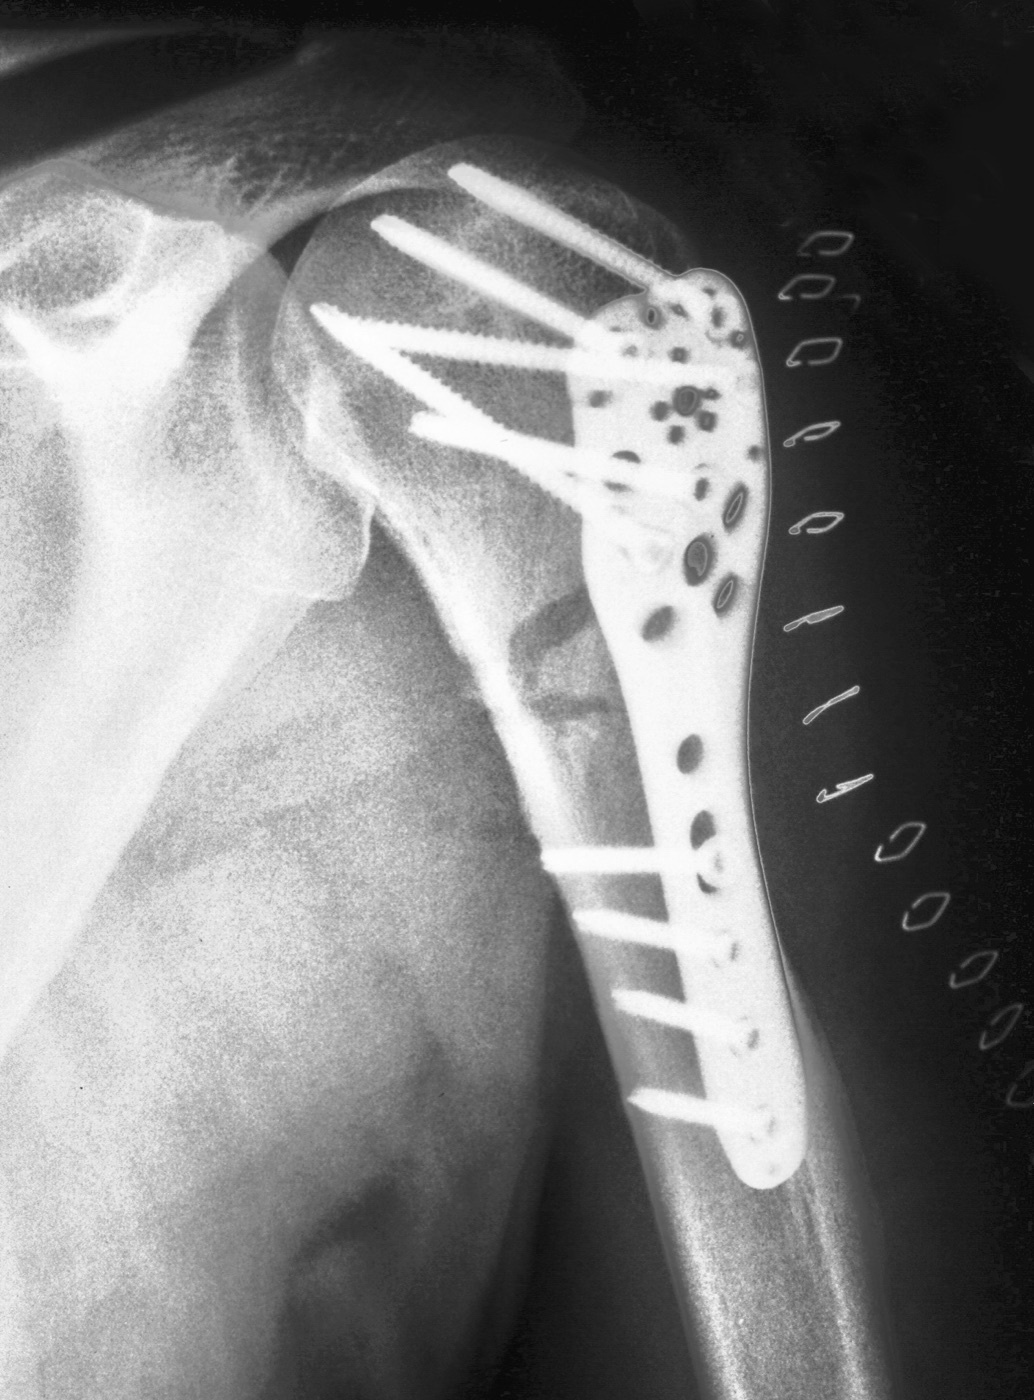
Figure 16. Open reduction and internal fixation of a proximal humeral fracture with an angular-stable locking plate, one of the constructs applied through the anterior approach. Thomas Zimmermann (THWZ), CC BY-SA 3.0 DE, via Wikimedia Commons.
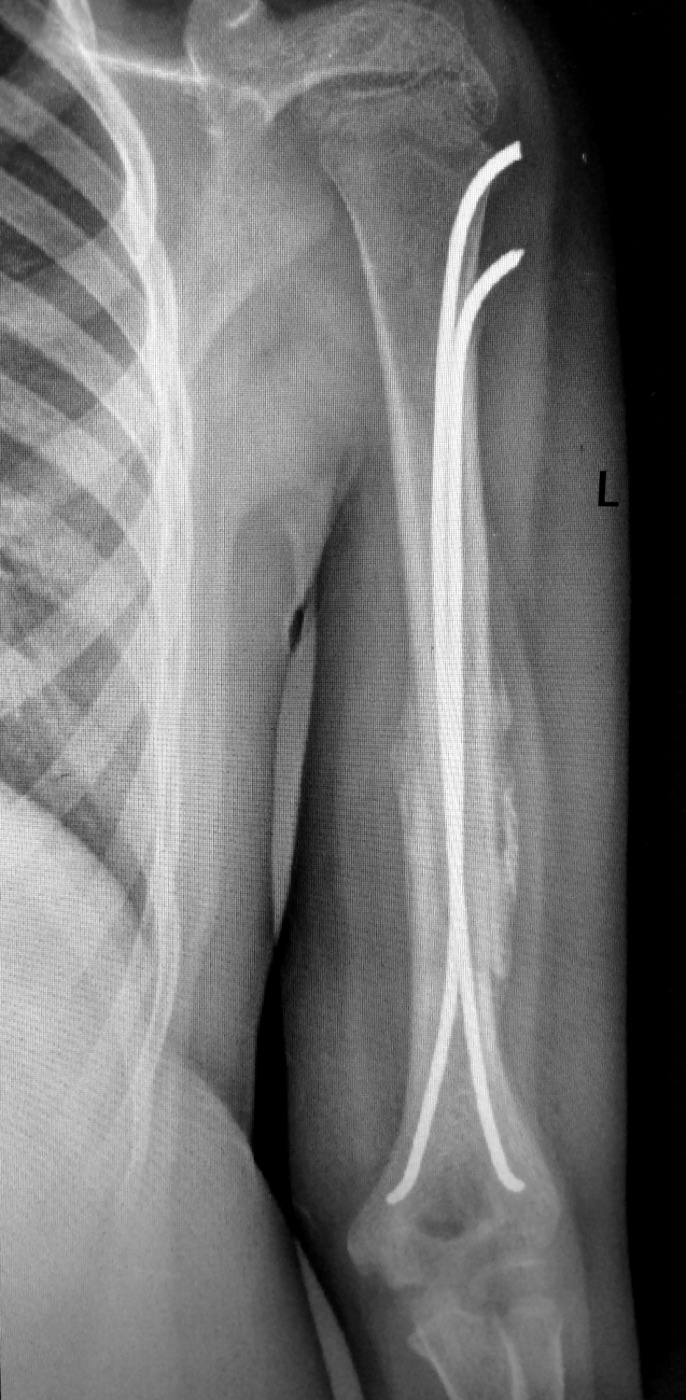
Figure 17. Intramedullary fixation of a displaced humeral shaft fracture with elastic nails. Ivtorov, CC BY-SA 4.0, via Wikimedia Commons.
Internervous planes - there are two
The anterior approach is unusual in using two different internervous planes, one proximal and one distal, because the shaft is so long that no single pair of muscles spans it.[22]
Proximally, the plane lies between the deltoid (axillary nerve) and the pectoralis major (medial and lateral pectoral nerves): the familiar deltopectoral interval, with the cephalic vein as its guide.[23]
Distally, the “plane” is in fact a split within a single muscle, the brachialis: the medial fibres (musculocutaneous nerve) are separated from the lateral fibres (radial nerve) by incising the muscle down its midline. This is the dual-innervation principle from Part I put to work. Each half keeps its own nerve, and the split is genuinely internervous despite lying inside one muscle belly.[24]
Superficial and deep dissection
Proximally, the deltopectoral groove is opened on the cephalic vein, which is retracted with whichever muscle is more convenient. The interval is developed down to the deltoid and pectoralis major insertions. A caution applies here: over-vigorous retraction of the deltoid can compress the axillary nerve on its undersurface and paralyse the anterior deltoid. Deep dissection incises the periosteum just lateral to the pectoralis major tendon; the anterior circumflex humeral artery crosses the field from medial to lateral and is ligated; part of the pectoralis insertion may be detached subperiosteally to expose the bone, detaching as little as possible.[25]
Distally, the biceps is retracted medially to reveal the brachialis cloaking the shaft. In a spiral fracture of the distal third, the setting in which the radial nerve may be wrapped around the fracture spike, the safest sequence is to find the radial nerve first: open the oblique interval between brachialis and brachioradialis just above the elbow, identify the nerve, trace it proximally to where it pierces the lateral intermuscular septum, and only then split the brachialis in its midline a safe distance from the nerve. Flexing the elbow relaxes the brachialis and eases the exposure. The lateral cutaneous nerve of the forearm is identified and protected if the dissection reaches the distal extreme of the incision.[26]
Dangers
The radial nerve is, predictably, the chief danger, and it is endangered at its two characteristic points. (1) In the spiral groove on the posterior mid-shaft it can be injured by drills, taps, or screws that overpenetrate the posterior cortex when an anterior plate is applied to the middle third, or by lever-type retractors passed around the bone; hence the rules to stay strictly subperiosteal, to avoid lever retractors, and to not overpenetrate the far cortex. (2) In the distal third, having pierced the lateral septum, it lies obliquely between brachialis and brachioradialis; here it is protected by identifying it before splitting the brachialis, after which the lateral half of the brachialis serves as a cushion between the retractors and the nerve.[27]
The other named dangers are the axillary nerve (compression by deltoid retraction), the musculocutaneous nerve and its terminal lateral cutaneous nerve of the forearm (medial to/between the biceps and brachialis, another reason to split the brachialis in the midline), the anterior circumflex humeral vessels (ligated as they cross the proximal interval), and the cephalic vein (the guide to the deltopectoral groove, preserved where possible).[28]
How to enlarge the approach
Locally, flexing the elbow relaxes both biceps and brachialis and eases retraction. The major extensile fact is asymmetric: the approach is freely extensile proximally, since its upper end is the deltopectoral interval, so it converts directly into the anterior approach to the shoulder (dividing the coracoid tip and incising subscapularis); but it cannot be extended distally. (The introductory paragraph’s remark that an approach is “extensile both proximally and distally” refers to the separate anterolateral approach to the distal humerus, not to this shaft approach.)[29]
The minimally invasive (MIPO) variant
The minimally invasive anterior approach is used almost exclusively for fracture fixation. Its rationale is biological: by not exposing the fracture, it preserves the blood supply to the fracture zone. The trade-offs are that reduction is harder to achieve and to judge without direct exposure, and that both patient and team are exposed to fluoroscopic radiation. Positioning is identical to the open approach (supine, no tourniquet), with the caveat that adequate images must be confirmed obtainable before prepping.[30]
The technique uses two windows, a proximal deltopectoral window and a distal window over the lateral border of the biceps in the distal third, whose exact placement is dictated by the fracture and implant. After splitting the brachialis in the distal window and developing an epiperiosteal (extraperiosteal) tunnel along the anterior surface of the bone (with a finger, periosteal elevator, or the plate itself, working close to the bone and usually starting distally), a plate is slid submuscularly to bridge the fracture between the two fixation points. The radial nerve lies lateral to the distal window between brachialis and brachioradialis and is identified there before the brachialis split in distal fractures, since the fracture spike may distort its position. If needed, the approach converts to the full open exposure simply by connecting the two skin incisions and completing the brachialis split.[31]
Part III - Posterior Approach to the Humerus
What it exposes and when to use it
The midline posterior approach is classically extensile and gives excellent access to the lower three-fourths of the posterior humerus. Like every humeral approach it is dominated by the radial nerve, which here must be sought in the spiral groove. Its uses are ORIF of shaft fractures (and, when the nerve is transected, classically in a displaced transverse mid-shaft fracture, direct exposure of the radial nerve), osteomyelitis, biopsy and tumour excision, nonunion, exploration of the radial nerve in the spiral groove, and insertion of retrograde humeral nails.[32]
Position
The patient is positioned either lateral (affected side up, arm hanging over a support) or prone with the arm abducted 90°; a sandbag supports the shoulder, the elbow is allowed to flex, and the forearm hangs over the side of the table. As with the anterior approach, no tourniquet is used.[33]
Landmarks and incision
The bony guides are the acromion (the summit of the shoulder) above and the olecranon fossa below, the latter hard to palpate because it is filled with fat and overlain by triceps. The incision is a straight midline posterior line running from 8 cm below the acromion to the olecranon fossa.[34]
Internervous plane - there is none
There is no true internervous plane. The dissection splits the triceps, all three heads of which are radial-supplied. This is safe because the nerve branches enter each head near its origin and then run distally within the muscle, so a longitudinal split does not denervate the muscle below the level of entry. The deep (medial) head, moreover, has the dual radial-and-ulnar supply noted in Part I, so it too can be split longitudinally without denervating either half.[35]
Triceps anatomy - the key to the dissection
The whole approach rests on the triceps having two layers. The outer layer is formed by two heads: the long head (origin: infraglenoid tubercle of the scapula) and the lateral head (origin: lateral lip of the spiral groove). The inner layer is the single medial (deep) head (origin: the whole posterior humerus below the spiral groove, down to the distal fourth). Critically, the spiral groove, and therefore the radial nerve, physically separates the origins of the lateral and medial heads.[36]
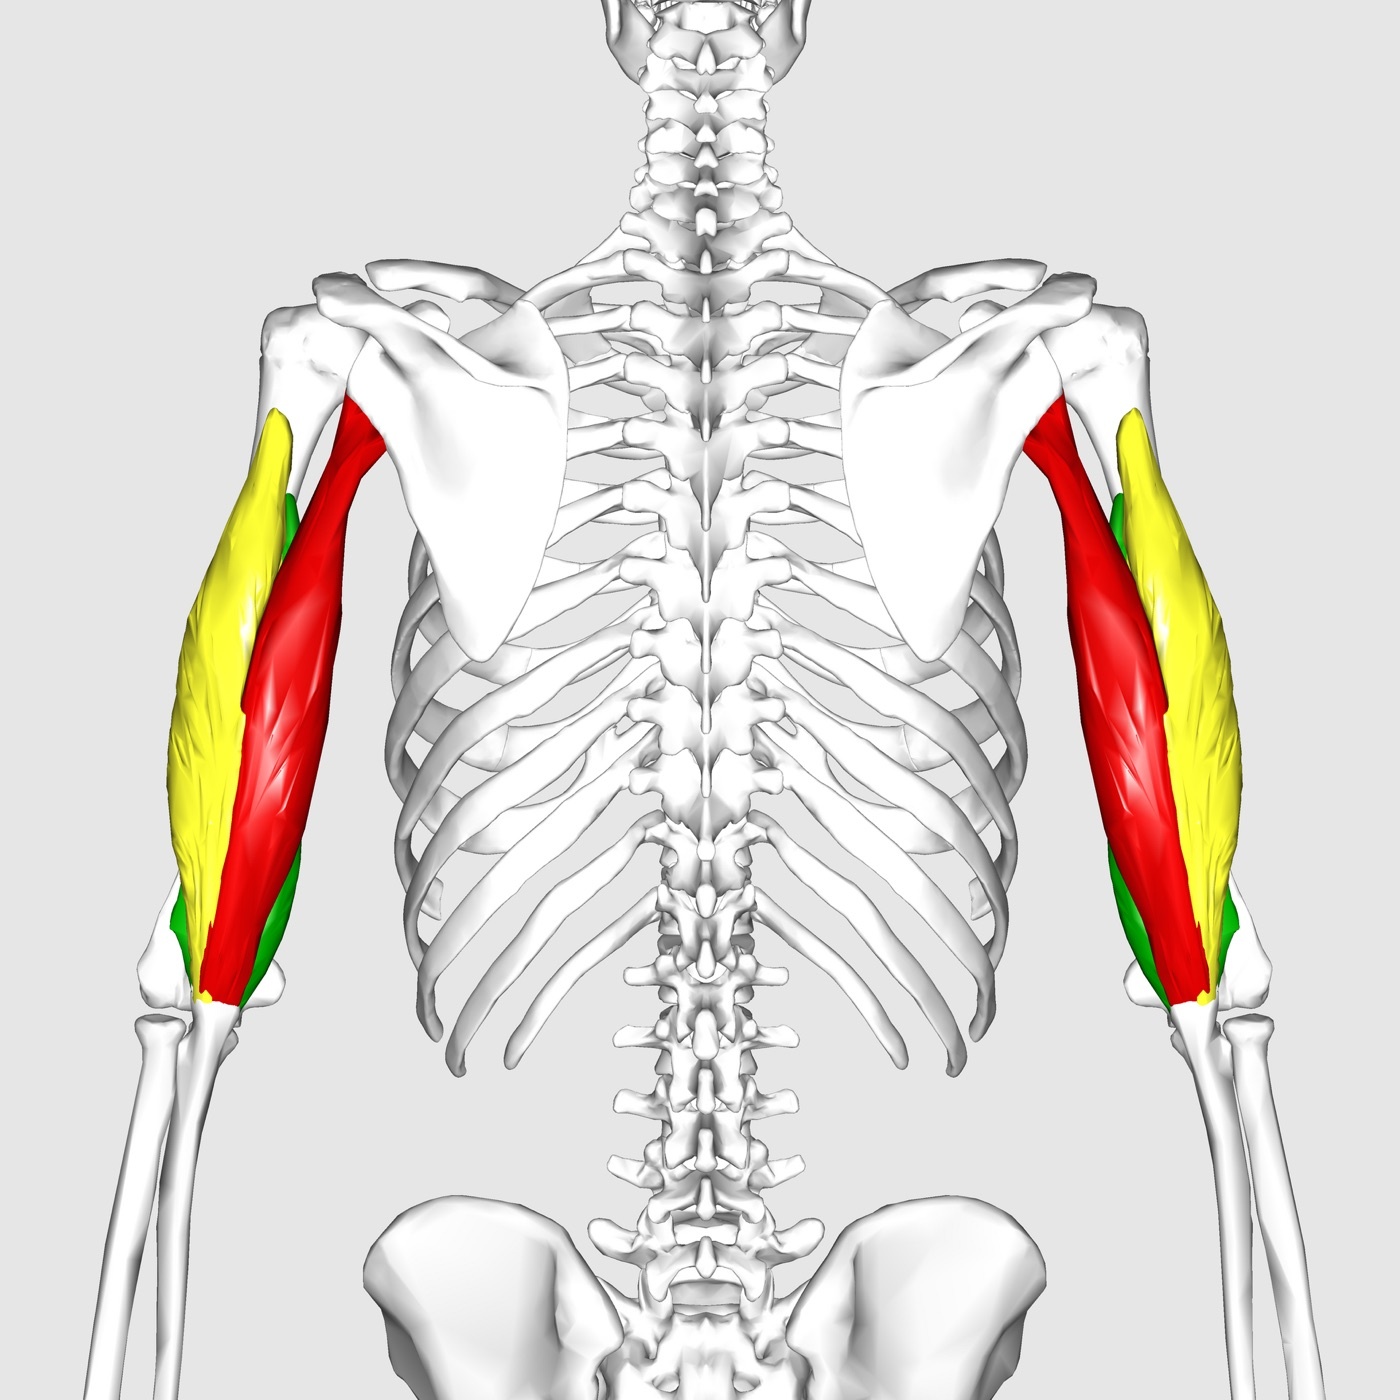
Figure 18. Triceps brachii with its long, lateral and medial heads (posterior compartment), colour-coded. Anatomography, CC BY-SA 2.1 JP, via Wikimedia Commons.
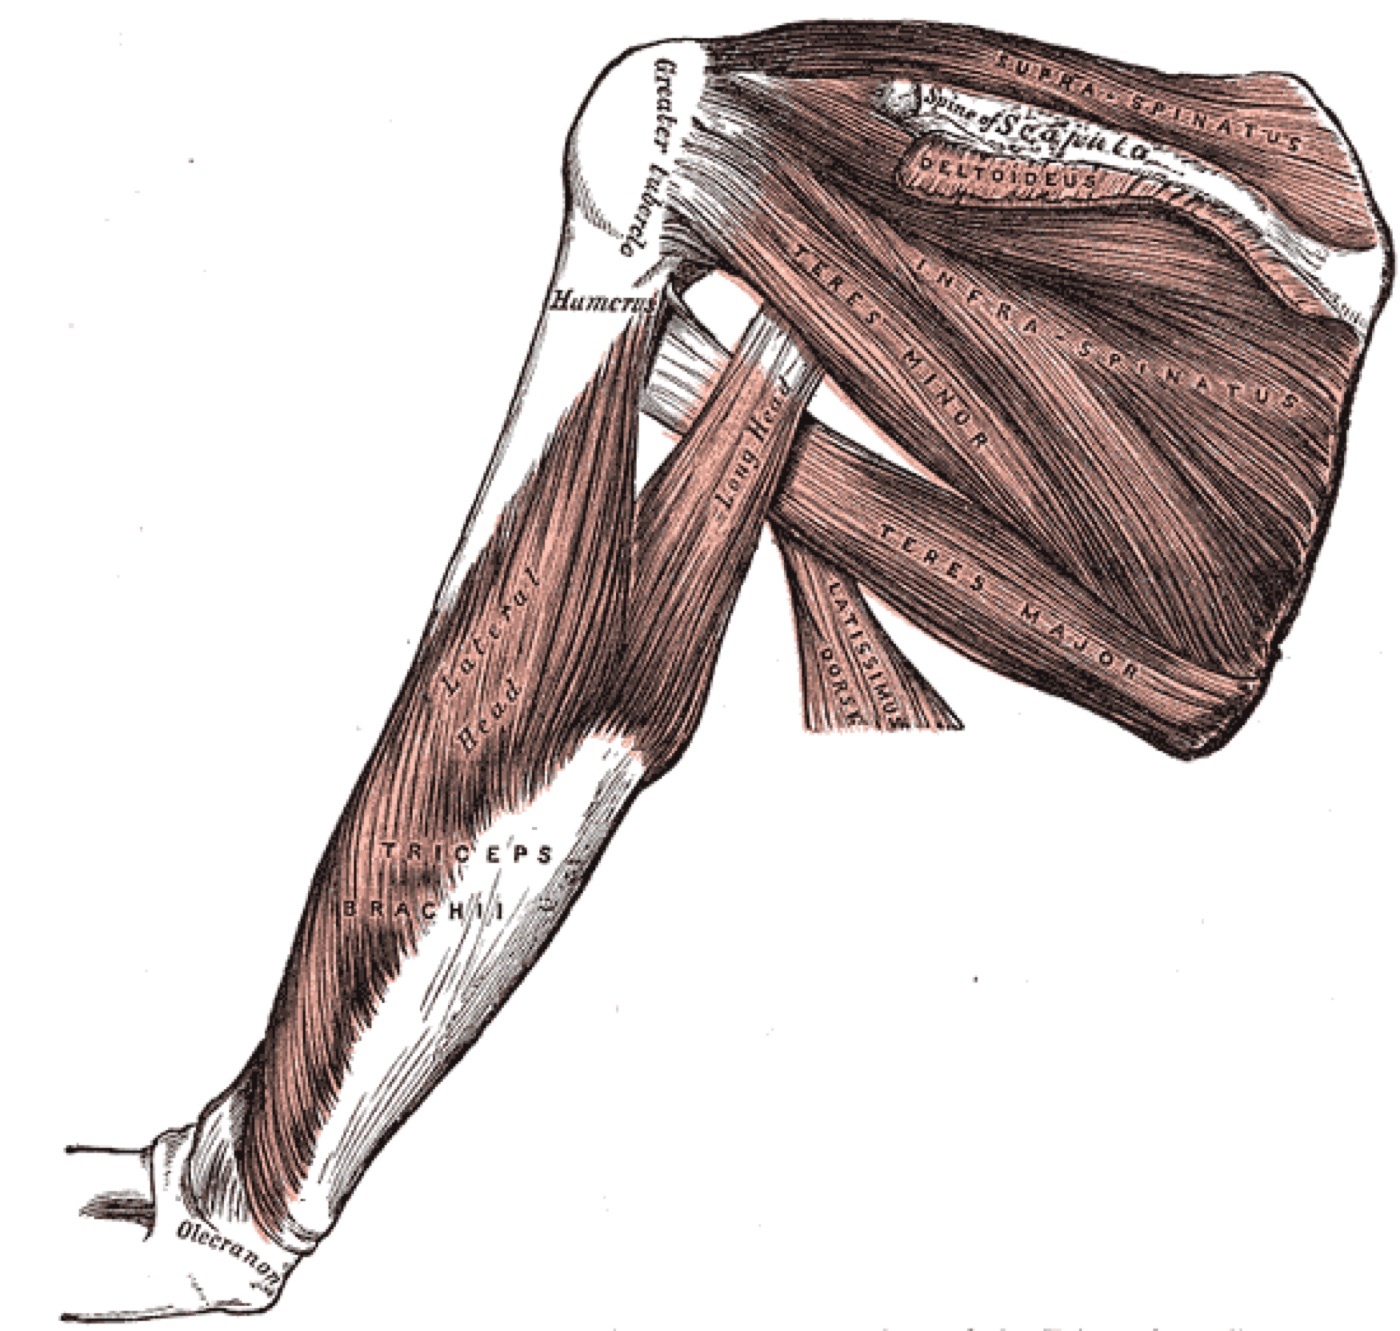
Figure 19. The triceps brachii and the dorsal muscles of the shoulder. Gray’s Anatomy plate 412 (public domain), via Wikimedia Commons.
Superficial and deep dissection
The deep fascia is incised in the line of the skin incision. The superficial dissection develops the interval between the lateral and long heads, beginning proximally (above where the two heads fuse into the common tendon) by blunt dissection, retracting the lateral head laterally and the long head medially. Distally the common tendon must be divided by sharp dissection in the line of the incision; many small crossing vessels are coagulated.[37]
The deep dissection then addresses the medial head, which lies beneath the other two, with the radial nerve running just proximal to its origin in the spiral groove. The medial head is incised in the midline down to periosteum, and the muscle is stripped from the bone in an epiperiosteal plane. Staying on the periosteum is not optional housekeeping: it protects the ulnar nerve, which pierces the medial intermuscular septum in the lower third of the arm and would be at risk if the muscle were elevated in any deeper plane. As little soft tissue as possible is detached, to preserve blood supply to the injury zone.[38]
Dangers
The radial nerve is vulnerable in the spiral groove, but the governing rule makes the danger manageable: never carry the dissection down to bone in the proximal two-thirds of the arm until the nerve has been positively identified. Once identified, it is safe. The profunda brachii artery accompanies it in the groove and is identified with it. Distally, the ulnar nerve is the structure at risk, protected by keeping the medial-head strip epiperiosteal. (The axillary nerve and posterior circumflex humeral vessels, which limit the proximal extent of the approach, are discussed under extensile measures.)[39]
How to enlarge the approach
Proximal extension is limited: the bone cannot be effectively exposed above the spiral groove, both because the radial nerve crosses there and because the deltoid begins to cross the field; more proximal exposure should be obtained by the anterior route. Distally, the incision can be carried over the olecranon to reach the elbow via an olecranon osteotomy (see the posterior approach to the elbow); or, sparing the triceps, the ulnar nerve is dissected out, planes are developed on the medial and lateral aspects of the triceps to expose the supracondylar ridges, and a sling is passed under the muscle so it can be retracted both ways to reach the whole posterior aspect of the distal humerus.[40]
Part IV - Approaches to the Distal Humerus
The distal humerus is reached by three named approaches, anterolateral, lateral, and medial, each tailored to one column or one indication. The anterolateral approach is the radial-nerve exploration and distal-shaft approach; the lateral approach is the tennis-elbow and lateral-condyle approach; the medial approach is the ulnar-collateral-ligament and medial-column approach.
Anterolateral approach to the distal humerus
This approach exposes the distal fourth of the humerus and has one decisive advantage over the brachialis-splitting shaft approach: it can be extended both distally and proximally. Its indications are ORIF of distal-half humeral fractures (especially the Holstein-Lewis fracture) and exploration of the radial nerve in the distal arm. The patient is supine, arm abducted ~60°; unlike the shaft and posterior approaches, a tourniquet is used (as high as possible, after exsanguination). The incision is a curved longitudinal line over the lateral border of the biceps, starting ~10 cm above the elbow crease and ending just above it.[41]
There is no true internervous plane, because both the brachioradialis and the lateral half of the brachialis are radial-supplied proximal to the field; but proximal extension only denervates a minor (probably proprioceptive) radial twig to brachialis, so the plane is both safe and extensile. The operative key is to find the radial nerve between brachialis and brachioradialis at the level of the elbow (“the elbow is the point at which the radial nerve should be identified in all surgery performed in this general area”) and then trace it proximally to where it pierces the lateral intermuscular septum. The deep dissection stays on the medial side of the nerve, incising the lateral border of brachialis to bone and reflecting it medially to expose the anterolateral surface of the distal shaft.[42]
The chief danger is the radial nerve, which must be identified and preserved before any incision is made through the brachialis; the lateral cutaneous nerve of the forearm runs in the line of approach and is retracted with the biceps. The approach is extensile proximally (developing the plane between brachialis and the lateral head of triceps, subperiosteally, to protect the radial nerve in the groove, or, alternatively, following the nerve through the septum into the posterior compartment to expose the distal two-thirds of the bone) and distally (into an anterior approach to the elbow, between brachioradialis and pronator teres).[43]
Lateral approach to the distal humerus
The lateral approach exposes the lateral epicondyle and the common extensor (wrist extensor) origin. It does not give access to the lateral joint except by extension, since the joint is better reached posteriorly, posterolaterally, or anterolaterally. Its uses are ORIF of lateral condyle fractures, surgical treatment of tennis elbow (lateral epicondylitis), and repair of the lateral collateral supporting structures. The patient is supine with the arm across the chest; a tourniquet is used. The incision is a 4-6 cm curved or straight line over the lateral supracondylar ridge, a useful landmark because it is longer and better-defined than its medial counterpart and runs almost up to the deltoid tuberosity.[44]
Again there is no true internervous plane, because both the triceps and the brachioradialis are radial-supplied; but the supply enters well proximal to the field, so the plane between them can be exploited distally without denervation. The interval between brachioradialis (reflected anteriorly) and triceps (reflected posteriorly) is taken to bone, exposing the common extensor origin on the lateral epicondyle. The radial nerve is the danger, and the cardinal rule is that the approach must not be extended proximally, because the nerve pierces the lateral intermuscular septum across the proposed line of dissection. It can, however, be extended distally to the radial head through the anconeus (radial nerve) / extensor carpi ulnaris (posterior interosseous nerve) plane, and no further distally, because the posterior interosseous nerve winds around the radial neck.[45]
Medial approach to the distal humerus
The medial approach reaches the medial supracondylar ridge, the common flexor-pronator origin, and the medial compartment of the elbow. Its advantage over the anteromedial approach to the elbow is that it requires no osteotomy of the medial epicondyle. Uses are ORIF of extra-articular medial-column fractures, medial epicondylitis, repair or reconstruction of the ulnar collateral ligament, and removal of loose bodies from the medial compartment. Two positions are offered: prone with the elbow flexed 90° and the forearm over the back (the medial epicondyle then faces the surgeon), or supine with the arm abducted and the shoulder fully externally rotated.[46]
Here, at last, there is a true internervous plane, between the flexor-pronator group (median and ulnar nerves) and the triceps (radial nerve). The incision is centred over the medial supracondylar ridge, ~5 cm above the joint, passing over the medial epicondyle to just below the joint. The decisive surgical step is in the superficial dissection: the ulnar nerve is palpated behind the medial epicondyle and isolated along the length of the incision before the dissection is deepened. The medial intermuscular septum is then released from the ridge and the flexor-pronator origin retracted to expose the anterior capsule and the medial side of the distal humerus.[47]
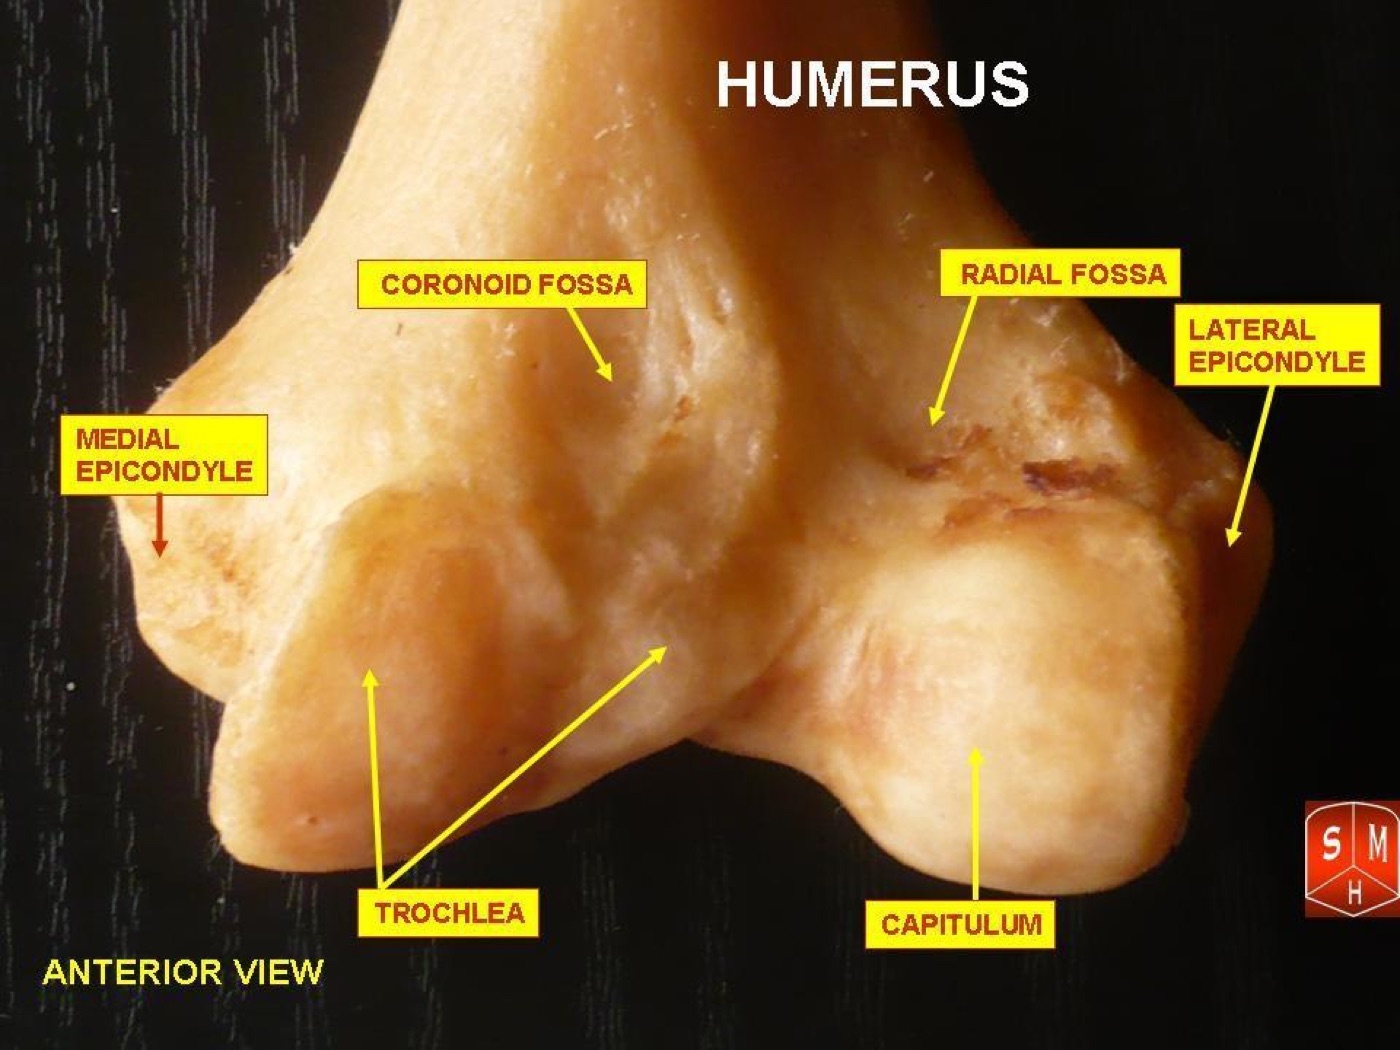
Figure 20. Anterior view of the distal humerus showing the medial and lateral columns and epicondyles, the trochlea and the capitulum. Anatomist90, CC BY-SA 3.0, via Wikimedia Commons.
The named dangers are the ulnar nerve, which must be identified and isolated before the incision is deepened, with retraction kept to a minimum because temporary ulnar palsies are common after ligament reconstructions, and the posterior branch of the medial cutaneous nerve of the forearm, which crosses the field superficially and is preserved to prevent neuroma. (The median nerve and brachial artery lie anterior to the medial column and are the classic anterior structures at risk in medial distal-humeral surgery, though this extract names only the two structures above as explicit dangers.) The approach cannot usefully be extended proximally (use an anterolateral or posterior approach for the mid-shaft) and can be extended distally only by osteotomy of the medial epicondyle.[48]
The three distal approaches at a glance
The three exposures of the distal humerus are summarised side by side below.[49]
| Feature | Anterolateral | Lateral | Medial |
|---|---|---|---|
| Exposes | Distal fourth (anterior shaft) | Lateral epicondyle + extensor origin | Medial ridge, flexor-pronator origin, medial joint |
| Key indication | ORIF distal humerus (esp. Holstein-Lewis); radial nerve exploration | ORIF lateral condyle; tennis elbow; lateral ligament repair | ORIF medial column; medial epicondylitis; UCL repair; loose bodies |
| Position | Supine, arm abducted ~60° | Supine, arm across chest | Prone, or supine with full external rotation |
| Internervous plane | None true (brachialis [musculocutaneous + radial] vs brachioradialis [radial]) | None true (triceps vs brachioradialis, both radial) | True: flexor-pronator (median + ulnar) vs triceps (radial) |
| Chief danger | Radial nerve | Radial nerve (proximally) | Ulnar nerve |
| Proximal extension | Yes (subperiosteal, protect radial n.) | Not possible (radial n. crosses line) | Not useful |
| Distal extension | Into anterior approach to elbow | To radial head only (anconeus/ECU) | Only via medial epicondyle osteotomy |
References
-
The radial nerve as “the structure at greatest risk during surgery” in all humeral approaches, and as “the key surgical landmark in the arm,” frames the whole chapter (Hoppenfeld, Surgical Exposures in Orthopaedics, 5th ed., ch. 2, p.163, p.213).
-
The chapter covers the anterior approach (p.163-179, open and minimally invasive), the posterior approach (p.179-193), and the anterolateral, lateral, and medial approaches to the distal humerus (p.193-212), followed by the applied surgical anatomy of the arm (p.212-229). The recurring structural emphasis on internervous plane and named dangers is the organising principle of the Hoppenfeld text.
-
Dual innervation of brachialis (lateral part radial, medial part musculocutaneous) as the basis of the anterior approach (Hoppenfeld p.165, p.217); dual innervation of the medial/deep head of triceps (radial and ulnar) as the basis of splitting it in the posterior approach (Hoppenfeld p.182, p.227-228).
-
The critical neurovascular structures “cross from compartment to compartment” as they course down the arm, so the anatomy is best viewed as two compartments sharing three nerves and three arteries (Hoppenfeld p.212, Fig. 2-39).
-
Anterior compartment = coracobrachialis, biceps, brachialis (musculocutaneous territory; two are elbow flexors); posterior compartment = triceps alone, radial-supplied; the compartments are separated in the distal two-thirds by the medial and lateral intermuscular septa (Hoppenfeld p.212-213). The septa and the nerves that penetrate them are seen once the triceps is removed (Hoppenfeld p.223, Fig. 2-49).
-
“The vascular organization of the arm is relatively simple; each nerve takes one artery with it” - brachial artery with the median nerve, profunda brachii with the radial nerve (supplying triceps), ulnar collateral artery with the ulnar nerve; all three anastomose freely around the elbow (Hoppenfeld p.215-216).
-
Radial nerve = continuation of the posterior cord; begins behind the axillary artery; runs on subscapularis, latissimus dorsi, and teres major along the posterior axillary wall; passes through the triangular space/interval between the long head of triceps and the humeral shaft, beneath teres major, accompanied by the profunda brachii artery (Hoppenfeld p.213, p.221).
-
In the arm the radial nerve lies in the spiral groove on the posterior humerus, between the lateral and medial (deep) heads of triceps, travelling with the profunda brachii artery; it branches to the lateral head and the lateral part of the medial head of triceps as it crosses (Hoppenfeld p.213, p.221, Figs. 2-47/2-48). The lateral head arises from the lateral lip of the spiral groove, the medial head from the medial side of it, so the nerve physically separates the two origins (Hoppenfeld p.221, Fig. 2-47).
-
After the spiral groove the radial nerve pierces the lateral intermuscular septum (with the profunda brachii) to enter the anterior compartment, emerging between brachialis and brachioradialis as it crosses the elbow; its main continuation is the posterior interosseous nerve, which pierces the supinator through the arcade of Frohse; where it pierces the septum it is vulnerable to distal locking bolts inserted from the lateral side (Hoppenfeld p.213, p.222, p.225, p.226; the term “radial tunnel syndrome” is standard teaching, not used verbatim in this page range).
-
The radial nerve is “vulnerable at two points as it courses along the humerus: one, in the spiral groove, and two, as it pierces the lateral intermuscular septum to run between the brachioradialis and the brachialis”; this distal plane is oblique, not vertical (Hoppenfeld p.171 Fig. 2-7, p.172).
-
Brachialis is the main elbow flexor (“the workhorse of the upper arm”); it has dual innervation - lateral part radial, medial part musculocutaneous - so it may be split longitudinally without denervating either half, which is the basis of the anterior approach; the musculocutaneous supply is dominant, so loss of the radial twigs has little clinical effect (Hoppenfeld p.217, p.219 Fig. 2-44).
-
The musculocutaneous nerve pierces coracobrachialis and runs on the brachialis supplying the flexor compartment; its terminal continuation is the lateral cutaneous nerve of the forearm, which pierces the deep fascia at the lateral border of the biceps just above the elbow crease and must be identified and preserved (Hoppenfeld p.166, p.216 Fig. 2-41, p.218 Fig. 2-42, p.173).
-
The median nerve remains in the anterior compartment, anteromedial to the humerus, runs with the brachial artery (lateral to it proximally, medial to it in the cubital fossa), and has no branches in the arm (Hoppenfeld p.214-215, p.219 Fig. 2-43).
-
The brachial artery runs with the median nerve down the medial arm under biceps and onto brachialis, palpable along its length (deep fascia its only medial cover); it lies medial to the humerus in the upper two-thirds and curves laterally over the anterior surface of the bone at the elbow, where it may be damaged in supracondylar fractures; the axillary artery becomes the brachial artery on the anterior surface of the humerus (Hoppenfeld p.215, p.221).
-
The ulnar nerve lies behind the brachial artery in the upper half of the arm, pierces the medial intermuscular septum about two-thirds of the way down to enter the posterior compartment, then runs on the back of the medial epicondyle almost subcutaneously; it has no muscular branches in the arm, but radial fibres to the medial half of the medial head of triceps run within its substance (“hitchhiking” radial fibres) (Hoppenfeld p.214-215, p.227).
-
Named humeral landmarks in the text: spiral groove (radial nerve); deltoid tuberosity (deltoid insertion, ~mid-shaft); medial and lateral supracondylar ridges (the lateral being longer/better-defined, extending almost to the deltoid tuberosity); medial epicondyle (large subcutaneous mass, ulnar nerve behind it) and lateral epicondyle (the smaller, common extensor origin); brachialis origin = lower two-thirds of the anterior humerus, insertion = coronoid process and tuberosity of ulna (Hoppenfeld p.202, p.209, p.219; deltoid tuberosity / epicondyle pairing partly standard teaching).
-
A supracondylar spur connected to the medial epicondyle by the ligament of Struthers may trap the median nerve against the bone, producing carpal-tunnel-like symptoms; it is differentiated because the forearm flexors and the palmar cutaneous branch of the median nerve are also affected (these branches arise below the ligament but above the carpal tunnel); coracobrachialis may have an extra head to the ligament (Hoppenfeld p.228).
-
Radial nerve palsy after humeral shaft fracture is usually neurapraxia, so exploration is not mandatory for a palsy present at fracture; a new palsy after reduction (none before) is a good indication for exploration, as the nerve may be trapped between fragments (Hoppenfeld p.213, ref. 17). The Holstein-Lewis fracture (distal-third spiral fracture with radial nerve at risk) is named in the anterolateral-approach indications (Hoppenfeld p.193) and cited (Holstein & Lewis, JBJS Am 1963;45-A:1382-1388, Hoppenfeld p.228 ref. 4); the distal-third spiral description is standard teaching. The clinical syndrome of “wrist drop” is standard teaching.
-
The anterior approach exposes the anterior surface of the humeral shaft; it and the posterior approach are the most versatile humeral approaches; uses = internal fixation of fractures, delayed/nonunion, osteotomy, biopsy and resection of tumours, osteomyelitis (Hoppenfeld p.163).
-
Position: supine, arm on an arm board abducted ~60°, patient tilted away from the affected arm; surgeon usually sits facing the axilla; no tourniquet (“it will only get in the way”) (Hoppenfeld p.163, Fig. 2-1).
-
Landmarks = coracoid process and the lateral border of biceps; incision begins over the coracoid tip, runs distally/laterally in the line of the deltopectoral groove to the deltoid insertion (~halfway down the shaft), then continues distally along the lateral border of biceps, stopping ~5 cm above the elbow flexion crease (Hoppenfeld p.164-165, Fig. 2-2). The classic “coracoid to lateral epicondyle” surface line is standard teaching; the text names coracoid → deltopectoral groove → deltoid insertion → lateral border of biceps.
-
The anterior approach uses two internervous planes, proximal and distal (Hoppenfeld p.165, Fig. 2-3A/B).
-
Proximal internervous plane = deltoid (axillary nerve) vs pectoralis major (medial and lateral pectoral nerves); the cephalic vein marks the deltopectoral groove (Hoppenfeld p.165).
-
Distal internervous plane = medial brachialis (musculocutaneous nerve) vs lateral brachialis (radial nerve); the brachialis is split down its midline, exploiting its dual innervation so neither half is denervated (Hoppenfeld p.165, p.167 Fig. 2-3B, p.169).
-
Proximal dissection: open the deltopectoral groove on the cephalic vein, develop to the muscle insertions; avoid over-retraction of deltoid (axillary nerve compression); deep, incise periosteum just lateral to pectoralis major tendon, ligate the anterior circumflex humeral artery (crosses medial→lateral), detach minimal pectoralis insertion subperiosteally; any peri-bony dissection must stay strictly subperiosteal to protect the radial nerve in the spiral groove, and lever retractors around the bone are avoided (Hoppenfeld p.165, p.168-169).
-
Distal dissection: retract biceps medially to reveal brachialis over the shaft; in distal-third spiral fractures the radial nerve may be wrapped on the fracture spike, so identify it first in the oblique brachialis-brachioradialis interval just above the elbow, trace it proximally to where it pierces the lateral septum, then split brachialis in the midline a safe distance from the nerve; flex the elbow to relax brachialis; identify and preserve the lateral cutaneous nerve of the forearm distally (Hoppenfeld p.166, p.169).
-
Radial nerve dangers: (1) spiral groove on the posterior mid-shaft - avoid straying onto the posterior surface, do not overpenetrate the posterior cortex with anteroposterior drills/screws under an anterior mid-shaft plate, avoid lever retractors around the bone, keep dissection subperiosteal; (2) distal third between brachialis and brachioradialis (oblique plane) - identify the nerve before splitting brachialis, then the lateral brachialis cushions it (Hoppenfeld p.169, p.171 Fig. 2-7, p.172).
-
Other dangers: axillary nerve (deltoid retraction); musculocutaneous nerve and its terminal lateral cutaneous nerve of the forearm (lie medial to/between biceps and brachialis - splitting brachialis in the midline protects them); anterior circumflex humeral vessels (ligate/diathermy as they cross the proximal interval medial→lateral); cephalic vein (guide to the groove, preserve if possible) (Hoppenfeld p.165-166, p.173).
-
Local measure: flex the elbow to relax biceps and brachialis. Extensile measures: proximally extensile into the anterior approach to the shoulder via the deltopectoral interval (cut the coracoid tip, incise subscapularis); the anterior shaft approach “cannot be extended distally” (Hoppenfeld p.173). The “extensile both proximally and distally” statement on p.163 refers to the anterolateral approach to the distal humerus, a different approach.
-
MIS anterior approach: used almost exclusively for fracture fixation; advantage = preservation of fracture-zone blood supply; disadvantages = fracture not exposed (harder reduction/assessment) and radiation exposure; same supine position, no tourniquet, confirm adequate imaging before draping (Hoppenfeld p.173-174).
-
MIS technique: two windows (proximal deltopectoral; distal over the lateral border of biceps in the distal third), placement dictated by fracture/implant; split brachialis and develop an epiperiosteal tunnel along the anterior humerus (finger/periosteal elevator/plate, start distally, stay on bone) to slide a plate submuscularly (bridge plating/MIPO); the radial nerve lies lateral to the distal window between brachialis and brachioradialis and is identified before splitting brachialis (fracture spike may distort it); convert to open by joining the incisions and completing the brachialis split (Hoppenfeld p.174-177, p.179).
-
The midline posterior approach is classically extensile, giving excellent access to the lower three-fourths of the posterior humerus; uses = ORIF of fractures (and exposure of a transected radial nerve in displaced transverse mid-shaft fractures), osteomyelitis, biopsy/excision of tumours, nonunion, exploration of the radial nerve in the spiral groove, and insertion of retrograde humeral nails (Hoppenfeld p.180).
-
Position: lateral (affected side uppermost) or prone (arm abducted 90°), with a sandbag under the shoulder, the elbow allowed to flex, and the forearm hanging over the table; no tourniquet (Hoppenfeld p.180, Fig. 2-14).
-
Landmarks = acromion above and olecranon fossa below (the fossa hard to palpate, fat-filled and triceps-covered); incision = midline posterior arm, from 8 cm below the acromion to the olecranon fossa (Hoppenfeld p.181, p.183, Fig. 2-15).
-
No true internervous plane; the dissection separates the triceps heads, all radial-supplied, with branches entering near each origin so a longitudinal split does not denervate; the medial (deep) head has dual radial + ulnar supply and can also be split longitudinally without denervation (Hoppenfeld p.181-182).
-
Triceps = two layers: outer layer of long head (infraglenoid tubercle) and lateral head (lateral lip of spiral groove); inner layer = medial/deep head (whole posterior humerus below the spiral groove to the distal fourth); the spiral groove with the radial nerve separates the origins of the lateral and medial heads (Hoppenfeld p.182, Fig. 2-47).
-
Superficial dissection: incise deep fascia in line with the incision; develop the interval between lateral and long heads, starting proximally (above their fusion into the common tendon) by blunt dissection (lateral head laterally, long head medially), then dividing the common tendon distally by sharp dissection; coagulate the many small crossing vessels (Hoppenfeld p.182, Figs. 2-17/2-18).
-
Deep dissection: the medial head lies below the other two, the radial nerve just proximal to its origin in the spiral groove; incise the medial head in the midline to periosteum and strip it epiperiosteally; staying epiperiosteal protects the ulnar nerve (which pierces the medial intermuscular septum in the lower third of the arm); detach minimal soft tissue to preserve blood supply (Hoppenfeld p.183-184, Fig. 2-19). The body text says “epiperiosteal” and the Fig. 2-19 caption “subperiosteally”; the consistent intent is to stay on/below the periosteal plane to protect the ulnar nerve.
-
Dangers: radial nerve in the spiral groove - never dissect to bone in the proximal two-thirds until the nerve is positively identified (safe thereafter); the profunda brachii artery accompanies it; ulnar nerve at risk distally - keep the medial-head strip epiperiosteal (Hoppenfeld p.184, p.187 Fig. 2-18). The axillary nerve and posterior circumflex humeral vessels as the proximal limiting structures are standard teaching (not named verbatim in this extract).
-
Proximal extension limited - cannot expose effectively above the spiral groove (radial nerve position and the deltoid crossing the field); use the anterior route proximally. Distal extension: extend over the olecranon for access via olecranon osteotomy (posterior approach to the elbow), or, triceps-sparing, dissect out the ulnar nerve, develop planes on the medial and lateral aspects of the triceps to expose the supracondylar ridges, and pass a sling under the triceps to retract it both ways and reach the whole posterior distal humerus (Hoppenfeld p.188, Figs. 2-20/2-21).
-
Anterolateral approach exposes the distal fourth of the humerus and can be extended both distally and proximally (its advantage over the brachialis-splitting approach, which cannot extend distally); uses = ORIF of distal-half fractures (esp. Holstein-Lewis) and radial nerve exploration; supine, arm abducted ~60°, exsanguinate and apply a high tourniquet; incision = curved longitudinal over the lateral border of biceps, from ~10 cm above to just above the elbow crease (Hoppenfeld p.193-194).
-
No true internervous plane (brachioradialis and lateral brachialis both radial-supplied proximally), but proximal extension denervates only a minor/proprioceptive radial twig to brachialis, so the plane is safe and extensile; find the radial nerve between brachialis and brachioradialis at the elbow (the point to identify it for all surgery in this area) and trace it proximally to the lateral intermuscular septum; deep dissection stays medial to the nerve, incising the lateral border of brachialis to bone and reflecting it medially (Hoppenfeld p.194, p.196). The lateral cutaneous nerve of the forearm runs in the line of approach and is retracted with the biceps (Hoppenfeld p.194).
-
Chief danger = radial nerve (identify and preserve before any brachialis incision); lateral cutaneous nerve of the forearm in the line of approach (retract with biceps). Proximal extension: plane between brachialis and the lateral head of triceps, subperiosteal to protect the radial nerve in the spiral groove, or follow the nerve through the lateral septum into the posterior compartment to expose the distal two-thirds; distal extension: into the anterior approach to the elbow between brachioradialis (radial nerve) and pronator teres (median nerve) (Hoppenfeld p.196-198, p.201).
-
Lateral approach exposes the lateral epicondyle and common extensor origin (no joint access except by extension; use posterior/posterolateral/anterolateral for the joint); uses = ORIF of lateral condyle, tennis elbow, lateral ligament repair; supine, arm across chest, tourniquet; incision = 4-6 cm curved/straight over the lateral supracondylar ridge (which is longer and better-defined than the medial, extending almost to the deltoid tuberosity) (Hoppenfeld p.201-202).
-
No true internervous plane (triceps and brachioradialis both radial, supplied proximally), so the interval is exploited distally; reflect brachioradialis anteriorly and triceps posteriorly to bone, exposing the common extensor origin; danger = radial nerve, which pierces the lateral septum in the distal third - proximal extension is not possible because the nerve crosses the line; distal extension to the radial head only, via the anconeus (radial) / extensor carpi ulnaris (posterior interosseous nerve) plane, limited further distally by the PIN winding round the radial neck (Hoppenfeld p.202, p.205-207).
-
Medial approach reaches the medial supracondylar ridge, the common flexor-pronator origin, and the medial elbow compartment; advantage over the anteromedial elbow approach = no medial epicondyle osteotomy; uses = ORIF of medial-column extra-articular fractures, medial epicondylitis, UCL repair/reconstruction, loose-body removal; positions = prone (elbow flexed 90°, forearm over back, epicondyle facing surgeon) or supine (arm abducted, shoulder fully externally rotated); exsanguinate and apply tourniquet (Hoppenfeld p.207-209).
-
Internervous plane = flexor-pronator group (median and ulnar nerves) vs triceps (radial nerve); incision centred over the medial supracondylar ridge ~5 cm above the joint, over the medial epicondyle to just below the joint; identify and isolate the ulnar nerve behind the medial epicondyle before deepening; release the medial intermuscular septum from the ridge and retract the flexor-pronator origin to expose the anterior capsule and medial distal humerus (Hoppenfeld p.209).
-
Dangers: ulnar nerve (identify and isolate before deepening; keep retraction minimal - temporary palsies common after ligament reconstructions) and the posterior branch of the medial cutaneous nerve of the forearm (preserve to avoid neuroma); the median nerve and brachial artery lie anterior to the medial column (standard teaching - not named as explicit dangers in this extract). Proximal extension not useful (use anterolateral/posterior for the mid-shaft); distal extension only by medial epicondyle osteotomy (Hoppenfeld p.209, p.212).
-
Comparative table compiled from Hoppenfeld p.193-212 (anterolateral p.193-201; lateral p.201-207; medial p.207-212).
-
The radial nerve is at greatest risk in all humeral approaches; two danger points - spiral groove (posterior mid-shaft, with profunda brachii) and where it pierces the lateral intermuscular septum to lie between brachialis and brachioradialis distally (Hoppenfeld p.163, p.171-172, p.213).
-
Proximal plane = deltoid (axillary) / pectoralis major (pectoral nerves); distal plane = medial brachialis (musculocutaneous) / lateral brachialis (radial), exploiting dual innervation (Hoppenfeld p.165, p.167, p.217).
-
Midline split preserves both halves (dual innervation) and uses the lateral brachialis as a cushion over the radial nerve while staying away from the musculocutaneous/lateral cutaneous nerves medially (Hoppenfeld p.165, p.169, p.172, p.179).
-
In distal-third spiral fractures the nerve may be wrapped on the fracture spike; identify it in the brachialis-brachioradialis interval at the elbow, trace proximally to the septum, then split brachialis in the midline away from the nerve and expose subperiosteally with the elbow flexed (Hoppenfeld p.169, p.177, p.194).
-
No internervous plane; branches enter the heads near their origins and run within the muscle, so a longitudinal split does not denervate; the medial head’s dual radial+ulnar supply lets it be split too (Hoppenfeld p.181-182, p.227-228).
-
Long head = infraglenoid tubercle; lateral head = lateral lip of spiral groove; medial head = posterior humerus below the spiral groove to the distal fourth; the radial nerve separates the lateral and medial head origins (Hoppenfeld p.182, p.220-221).
-
Never go to bone in the proximal two-thirds until the radial nerve is identified; ulnar nerve at risk distally (pierces the medial septum), so strip the medial head epiperiosteally (Hoppenfeld p.184, p.187).
-
Anterior extensile proximally into the shoulder (deltopectoral), not distally; posterior not effectively extensile above the spiral groove (radial nerve + deltoid), use the anterior route proximally; posterior extends distally over the olecranon ± osteotomy/sling (Hoppenfeld p.173, p.188).
-
Anterolateral - radial nerve, extensile both ways; lateral - radial nerve, no proximal extension, distal only to the radial head; medial
- ulnar nerve, no useful proximal extension, distal only by epicondyle osteotomy (Hoppenfeld p.196-198, p.201, p.205-207, p.212).
-
Palsy at fracture = usually neurapraxia, exploration not mandatory; new palsy after reduction (none before) = good indication to explore (nerve may be trapped between fragments) (Hoppenfeld p.213).
-
Holstein-Lewis = distal-third spiral fracture with radial nerve at risk; approached anterolaterally (Hoppenfeld p.193; eponym ref. p.228; distal-third description standard teaching).
-
Ligament of Struthers (from a supracondylar spur to the medial epicondyle) can trap the median nerve; distinguished from carpal tunnel by involvement of the forearm flexors and the palmar cutaneous branch, which arise below the ligament but above the wrist (Hoppenfeld p.228).